Chapter 1. Getting Started |
|
|
This chapter provides the basic information you need to get started working with SeqWeb. Everyone should read the SeqWeb Requirements and Window Layout sections before proceeding. If you are already familiar with a previous version of SeqWeb and you want to get into an analysis as quickly as possible, you may need only the Quick Start. Otherwise, we suggest you also walk through an Example Analysis to become familiar with the steps. If you want or need more detailed information about using SeqWeb, see the Preface, which describes the organization of this document, or click on the Help icon to access online help. |
SeqWeb provides a simplified interface to a core set of Wisconsin Package sequence analysis programs. Within those programs, a core set of parameters are available for each program.
SeqWeb is installed on a server at your local site and administered by your local SeqWeb Administrator. This person determines which of the GCG-provided databases are installed at your site and sets up accounts for accessing SeqWeb.
You access SeqWeb from your desktop or laptop computer by using a web browser, such as Netscape or Internet Explorer.
To use SeqWeb Version 2.0, you must have:
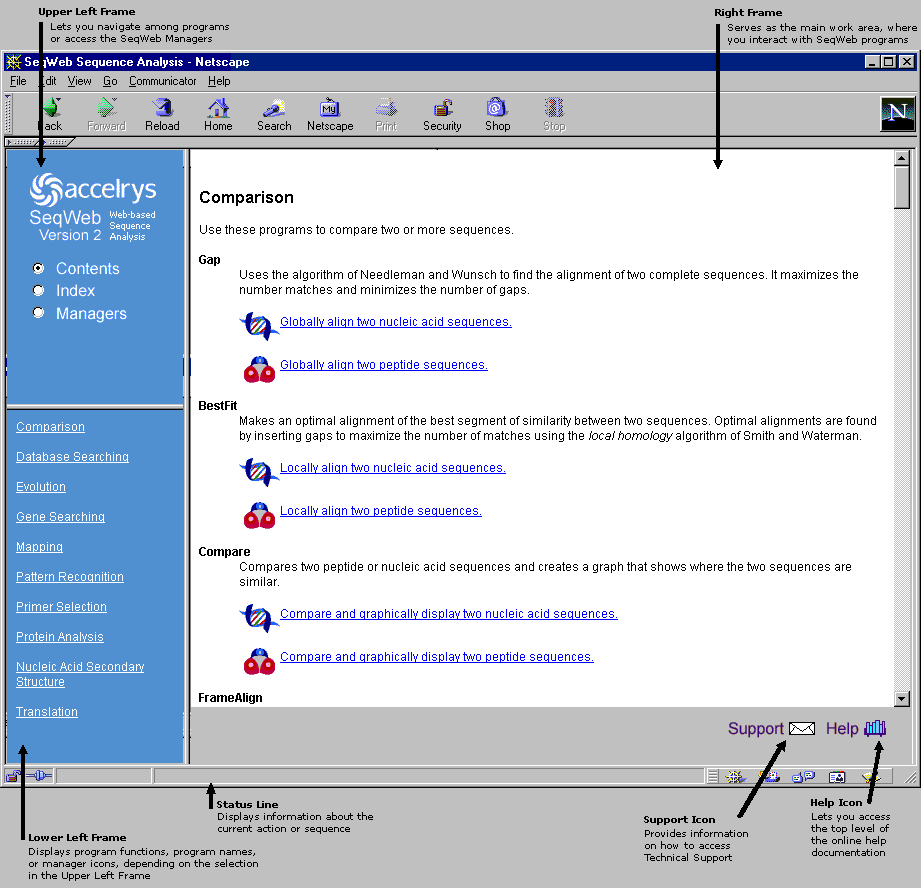
The basic SeqWeb window layout is shown below. The two frames on the left are used for navigating throughout SeqWeb's functions. The large frame on the right is primarily for interacting with and running SeqWeb programs. Note that the bottom of the window contains a status line, as well as icons to access Technical Support and Online Help.
Note: A Netscape window is shown below and throughout this document. Internet Explorer windows are similar but not exactly the same.

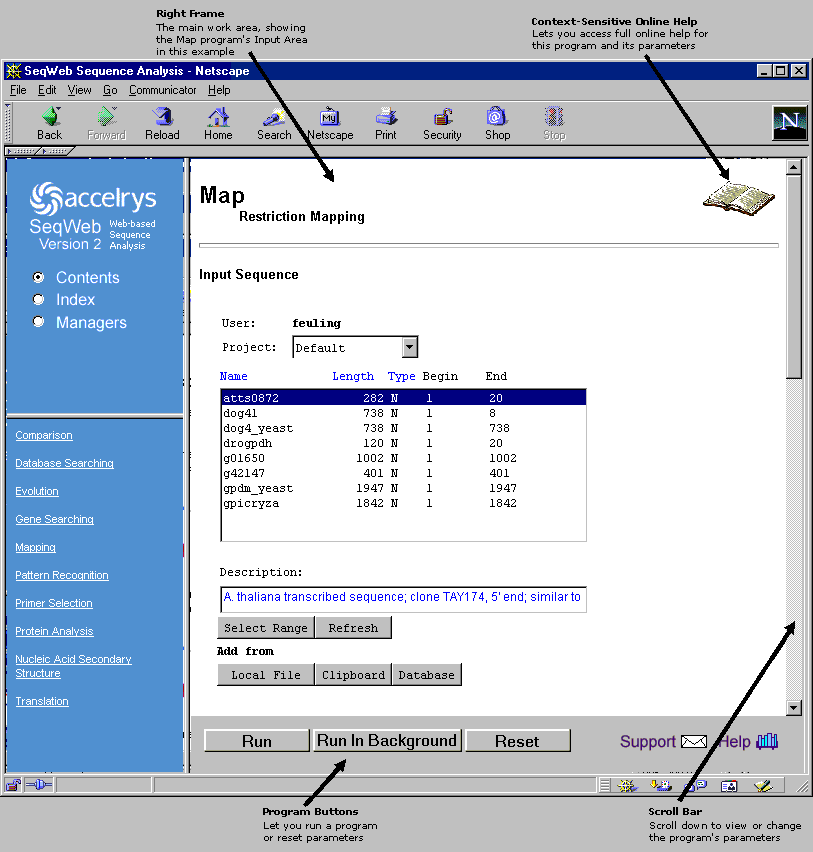
Once you select a program, the right frame displays content specific to that program (as shown below). Note that the top of the content frame contains a book icon, which provides access to online help specific to this program, and that the bottom of the frame contains an area for program-specific buttons.

To use SeqWeb, follow these simple steps:
If you need additional help getting started with SeqWeb, walk through the Example Analysis below.
This example analysis walks you through the steps used to analyze a sequence with SeqWeb. It is intended to familiarize you with the SeqWeb interface and to get you working with your own sequence data quickly. This example uses Netscape for the browser, but the steps are basically the same if you are using Internet Explorer. The example begins with the assumption that you are already logged in to SeqWeb. If you need assistance in doing so, contact your SeqWeb administrator.
If you have not already done so, familiarize yourself with the basic SeqWeb window layout (described above) before starting the example.
Let's walk through an example session, step by step, using the MAP program to perform a restriction mapping on a DNA sequence:
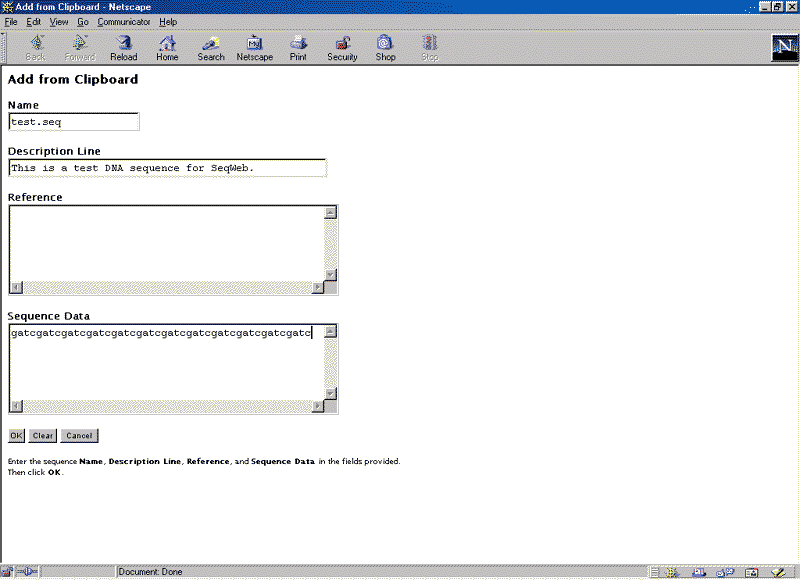
For this example, we will create a new sequence using the Clipboard.
Name: test.seq
Description Line: This is a test DNA sequence for SeqWeb.
Reference: (leave blank)
Sequence Data: gatcgatcgatcgatcgatcgatcgatcgatcgatcgatcgatcgatc
The Add from Clipboard window should now look like this:

If you choose to run a program on a nucleic acid sequence, the Input Sequence list automatically displays only those nucleic acid sequences you had previously added into SeqWeb. Similarly, if you choose to run a program on a protein sequence, SeqWeb displays only previously added protein sequences.
To select the sequence you want to analyze, simply click on it in the list.
Notice also that this program allows you to choose the enzyme set to be used for analysis. To select the enzymes to be used, click the View Chosen Enzymes button and the Enzyme Chooser window displays. For this example, we will leave the settings as is, so click the Close button at the bottom of the Enzyme Chooser window if you have opened it. (For more information about the Enzyme Chooser, click the book icon in the upper right corner of the Enzyme Chooser window.)
Warning: Some Wisconsin Package programs may take longer to complete their analyses. While you are waiting for an analysis to complete, do not click the Back button or move to another web page in that web browser window. This will cause the program to stop running.
Note that you can easily refine the program run from the results page if you want to run the analysis again with different parameter settings.
Warning: Your SeqWeb output may have multiple files associated with it, so you should be cautious about renaming the files as you save them to your local computer. Output that includes multiple files contains links within each file to the other files associated with it. Therefore, renaming any of the files would break the links between them.