- Background
- Your Task
Note This chapter assumes that you have completed the preceding tutorials and are familiar with Vector NTI’s user interface and know how to select fragments and enter them to the Goal List.
This chapter demonstrates the creation of a new molecule by design, i.e. with the aid of Vector NTI’s built-in biological knowledge. In design, the user compiles a list of fragments that describe a goal molecule. But instead of personally choosing restriction sites, methods of terminus modification, etc., the user leaves all choices up to Vector NTI. Using built-in biological knowledge, Vector NTI creates a construction plan that takes advantage of the best possible restriction sites and genetic engineering techniques.
To have Vector NTI design a molecule, you must first define your goal molecule, filling in the Goal List just as you did in the case of construction. Unlike construction, the description of your goal molecule for design will consist only of fragments of existing molecules. If linkers, adapters, or other fragments need to be used, Vector NTI will insert them itself.
You can use the Fragment Editors to describe your goal molecule for design, but you will certainly find it much more convenient to use the Fragment Wizard available from the Molecule Display windows.
Fragments describing the goal molecule for design have a more subtle nature than the fragments used in construction. For design, the goal molecule must consist of exactly one recipient fragment, which must be the first in the Goal Molecule Definition List, and one or more donor fragments.
The recipient fragment is taken from a parent molecule, called the recipient molecule. Every nucleotide in the recipient fragment will be included in the final created molecule. Vector NTI will then use all of the parent molecule outside the recipient fragment to try to find convenient restriction sites. Thus nucleotides of the parent molecule outside the recipient fragment may or may not be included in the final created molecule.
Sometimes, you may want to indicate a specific restriction site at one or both ends of the recipient fragment. If a terminus of the recipient fragment is a restriction site, then Vector NTI will automatically use that restriction site in building the new molecule. You may request Vector NTI to save or lose such a specific restriction site. If you do not specify that the site should be retained, then that site may disappear from the final created molecule even if you do not specify that the site must be lost.
Fragments other than the first in the list are called donor fragments. The purpose of donor fragments is to carry functional signals into the recipient. Therefore, when you describe a donor fragment, you should usually describe it not by its termini, but by the functional signals it contains. This means that when you define a donor fragment in a Molecule Display window, you should click on specific functional signals. Every nucleotide of these specific functional signals will be included in the goal molecule—but nucleotides outside these functional signals may or may not be included in the goal molecule. If a fragment does not have at least one functional signal indicated, it cannot be treated as a donor fragment.
In addition to functional signals, a donor fragment can contain flanking regions. As you describe a donor fragment, you will click on one or more functional signals, and the Molecule Display window’s selection zone will adjust to include them. If you then drag the edges of the selection zone beyond the functional signals, you will end up with a fragment defined as a group of one or more functional signals plus some nucleotides flanking the functional signals to the end of the selection zone. These are the maximum flanking regions which you are willing to permit. Vector NTI will try to reduce the flanking regions of donor fragments to be as small as possible, but will not go beyond these flanking regions when looking for restriction sites. Also, sometimes you may wish to describe one or both of the restriction sites with which functional signals must be cut from the donor molecules. The next chapter of the tutorial will demonstrate these more complicated situations.
The present chapter will demonstrate a simple case, when minimal information is needed from the user to describe the donor and recipient.
Your Task
In this section your task will be to create a new molecule by cloning the tetracycline resistance gene from pBR322 into pUC19. You will leave selection of all genetic engineering techniques entirely up to Vector NTI.
Follow the steps in the order shown. Figures show what your screen should look like at various points along the way.
1. Launch Vector NTI
Launch Vector NTI by double-clicking its icon in the program group or folder in which you installed Vector NTI.
2. Create and Arrange Display windows for pBR322 and pUC19
Open Molecule Display windows containing the molecules pBR322 and pUC19. Use the default Display settings. You will be working with the molecules’ graphical maps, so arrange the Display windows conveniently.
3. Begin to define the goal molecule
We will now begin to define our goal molecule. pUC19 will provide the recipient fragment; pBR322 will provide a donor fragment.
4. Define the recipient fragment
The recipient fragment will be most of the pUC19 molecule. Make the pUC19 Display window the active window. Use the Switch Panes button to activate the graphics pane of the Molecule Display window.
Now press the Add Fragment to Goal List button (  ) to display the Fragment Wizard dialog. This dialog will guide you through the process of a recipient fragment selection. The Fragment Wizard dialog consists of several sequential screens describing the corresponding actions you should take to define the fragment. If you make a mistake you can always return to the previous step by pressing the Back button. Notice, that the dialog is not modal and you can manipulate a selection in the graphics pane behind it. Move the dialog up or down so that you can see the graphical map of pUC19.
On the first screen, select the Design Recipient Fragment option. Click the Next button to proceed.
The second screen helps you to define the 5’ terminus of a new fragment. Select “Set to a position” option and enter 500 in the edit box. Click the Next button to proceed.
The third screen helps you to define the 3’ terminus of a new fragment. Select “Set to a position” option and enter 250 in the edit box. Click the Finish button to complete the definition of a fragment.
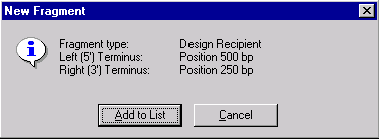
The New Fragment message box is displayed with the description of a selected recipient fragment. Check the description of the fragment in the message box. If the description of the fragment is correct, press the Add to List button. The recipient fragment is added to the Molecule Goal list.
The recipient fragment you just selected is displayed as a wireframe in the graphics pane. Notice, that the polylinker near the 2 o’clock position is outside the selection. All nucleotides within the selection zone will be transferred unharmed into the goal molecule. If we included the polylinker in the selection, Vector NTI would not be able to use those restriction sites.
5. Define the donor
Now let’s define the donor fragment. Switch to the Display window containing pBR322. Click once in the graphics pane, and then press the Add Fragment to Molecule Goal List button (  ) to display the Fragment Wizard dialog.
On the first screen, select the Design Donor Fragment option and click the Next button to proceed.
The second screen helps you to select the functional signals to be carried to the recipient fragment. Move the cursor until it is over the TC(R) arrow or label in the graphics pane. The cursor changes to a hand (  ), indicating that you are pointing directly at a functional signal. Click once to select the entire TC(R) signal. The selection wireframe appears, aligned directly with the start and end of TC(R) and the name of the signal is displayed in the Fragment Wizard dialog.
The subsequent steps of the Fragment Wizard allow you to specify the flank regions for more complicated design specifications that will be demonstrated in the next chapter of the tutorial. Now, click the Finish button to skip these steps. The default values are used to complete the definition of the fragment.
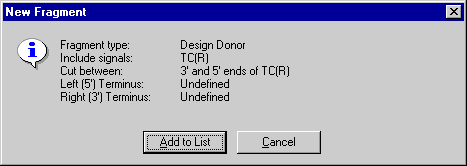
The New Fragment message box is displayed with the description of the selected donor fragment. Check the description of the fragment in the message box. Notice, that the 3’ and 5’ termini of the donor fragment are described as “Undefined”. Press the Add to List button. The donor fragment is added to the Molecule Goal list.
6. Inspect the Goal List
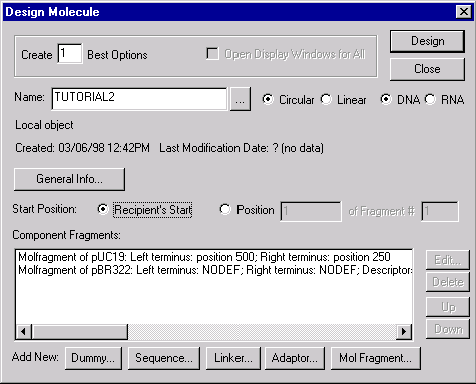
Now check the Goal Molecule Definition List to make sure your fragments were properly included. Press the Molecule Goal List button (  ) in the main toolbar, and the Construct/Design Molecule dialog box appears. The Component Fragments section of the dialog box contains the Goal List. The list consists of the two fragments you defined. Note that for the recipient, the termini are defined by nucleotide positions. For the donor, the termini are indefinite, or not defined (NODEF); but, there is a data item stating that the fragment must contain the TC(R) descriptor.
Note that the title of the dialog box, in comparison with the previous case (Chapter 6), changes from “Construct Molecule” to “Design Molecule”. Vector NTI recognized that your fragments are for design rather than for construction and changed the operational mode of the Construct/Design Molecule dialog box.
Notice that you did not have to provide any restriction sites or other cloning information—Vector NTI will work out all the details needed to perform a correct, convenient cloning, thus saving you a large amount of effort.
7. Enter general information for your new molecule
Change the name of the molecule to TUTORIAL2. Press the General Info button. In the General Data dialog box, you can specify general information about the new molecule. In the Description field, enter “Tutorial molecule #2”.
Set the Replicon Type to Plasmid, and turn on the Bacteria Extra-Chromosome Replication option. Enter your name as a keyword by selecting it from the list of existing keywords and pressing the Add button.
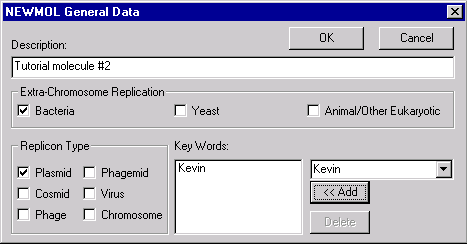
Press OK to return to the Construct/Design dialog box.
Check the Recipient’s Start button in the radio button group just above the Component Fragments section to ask Vector NTI to make the start of the new molecule at the same place (if possible) where the recipient molecule (pUC19) starts.
8. Prepare to design the new molecule
Press the Design button in the upper right corner of the Design Molecule dialog box. Vector NTI first asks you to name a subbase for results. Select the “Tutorial” subbase we created before and press OK to continue. Vector NTI saves the information you have entered about your new molecule, i.e. the name, replicon type, extra-chromosome replication abilities, list of fragments, etc. Then the Design Parameters dialog box appears:
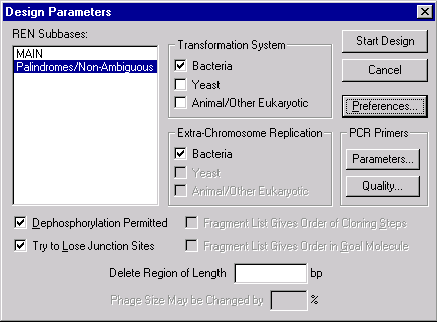
In this box you can select the subbases (groups) of restriction endonucleases (RENs) which Vector NTI will consider when designing the new molecule. For example, you could later create a subbase listing the RENs you have on hand in the laboratory and tell Vector NTI to design the new molecule using only those enzymes.
You can also indicate the transformation systems to be used in your experiments as well as the presence or lack of extra-chromosome replication capability of your molecule in those transformation systems. You can permit or forbid the use of dephosphorylation as a preselection method, etc.
Make sure that the Palindromes/Non-Ambiguous REN subbase is selected. For this tutorial, leave all other parameters at their default values.
9. Set your preferences for molecule design
Now click on the Preferences button. The Design Preferences dialog box appears.
The Design Preferences dialog box is one of Vector NTI’s most powerful tools. It lets you tell Vector NTI exactly how you prefer to create new molecules. You use this dialog box to tell Vector NTI what is best for you. You can tell Vector NTI what genetic engineering techniques are permissible and assign priorities for use of the permissible techniques. You can set preferences in the categories of fragment isolation, fragment ligation, and terminus modification.
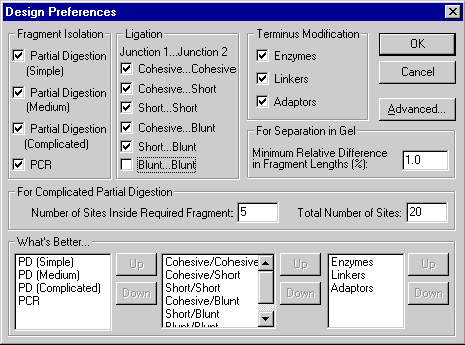
Vector NTI will design the goal molecule in different ways, depending on how you set the Design Preferences. You will sometimes find it useful to have Vector NTI design the same goal molecule several times, changing the design preferences each time. This will give you several alternatives for constructing your molecule.
Let’s change the preferences for fragment ligation. Turn off the check box for blunt–blunt ligation. Blunt–blunt ligation means that both the donor and the recipient have only blunt termini (i.e. there are no cohesive ends on either the recipient or donor fragments). Since we are deactivating this option, Vector NTI will make sure that all fragments have at least one cohesive end.
Below the check boxes are priority lists specifying which of the techniques are preferable. Leave these at their default values.
10. Leave the Advanced Design Settings at their default values
With the Advanced Preferences, available through the Design Preferences dialog box, you could change the way Vector NTI’s knowledge-based system evaluates possible design paths. You could change the depth of searches and other parameters of Vector NTI’s knowledge base.
For this tutorial, ignore the Advanced Design Settings.
Press the OK button to accept the Design Preferences and return to the Design Parameters dialog box.
11. Design the new molecule
With the goal molecule defined and your preferences for design techniques entered and prioritized, you are ready to command Vector NTI to design your new molecule. Press the Start Design button. Vector NTI collects information from the database, generates some necessary data and then begins designing your goal molecule. “Thinking...” appears in an information box. Vector NTI’s knowledge-based system generates many possible ways of cloning the donor into the recipient and seeks the best solution using biological knowledge and the preferences you indicated. An optimum cloning method is quickly found and the goal molecule is created based on that best option.
12. Inspect the new molecule
When the design is complete Vector NTI opens a new Molecule Display window containing the molecule you have created.
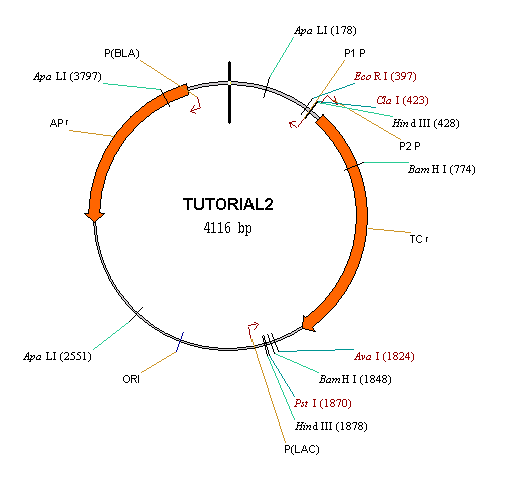
Inspect the graphical map and text description of your new molecule. In the text description pane, note that there is a folder that was not present in any of the molecules you have dealt with to date, pBR322, pUC19, and TUTORIAL1. This is the Design Description folder, which contains instructions for creating TUTORIAL2 in real-life cloning experiments.
13. Inspect the design plan
Switch to the text pane and open the Design Description folder. Inside is a subfolder labeled Step #1. Open this as well. Vector NTI has chosen to use the SmaI and EcoRI sites of the recipient, and the EcoRI and MluNI sites of the donor. The system chose sites that are compatible, so no biochemical operations will be necessary to modify the termini.
Note that with the restriction sites Vector NTI chose, both fragments have one cohesive end and one blunt end, so blunt–blunt ligation is avoided as we requested. The donor fragment has conveniently short flank regions, less than 200 nucleotides on either side of the desired functional signal TC(R). Vector NTI chose the cloning option which definitely gives the required orientation of the cloned fragment in the recipient. Also note that one of the recipient’s restriction sites—SmaI—is lost after ligation allowing efficient preselection.
Vector NTI selected the restriction sites for this cloning step to minimize the effort needed to make the new molecule in real-life experiments. When designing a molecule, Vector NTI first and foremost takes into account the user’s preferences for design methods. It simultaneously tries to use as little partial digestion as possible, select restriction sites that join easily and require little or no processing of termini, cut fragments so as to make them as small as possible and in general use its “common sense” knowledge to perform the design as quickly as possible.
Moving further down the Design Description: Step #1 folder, note that Vector NTI has recommended preselection by using SmaI and the fact that the recipient’s SmaI site was lost, followed by transformation in bacteria. Since we permitted only one transformation system (bacteria), Vector NTI had no alternatives. If we had permitted several transformation systems, Vector NTI would have chosen the system that involves the least effort.
Vector NTI has also recommended methods for clone analysis after transformation. Our molecule had good ligation conditions (one cohesive–cohesive junction, full digestion, no biochemical operations on the termini required), and preselection was performed. For TUTORIAL2 only one method of clone analysis is recommended, restriction analysis. Vector NTI recommends the BspDI site, which is new in the recombinant and does not exist in the recipient.
Vector NTI did not recommend colony hybridization as a method of clone analysis, but in case you decide to use colony hybridization, the system recommends an oligonucleotide. The system also recommends PCR primers in case you intend to use that technique to isolate the cloned fragment from the recombinant.
Finally, Vector NTI lists some important restriction sites on the new molecule. It gives sites which can be used to isolate the cloned fragment from the recombinant, picking sites as close as possible to the cloned fragment. EcoRI was retained after cloning, so this can be used to isolate the cloned fragment at one end. SmaI and MluNI have disappeared in the recombinant, so Vector NTI chooses the next-closest site, XbaI. Note that Vector NTI has only considered the restriction endonucleases in the REN subbase we indicated in the Design Parameters dialog box.
Vector NTI shows what sites the recombinant lacks, and lists all unique sites on the recombinant. These unique sites are divided into two groups, those inside the cloned fragment and those outside.
If the design were to consist of more than one cloning step, similar information would be given in a separate folder for each stage of the process.
14. Print out the design plan
The final step in Part 3 of the tutorial is to print out the design plan Vector NTI has generated for your new molecule. Click anywhere in the text pane of the TUTORIAL2 Display window to activate it. Close all of the folders in the text pane. Open the Design Description folder and the Step #1 subfolder. Press the Print button (  ) on the Window toolbar, and the open folders in the text pane are printed to your printer. You have now received a hard copy of the design plan for TUTORIAL2.
This concludes Chapter 7 of the Vector NTI tutorial. In Chapter 8 you will explore more complex molecule designs.
Design Description
Step #1
Result Molecule: TUTORIAL2
Recipient: pUC19
Left Terminus: SmaI #1 (total 1)
Right Terminus: EcoRI #1 (total 1)
Full digestion
Donor: pBR322
Left Terminus: EcoRI #1 (total 1)
Flank Region: 87
Right Terminus: MluNI #1 (total 1)
Flank Region: 170
Full digestion
Ligation: one blunt junction, one cohesive junction
Left recipient site lost after ligation
Required orientation achieved
Preselection: digestion by lost site(s) - SmaI
Transformation system: Bacteria
Extra-chromosomal replication
Recommended method(s) for clone analysis:
Restriction Analysis
Restriction analysis:
recombinant has new restriction site BspDI
Recommended oligonucleotide for colony hybridization
of cloned fragment in resulting molecule:
AATTCTCATGTTTGACAGCT
Recommended primers for PCR amplification
of cloned fragment in resulting molecule:
Sense Primer:
TTGTAAAACGACGGCCAGTG
Antisense Primer:
GTCGACTCTAGAGGATCCCC
Important Restriction Sites:
Cloned fragment may be cut by EcoRI and XbaI
Recombinant lacks sites of:
AatI Acc65I AccIII AflII AgeI ApaI
AscI AsuII AvrII BbrPI BclI BglII
BsiWI Bsp120I BsrGI BssHII Bst1107I Ecl136II
HpaI KpnI KspI MfeI MluI MluNI
NcoI NotI NsiI PacI PaeR7I PmeI
Ppu10I SacI SmaI SnaBI SpeI XmaI
Unique sites inside cloned fragment:
BspDI EagI EcoRI EcoRV NheI NruI
Unique sites outside cloned fragment:
AatII NdeI PstI ScaI SspI XbaI
See Also:
Chapter 9 -- Advanced Molecule Design
Chapter 7 -- Molecule Construction
Chapter 14 -- Molecule Components and Construction
Chapter 16 -- Molecule Design
Introduction
Chapter 15 -- Database Operations
Back to Index