- Overview
- Molecule types: basic and constructed
- Methods of creating new DNA/RNA molecules
- Tools for creating new DNA/RNA Molecules
- Methods of creating new protein molecules
- Summary
Chapter 14
Molecule Components and Construction
This chapter describes the essentials of creating new molecules with Vector NTI. The chapter covers the difference between basic and constructed molecules, and describes two important dialog boxesthe Construct/Design Molecule dialog box, and the Molecule Editor.
Molecule types: basic and constructed
Molecules in Vector NTI can be of two fundamental types: basic and constructed.
Basic molecules are those which are not described to Vector NTI as built from component fragments. Therefore, their feature map, sequences, and restriction maps of unsequenced regions (DNA molecules only) are entered by the user or imported from other databases.
Constructed molecules are those which are described to Vector NTI as being built from one or more fragments. For DNA molecules, these can be fragments of existing DNA molecules, linkers, adaptors, etc. The feature map and nucleotide sequence of a constructed DNA molecule are created automatically based on the maps and sequences of the ancestors. The user can add features to the feature map in addition to those obtained from the ancestors. Protein molecules can be constructed by translating a certain region of a DNA molecule. A constructed protein molecule does not receive any feature map from its parent DNA molecule.
Methods of creating new DNA/RNA molecules
In Vector NTI, new DNA/RNA molecules can be created in four ways. To create a basic molecule from scratch, the user describes a feature map, enters a nucleotide sequence with the aid of the Vector NTI Sequence Editor, and enters a restriction map for unsequenced regions of the molecule. Basic molecules can also be imported from external data files (GenBank, EMBL, FASTA formats).
Constructed DNA molecules can be created from user descriptions of compatible component fragments. This method is called construction in Vector NTI terms. They may also be created when Vector NTI uses its built-in biological knowledge according to the users desires and a specific design task. This method called design is described in a separate chapter of the manual.
Tools for creating new DNA/RNA Molecules
Vector NTI has three important tools for creating new molecules: the Fragment Wizard, the Construct/Design Molecule dialog box and the Molecule Editor. The Construct/Design Molecule dialog box is a primary means of creating new constructed molecules. You can define component fragments with the help of the Fragment Wizard, enter a new molecules general information and then create the molecule using construction or design procedures. The Molecule Editor is the tool for editing the existing database molecules and for creating new basic molecules from scratch.
The Goal Molecule Definition List (Goal List)
The Vector NTI workspace maintains a list of fragments which the user would like to combine to create a new molecule. This is called the Goal Molecule Definition List.
You can add fragments to the Goal Molecule Definition List directly in the Construct/Design dialog or select them from Molecule Display windows using the Vector NTI Fragment Wizard described below.
To see the Goal Molecule Definition List, press the Show Goal List button (  ) in the main toolbar or choose the Molecule Goal List command from the List menu. The Construct/Design Molecule dialog box appears filled up with a new molecule. The Component Fragments section of this dialog box contains the fragments which are currently in the Goal Molecule Definition List.
The Fragment Wizard
The Fragment Wizard tool is a primary means for adding fragments of DNA molecules from the Vector NTI database to the Goal Molecule Definition List. The Fragment Wizard is a modeless dialog guiding you through several steps required to fully define a molecule fragment suitable for design or construction. It communicates with the active Molecule Document window and allows you to select the fragment in its graphics pane while providing the visual feedback and explanation of the actions.
To use Fragment Wizard, you need to open a Display Window for the database molecule that will be the source of a fragment. Make sure that the molecule window is the active one (topmost), activate its graphics pane and press the Add Fragment To Goal List button (  ) on the Window toolbar. The Fragment Wizard dialog is displayed:
There are four buttons on this dialog: Cancel, Back, Next, and Finish. The Cancel button allows you to dismiss the dialog without finishing the fragment definition process. The Next button advances to the next step of the definition process; the button is disabled if you have not entered enough information for the current step or if the information you entered is not correct. The Back button returns you to the previous step if you want to change the information you entered before. The Finish button allows you to go directly to the last step, skipping all the remaining steps, if any. Fragment Wizard goes through all the steps you skipped and supplies the missing information using default values and the coordinates of the current selection in the Display window. You can get the same effect by repeatedly pressing the Next button.
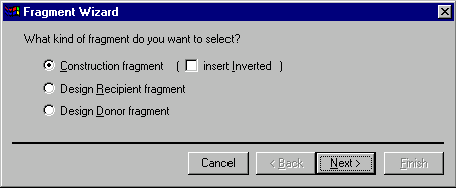
The Fragment Wizard dialog contents is dynamically changed to display the entry fields and descriptions corresponding to the current step in the fragment definition process. When you start the Fragment Wizard, it displays the first "screen" allowing you to choose the kind of fragment you want to define. Your choices are Construction fragment, Design Recipient fragment and Design Donor fragment. Construction fragments are used in the molecule construction process; design donor and recipient fragments are used in the design process.
In this chapter, we will concentrate on the construction fragments only. Design donor and design recipient fragments will be discussed in the Chapter 15.
If you select the Construction fragment option on the first screen, you can also specify that the fragment you are selecting should be inverted in the constructed molecule by checking the Insert Inverted box. Press the Next button to go to the second screen of the Fragment Wizard dialog.
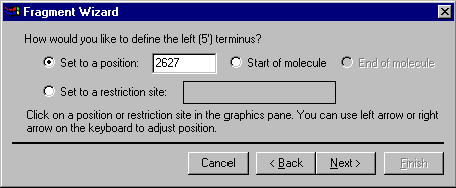
The second screen allows you to specify the 5 terminus of a new fragment. Your choices of the terminus type are a position, the start of the molecule, the end of the molecule (this option is disabled for the 5 terminus) and a restriction site. If you want to set the 5 terminus to a certain position, you can either select this option button and enter the position coordinate in the dialog or click in the graphics pane of the Display window. In the latter case, the option button will be selected automatically and the caret position will be displayed in the position field of the dialog. You can also use keyboard keys to move the caret in the graphics pane as described in Chapter 10. To set the 5 terminus to the start of the molecule, select the Start of Molecule option in the dialog. If you want to set the terminus to a restriction site, click on the site or its label in the graphics pane. The name of the restriction endonuclease and the position of the site will be displayed in the site box of the Fragment Wizard dialog. When the 5 terminus is set, press the Next button to go to the third screen of the Fragment Wizard dialog.
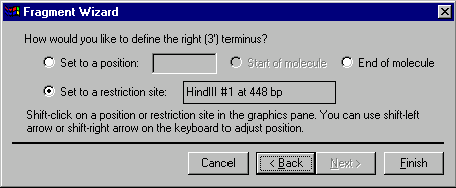
The third screen allows you to specify the 3 terminus of the fragment. Your choices of the terminus type are a position, the start of the molecule (this option is disabled for the 3 terminus), the end of the molecule and a restriction site. If you want to set the terminus to a certain position, you can either enter the position into the position box on the dialog or shift-click in the graphics pane and adjust the position using shift-arrow key combinations. To set the 3 terminus to the end of the molecule, select the End of Molecule option. If you want to set the terminus to a restriction site, shift-click on the site or its label in the graphics pane. Notice, that shift key should be held down for all selections in the graphics pane since you need to extend the existing selection, leaving the 5 terminus on its place. If your action in the graphics pane changes the 5 terminus position, the Fragment Wizard automatically returns you back to the second screen where the 5 terminus is defined.
The third screen is the last in the construction fragment definition sequence. The Next button is disabled. Press the Finish button to complete the definition of the fragment.
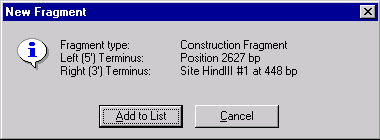
The New Fragment message box is displayed with the description of the selected fragment. If you made a mistake, press the Cancel button to return to the Fragment Wizard dialog. Otherwise, press the Add to List button. The fragment will be added to the Goal Molecule Definition List and the Fragment Wizard dialog will be closed.
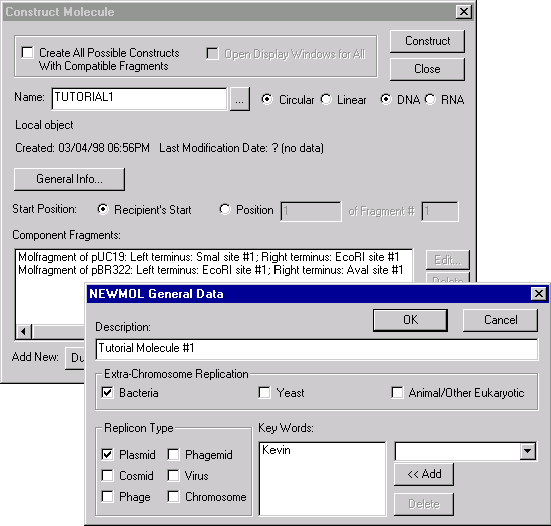
The Construct/Design Molecule Dialog Box
In this dialog box, you may describe the new molecule to be constructed and saved into the Vector NTI database. Also you can open it for an existing database molecule to reconstruct it, e.g. after changing its component fragments.
This dialog box may be called up from the Molecule and List menus and from the Database Manager. When called by the Construct or Design command from the Molecule menu, the dialog box is automatically loaded with the molecule from the currently active Molecule display window; you have the option to reconstruct or redesign the molecule from the component fragments. When called by the Create New4
Using Construct/Design Procedure command from the Molecule menu or by the Molecule Goal List command from the List menu, the dialog box is automatically loaded with the new molecule described through Goal Molecule Definition List. When called from Database Manager, the Construct/Design Molecule dialog box is automatically loaded with the molecule currently selected in the Database Manager.
The Construct/Design Molecule dialog box has two operational modesa mode for molecule construction and mode for molecule design. The appropriate mode is set automatically depending on the type of component fragment(s) currently contained in the Component Fragment section. The title of the dialog box"Construct Molecule" or "Design Molecule"reflects the current dialog box mode.
The Name, DNA/RNA and Form fields
The Name, DNA/RNA, and Form fields allow you to specify the result of the construction/design procedure.
- The Name field holds the name of the constructed/designed molecule.
- The Circular/Linear field indicates whether the molecule is circular or linear.
- The DNA/RNA buttons show whether the molecule is DNA or RNA.
The information in these fields appears in the General Description folder when the molecule is loaded into a Display window.
The General Information fields
The Description, Replicon Type, Extra-Chromosome Replication, and keyword fields hold general information about the molecule. To edit these fields, press the General Info button on the Construct/Design dialog.
- The Description field holds notes about the molecule.
- The Replicon Type field indicates the molecules replicon type.
- The Extra-Chromosome Repl. field indicates those transformation systems in which the molecule is capable of extra-chromosome replication.
- The Key Words field The Key Words field allows you to enter key words about the molecule. These are useful for database search.
The Key Words field consists of a box showing the keywords that pertain to the molecule, a combo box with a list of all of Vector NTIs existing keywords, and buttons to add or delete items from the list of key words.
To add an item to the molecules list of keywords, select the item you desire in the list of existing keywords in the combo box, or type a new keyword. Then press the Add button, and the keyword is moved into the molecules list.
To remove an item from the molecules list of keywords, highlight the item you want to remove and press the Delete button.
This information also appears in the General Description folder when the molecule is loaded into a Display window.
The Recipient's Start/Position ... of Fragment # ... field
This field allows you to select the method of defining the starting coordinate of the new molecule. If you select the Recipient Start button, Vector NTI will try to choose the start of the new molecule as close as possible to the start of the "recipient" component fragment. The "recipient" fragment is the first fragment of the Fragment of Molecule type in the component fragment list. If you select the Position ... button, you will be able to define a specific nucleotide of a specific fragment as the starting nucleotide of the new molecule. By default, its the first nucleotide of the first fragment.
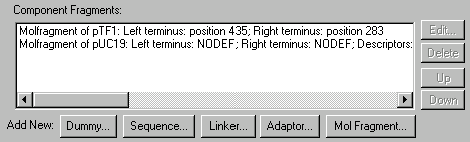
The Component Fragments field
Constructed molecules consist of one or more component fragments. Use the Component Fragments field to enter this information.
You may edit, delete, and change the order of the fragments in the Component Fragments field, and you may add new fragments of five types.
To edit a component fragment, highlight the fragment in the Component Fragments field and press the Edit button to the right of the field, or double-click the fragment in the list. A dialog box will appear, allowing you to edit information about the fragment. Which specific dialog box appears will depend on the type of the fragment you have highlighted. The five types of fragments each have their own editing dialog; these are described below in the section on adding new fragments.
To delete a component fragment, highlight the fragment and press the delete button to the right of the Component Fragments field. The fragment disappears from the list.
To change the position of a fragment in the list of component fragments, highlight the fragment you want to move, and press the Up or Down buttons to change its position in the list.
The molecule will be constructed from the fragments in the order shown, so changing the positions in the list will change the resulting molecule.
Adding new Component Fragments
To add a new fragment to the list of component fragments, press the appropriate button below the Component Fragments field. An appropriate Fragment Editor dialog box will appear, in which you may enter information about the new fragment.
Dummy fragments
DUMMY fragments are unsequenced regions of a molecule.
When you add or edit a Dummy fragment, the DUMMY Fragment dialog box appears:
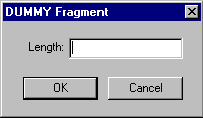
In the Length field, enter the number of unsequenced nucleotides the fragment contains.
DUMMY fragments have blunt termini.
Sequence fragments (oligonucleotides)
SEQUENCE fragments are user-specified oligonucleotides.
When you add or edit a SEQUENCE fragment, the SEQUENCE Fragment dialog box appears:
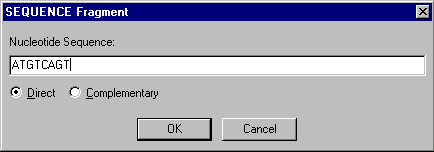
In the Nucleotide Sequence field, enter an oligonucleotide up to 120 units long. With the radio buttons, indicate whether this fragment should have direct or complementary orientation.
SEQUENCE fragments have blunt termini.
Linkers
LINKER fragments are single restriction sites with short flank sequences.
When you add or edit a LINKER fragment, the LINKER Fragment dialog box appears:
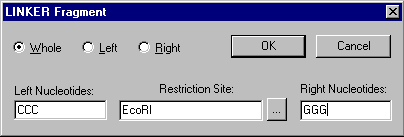
In the Restriction Site field, enter the name of the restriction endonuclease whose site the linker will contain. You can press the Browse button (  ) to select from a list of RENs in the Vector NTI database.
In the Left Nucleotides and Right Nucleotides fields, you may enter nucleotide sequences surrounding the restriction site.
With the radio buttons, indicate whether the linker should be the whole restriction site or whether it should be the left or the right part of the site.
If a LINKER fragment is whole, then both ends are blunt. If it is a left part, the 5 end is blunt and the 3 end depends on the linkers site. If it is a right part, the 3 end is blunt and the 5 end depends on the linkers site.
Adaptors
ADAPTOR fragments represent adaptors.
When you add or edit an ADAPTOR fragment, the ADAPTOR Fragment dialog box appears:
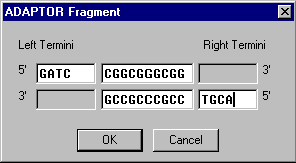
In Vector NTI terms, an adaptor consists of a 5 or 3 left terminus, a central double-stranded part, and a 5 or 3 right terminus. All parts of an adaptor are optional.
Describe these parts in the appropriate fields of the dialog box.
ADAPTOR fragments have termini which depend on the information you enter.
Fragments of existing molecules
Fragments of existing molecules are the key part of most constructed molecules.
Note Although you can add molecule fragments directly from the Construct/Design dialog box, it is much more convenient to add them in advance (before calling up the dialog) with the help of the Fragment Wizardthe tool specifically designed for visual selection of molecule fragments from Molecule Display windows.
When you add or edit such a fragment, the Fragment of Molecule dialog box appears:
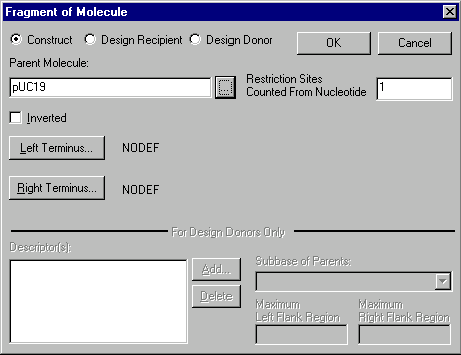
In the Construct/Design Recipient/Design Donor field check the appropriate button to indicate the type of the molecule fragment.
In the Parent Molecule field, enter the name of the molecule from which this fragment is taken, or press the Browse button ( ) to select a molecule from Vector NTIs database.
Check the Inverted box if this fragment should be inserted in the inverted orientation.
In the Restriction Sites Counted From Nucleotide field, enter the position in the parent molecule from which restriction site occurrences should be counted. The Restriction Sites Counted From Nucleotide field is important when this fragment is taken from a selection Display window, in which case the numbering of sites in the selection Display window may not correspond to the numbering of sites in the molecule as a whole. Usually the value of this field is 1.
To describe a fragment which is a fragment of an existing molecule, you must describe its left and right termini.
Brief descriptions of the termini are displayed next to the corresponding buttons.
The For Design Only subsection of the Fragment Editor dialog box is described in the chapter on molecule design.
Editing the termini of Fragment of Molecule-type component fragments
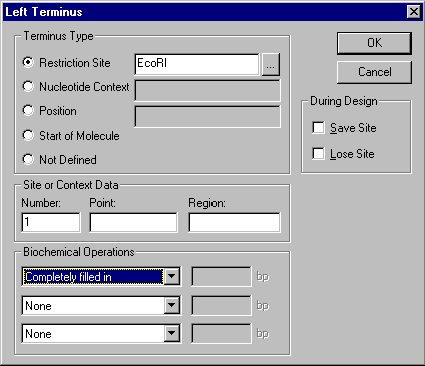
Pressing the Left Terminus or Right Terminus buttons calls up the Terminus Editor dialog box.
In the Terminus Type subsection, use the radio buttons to indicate the type of the terminus, Restriction Site, Nucleotide Context, Position, Start of Molecule, or Not Defined.
Restriction site
If the terminus is a restriction site, enter the name of the corresponding restriction endonuclease in the Restriction Site field, or press the Browse button ( ) to select from a list of the RENs in Vector NTIs database.
The restriction site chosen here determines the form of the terminus (blunt, 5, 3). The terminus can be further modified by biochemical operations, as described below.
Nucleotide context
If the terminus is a nucleotide context (oligonucleotide), enter the context in the field to the right of the Nucleotide Context radio button.
This type of terminus is blunt.
Position
If the terminus is a position in the molecules nucleotide sequence, enter the position in the field to the right of the Position radio button.
This type of terminus is blunt.
Start / End of Molecule
If the terminus is the start or end of the parent molecule, click the appropriate radio button.
This type of terminus is blunt.
Not Defined (NODEF)
If the terminus is undefined, click the Not Defined radio button. A fragment with one or more NODEF termini can only be used for automatic molecule design.
Occurrence and location for restriction site and nucleotide context termini
If the terminus is a restriction site or nucleotide context, you are required to indicate where on the parent molecule the site or context can be found. Use the Number field or the Point and Region fields for this purpose.
Entering an integer value in the Number field tells Vector NTI to use that occurrence of the site or context on the parent molecule.
In place of a number, you may enter an area of the molecule within which the site or context occurs only once. Entering a value in the Point and Region fields tells Vector NTI to look for the site or context within (Region) nucleotides of the (Point) nucleotide of the parent molecule.
Vector NTI uses the Point and Region fields only if the Number field is empty.
Biochemical operations
Termini of Restriction Site type can be treated with up to three consecutive biochemical operations. The operations are performed in the sequence listed in the Terminus Editor dialog. The top operation in the list is performed first, the middle operation (if any) is performed second, and the bottom operation (if any) is performed third.
Select the desired operations from the lists in the combo boxes.
None
- If the terminus should not be treated, enter None in the Biochemical Operations combo boxes.
Completely filled in
- The Completely filled in operation fills in cohesive fragment termini to make them blunt.
Incompletely filled in
- The Incompletely filled in operation fills in cohesive fragment termini to within a few nucleotides of being blunt.
S1-treated
- The S1-treated operation cuts cohesive termini down to blunt.
Bal31 treated
- The Bal31-treated operation cuts off a given number of nucleotides from both strands.
3-5 exonuclease treated
- The 3-5 exonuclease-treated operation cuts off a given number of nucleotides in the 3-5 direction.
5-3 exonuclease treated
- The 5-3 exonuclease-treated operation cuts off a given number of nucleotides in the 5-3 direction.
The Control Fields and Commands
Create All Possible Constructs... field
This field is active when the Construct/Design Molecule dialog box is in the construction mode. If you check this box on, the system will create all possible constructions (up to 24) which can be obtained from the molecule component fragments. This option allows to create automatically the parasitic constructs in the reaction mix, for instance, the clones with wrong orientation of inserted fragment.
Vector NTI creates the names of additional constructs on the basis of the name of the "main" constructed molecule. If the name of the molecule is <MOLNAME>, the name of the first additional construct will be <MOLNAME>_#1, the name of the second additional construct will be <MOLNAME>_#2, etc.
The additional constructs are placed in the special subbase. Vector NTI forms the name of the subbase on the basis of the name of the "main" constructed molecule. If the name of the molecule is <MOLNAME>, then the name of the subbase containing additional constructs will be <MOLNAME>_$Construction Options.
If you start a construction task for a goal molecule with a name that causes a conflict with an existing set of construction options, Vector NTI will inform you of the conflict and ask permission to delete the existing options. If you do not want to do this, we recommend you choose a different name for the new goal molecule or rename old construction options.
Create N Best Option(s) field
This field is active when the Construct/Design Molecule dialog box is in the design mode. Here you can specify the number of design options (up to 10) you would like to get from Vector NTI. The actual number of output options may be fewer that the specified number if there are not enough possible options.
Vector NTI creates the names of additional options on the basis of the name of the "main" created molecule. If the name of the molecule is <MOLNAME>, the name of the first additional option will be <MOLNAME>_#1, the name of the second additional option will be <MOLNAME>_#2, etc.
The additional options are placed in the special subbase. Vector NTI forms the name of the subbase on the basis of the name of the "main" created molecule. If the name of the molecule is <MOLNAME>, then the name of the subbase containing additional options will be <MOLNAME>_$Design Options.
If you start a design task for a goal molecule with a name that causes a conflict with an existing set of design options, Vector NTI will inform you of the conflict and ask permission to delete the existing options. If you do not want to do this, we recommend you choose a different name for the new goal molecule or rename old design options.
Open Display Windows for All field
This field is active when the Construct/Design Molecule dialog box is called up using a menu command and the Create All Possible Constructs box is checked on or, the specified number of design output options is more than 1. If you check this box on and more than one molecule will be created during the construction or design process, new Molecule Display windows will be opened for all of them immediately after completing of the procedure. If the Construct/Design Molecule dialog box is called up from a menu command but this box remains unchecked, Vector NTI will automatically open a new Molecule Display window just for the "main" resulting option (the molecule with the name specified in the Name field). In case of design the Display windows are not created for intermediate molecules, but only for the final option(s).
The DNA/RNA Molecule Editor
Note The Molecule Editor dialog box is an alternative to the Molecule Display window allowing you to edit the database molecules in a description-oriented environment. Editing a molecule in the Molecule Editor is more convenient if you want, for example, to delete ten functional signals from the functional map. Besides that, the Molecule Editor is the only way to create a molecule from scratch (Molecule Display windows cannot show molecules of zero length). In other cases, Molecule Display windows give you more visual feedback and more automatic processing (i.e. automatic adjustment of functional signal coordinates on sequence insertions and deletions).
The figure shows the DNA/RNA page of the Molecule Editor with one of the tutorial molecules loaded.
To be edited with the Molecule Editor, a molecule must be fully processed. Sometimes, for instance, when you are trying to construct a molecule from the incompatible component fragments, Vector NTI saves the entered molecules data but does not process the molecule completely. It allows you to load the molecule from database into the Construct/Design Molecule dialog box, edit its component fragments, and reconstruct the molecule. But you cannot load a molecule into the Molecule Editor until its fully processed.
The Molecule Editor can also be used to describe a new molecule from scratch. Please note, that you must enter new molecules nucleotide sequence using the Sequence Editor to be able to save the new molecule. If the new molecule is unsequenced, its easier to construct it first from one DUMMY fragment using Construct/Design Molecule dialog box, and then enter its functional and restriction maps loading the molecule from the database into the Molecule Editor.
If you have made any changes to a molecule in the Molecule Editor, you must press the Molecule Editors OK button to enter the new information into the database.
Note When a molecule is created during the Vector NTIs design or construction process its nucleotide sequence and functional map are created automatically from its parents. You may add new functional signals to the molecule's functional map. You may also delete or edit automatically generated functional signals or edit automatically generated nucleotide sequence but in that case the system will need to disconnect the molecule from its parents to avoid data inconsistency, so that the molecule will keep all its data besides the component fragments. The system will prompt you if such a situation occurs.
The General Information page
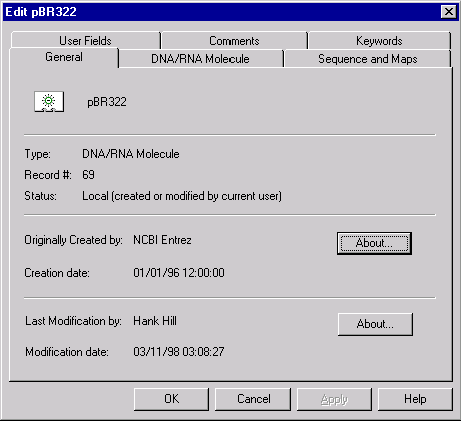
The General Information page has the same format for all database objects. When the Molecule Editor is called to create a new molecule, this page allows you to enter a name for the new molecule. If the Molecule Editor is called to edit an existing molecule, the name is just displayed on the page. This page also displays current status of the database object and other bookkeeping information.
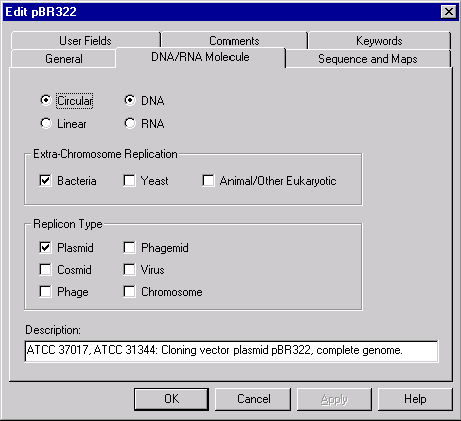
The DNA/RNA Molecule page
The Type, Form, Description, Replicon Type, and Extra-Chromosome Replication fields of the DNA/RNA Molecule page hold specific information about the DNA or RNA molecule. The information in these fields appears in the General Description folder when the molecule is loaded into a Display window.
- The Circular/Linear buttons indicate whether the molecule is circular or linear.
- The DNA/RNA buttons show whether the molecule is DNA or RNA.
- The Extra-Chromosome Replication field indicates those transformation systems in which the molecule is capable of extra-chromosome replication.
- The Replicon Type field indicates the molecules replicon type.
- The Description field holds single-line description of the molecule.
The Sequence and Maps page
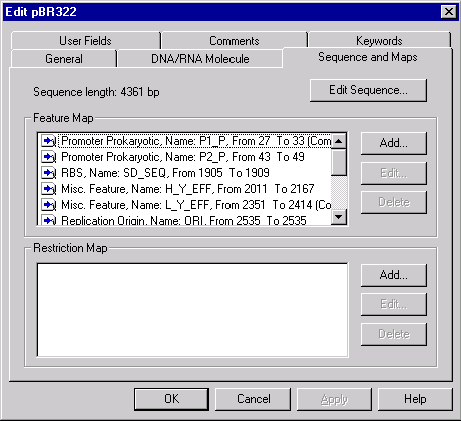
Editing Sequence
From the Sequence and Maps page you can call up the Sequence Editor to edit the sequence of the molecule. To edit the sequence press the Edit Sequence button. Vector NTIs Sequence Editor dialog box appears loaded with the sequence of the molecule.
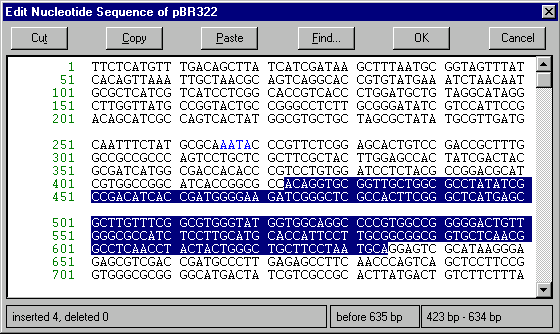
You can now edit the sequence using standard text editing techniques. You can use the Cut, Copy, and Paste buttons to exchange sequence data through the Clipboard.
To find a specific string of acids, press the Search button. It calls up the Search dialog box where you can specify the string to look for and search direction (up or down). More than one Search dialog could be open at the same time.
Press the OK button to save any changes you made to a temporary buffer in the Molecule Editor; Vector NTI returns you to the Sequence and Maps page of the Molecule Editor.
Editing the Feature Map
Use the Feature Map icon to make changes or additions to the molecules feature map.
To add an item to a molecules feature map, press the Add button in the Feature Map group. The Molecule Feature dialog box appears:
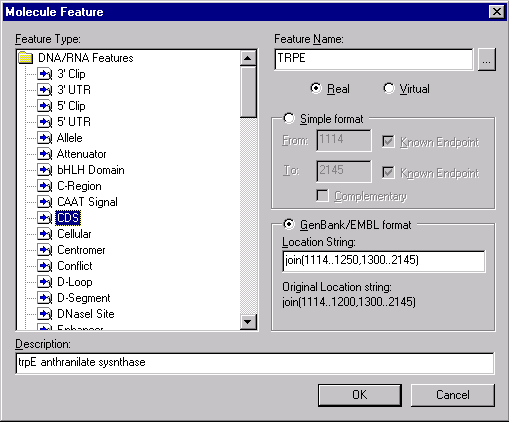
In the Molecule Feature dialog, you must first indicate the type of feature you want to add by selecting a particular Feature Type in the classification tree. You then enter the specific name of the feature in the Feature Name field. To see a list of specific names for each feature type, press the Browse button () next to the Feature Name field. This calls up the Feature Name dialog box, which lists the specific names available for that feature type:
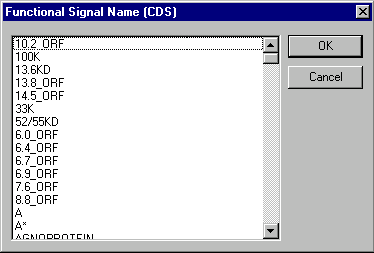
When you have selected a feature name in this dialog, press the OK button to return to the Molecule Feature dialog box.
You can select the feature positions by using one of two formats, the Simple format, or the GenBank/EMBL format. If you select the Simple format, the position of the feature can be entered in the From and To fields. If you select the GenBank/EMBL format, you will set a complex location string that describes the positions of the exons and location of the features. The full description of location string format can be found in the GenBank or EMBL sources. For you convenience, you can always see the original location string of the feature.
In Simple Format mode, check the Complementary box if the signal is located on the complementary strand and in the From and To fields, enter the starting and ending coordinates of the functional signal you are adding.
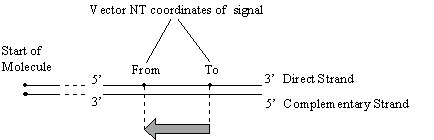
Note: Vector NTI uses the currently accepted convention for the coordinates of complementary features. All coordinates are given as if on the direct strand, from the leftmost to the rightmost nucleotide of a signal, as shown in the figure:
If you wish, you may also use the Description field to enter notes about the feature you are adding.
When the information about a feature is satisfactory, press the OK button to return to the Sequence and Maps page of the Molecule Editor, and your feature will be added.
To edit a feature in the feature map, double-click it or highlight the feature you want to edit and press the Edit button in the Feature Map group. The Molecule Feature dialog box will appear loaded with the feature you selected. Make any changes you want, and press the OK button to register your changes or press the Cancel button to cancel them. Vector NTI will then return you to the Molecule Editor.
To remove a feature from a molecules feature map, highlight the feature and press the Delete button under the Functional Map field. Vector NTI will then delete the feature.
Editing the Restriction Map
Use the Restriction Map group to enter restriction maps for unsequenced regions of the molecule.
To add a restriction site to the molecules restriction map, press the Add button in the Restriction Map group. The Restriction Sites dialog box appears:
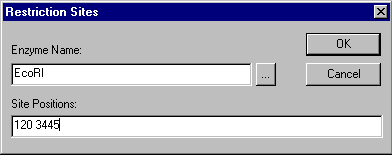
In the Enzyme Name field, enter the name of the restriction endonuclease whose site(s) you want to add to the restriction map, or press the Browse button ( ) to see a list of RENs in the Vector NTI database.
In the Site Positions field, enter the nucleotide positions where the sites of the enzyme you have chosen are found, separated by spaces.
To edit an item in the restriction map, double-click it or highlight the item you want to edit and press the Edit button in the Restriction Map group. The Restriction Sites dialog box appears, loaded with the site you selected. Make any changes you want, and press the OK button to register your changes or the Cancel button to cancel them. Vector NTI returns you to the Molecule Editor.
To remove an item from the restriction map, highlight the item and press the Delete button in the Restriction Map group. Vector NTI deletes the item.
The User Fields page
Note This section precedes the detailed description of the User Fields mechanism. See Chapter 15 for details.
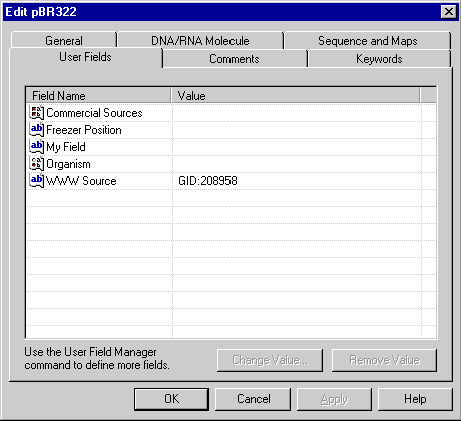
The User Fields page has the same format for all database objects. The User Fields page presents you with a list of all User Fields currently filled in the object being edited as well as the list of blank fields that are defined in the local User Field Definition list but are not yet filled in that object. You can fill or edit any field by double-clicking on the field name or selecting the field name and pressing the Change Value button. If the field you want to edit is not listed in the local User Field Definition list, Vector NTI will ask you to enter the fields definition first. When the field definition is added to the local definition list, Vector NTI will display the appropriate field value dialog. To quickly clear any User Field of the object, select the name of the field and press the Remove Value button.
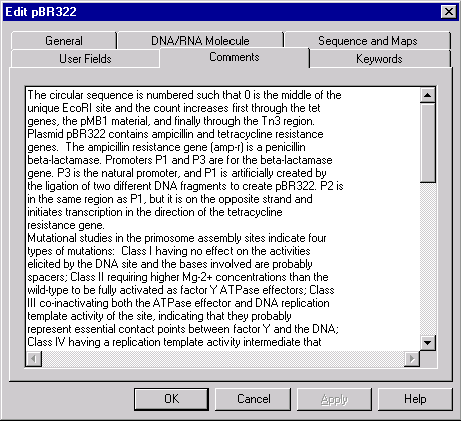
The Comments page
The Comments page has the same format for all database objects. Vector NTI allows you to associate a text comment of unlimited length with any database object and edit the comments using this page.
The Keywords page
The Keywords page has the same format for all database objects. It allows you to enter keywords useful for database search.
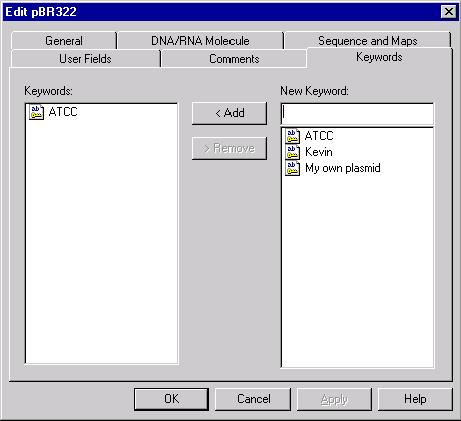
The Keywords page consists of a list box showing the keywords that pertain to the molecule, a combo box with a list of all of Vector NTIs existing keywords, and buttons to add or delete items from the list of keywords.
To add an item to the molecules list of keywords, select the item you desire in the list of existing keywords in the combo box, or type a new keyword. Then press the Add button, and the keyword is added to the molecules list.
To remove an item from the molecules list of keywords, highlight the keyword you want to remove and press the Remove button.
Methods of creating new protein molecules
In Vector NTI, new protein molecules can be created in three ways. To create a basic protein molecule from scratch, the user describes a feature map and enters an amino acid sequence with the aid of the Vector NTI Sequence Editor. Basic protein molecules can also be imported from external data files (GenPept, SWISS-PROT, FASTA formats).
Constructed protein molecules can be created by translation from user description of a fragment of a DNA molecule.
Creating new protein molecules by translation
To create a new protein molecule by translation, you need to open a Display Window for the database DNA molecule that contains the region to be translated. Make sure that the molecule window is the active one (topmost). Select a region on the molecule using standard selection techniques; you may use either graphics or sequence pane. Choose the Molecule4
Create New4
Using Translation Procedure (Protein)4
Direct Strand (or
4
Complementary Strand) command. Vector NTI displays the Molecule Editor dialog allowing you to give a name to the new protein and edit description, comments, User Fields and keywords. Vector NTI calculates the amino acid sequence automatically; it also suggests initial values for the name, description and keywords fields. After the OK button is pressed, the new molecule is saved to the database and the new Display window is opened for the molecule.
The Protein Molecule Editor
Note The Molecule Editor dialog box is an alternative to the Molecule Display window allowing you to edit the database molecules in a description-oriented environment. Editing a molecule in the Molecule Editor is more convenient if you want, for example, to delete ten features from the feature map. Besides that, the Molecule Editor is the only way to create a molecule from scratch (Molecule Display windows cannot show molecules of zero length). In other cases, Molecule Display windows give you more visual feedback and more automatic processing (i.e. automatic adjustment of feature coordinates on sequence insertions and deletions).
The Protein Molecule Editor is very similar to the DNA/RNA Molecule Editor described above. The differences between two are listed below:
The General Information page
The General Information page has the same format and functionality for all database objects.
The Protein page
The Protein page allows you to enter or edit the Description field holding single-line description of the protein molecule.
The Sequence and Features page
This pages functionality is the same as one of the Sequence and Maps page of the DNA/RNA Molecule Editor. Only sequence and feature map editing are supported.
The User Fields page
The User Fields page has the same format and functionality for all database objects.
The Comments page
The Comments page has the same format and functionality for all database objects.
The Keywords page
The Keywords page has the same format and functionality for all database objects.
Summary
This chapter gave you an overview of creating new molecules with Vector NTI and introduced you to the Fragment Wizard, Molecule Editor, and Goal Molecule Definition List and other tools for creating new molecules.
The chapter covered the following points:
- Molecule types: basic and constructed
- Tools for creating new molecules
- The Fragment Wizard
- The Molecule Editor
- The Goal Molecule Definition List
- Importing molecules
- Component fragments of molecules
- Fragment termini
See Also:
Introduction
Chapter 7 -- Molecule Construction
Chapter 15 -- Database Operations
Chapter 8 -- Molecule Design
Chapter 9 -- Advanced Molecule Design
Chapter 11 -- Display Windows and User Interface
Chapter 4 -- Tools and Internet Connectivity
Chapter 17 -- Vector NTI Tools
Chapter 16 -- Molecule Design
Chapter 3 -- Working With Graphics Representation
Chapter 1 -- Display Windows
Chapter 13 -- Oligonucleotides and Primers
Chapter 12 -- Gel Display Windows
Chapter 2 -- Molecule Operations
Chapter 6 -- PCR Analysis
Back to Index
