- Background
- Your Task: Amplify a region of ColE1
This chapter introduces you to Vector NTI’s PCR analysis capabilities.
Your Task: Amplify a region of ColE1
Your task will be to amplify a region of ColE1 using Vector NTI’s polymerase chain reaction (PCR) capabilities, and produce a high-quality graphical display of the product.
1. Launch Vector NTI
Launch Vector NTI by double-clicking its icon in the program group or folder in which you installed Vector NTI.
2. Open a Molecule Display window containing ColE1
Activate the Database Explorer window and switch to the DNA/RNA molecules table. Select the DNA/RNA Molecules (MAIN) subbase and double-click on the ColE1 molecule. A Display window opens in the workspace, containing ColE1’s text description, graphical features and restriction maps, and sequence.
Press the maximize box in the upper right corner of the ColE1 window. The window expands to fill the whole Vector NTI workspace.
3. Select the region of ColE1
With the Switch Panes button (  ) in the Window toolbar, activate the Display window’s graphics pane.
Using the technique described in Chapter 1 of the Tutorial, select the 5200–6400 region of ColE1.
4. Prepare for PCR analysis
Now let’s prepare to perform PCR analysis on the selected fragment. From the Analyze menu, select the PCR Primers option. The PCR Analysis dialog box appears:
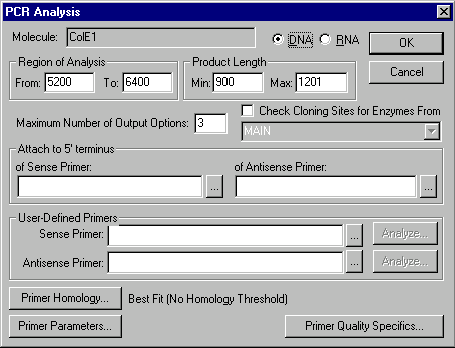
Inspect the PCR Analysis dialog box. With this dialog, you can have Vector NTI search for convenient sense and antisense primers, define those primers yourself, attach short sequences at the 5’ and/or 3’ ends of the product, describe homology requirements, define biochemical and structural parameters for PCR primers and set your “importance factors” for different primer parameters. You can also require Vector NTI to check primers’ uniqueness.
Press the Primer Homology button. The Homology of PCR Primers dialog box appears. Look at the options in the dialog box allowing you to describe various homology requirements.
Press the f1 key (Windows) or help key (Macintosh) for details.
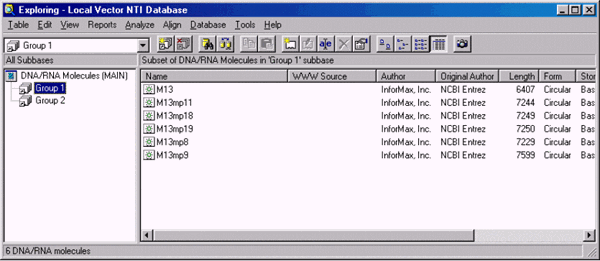
Leave all the options unchanged as you inspect the Homology of PCR Primers dialog box and press the Cancel button. You will return to the PCR Analysis dialog box.
Press the Primer Parameters button. The Primer/Oligo Parameters dialog box appears. Look at the many options in the dialog box.
Press the f1 key (Windows) or help key (Macintosh) for details.
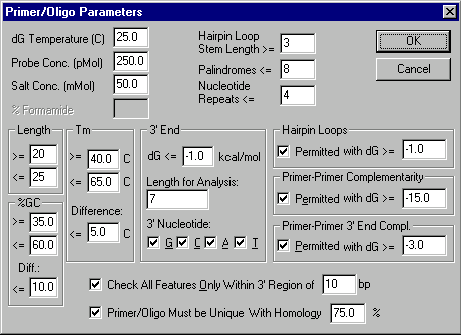
Leave all the options unchanged as you inspect the Primer/Oligo Parameters dialog box and press the Cancel button. You will return to the PCR Analysis dialog box.
Press the Primer Quality Specifics button. The Primer/Oligo Quality Specifics dialog box appears. Look at the controls in the dialog box allowing you to assign “importance factors” to different primer parameters changing scoring function which evaluates primer quality.
Press the f1 key (Windows) or help key (Macintosh) for details.
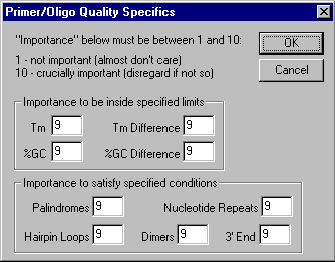
Leave all the options unchanged as you inspect the Primer/Oligo Quality Specifics dialog box and press the Cancel button. You will return to the PCR Analysis dialog box.
5. Perform PCR Analysis
When you are done inspecting the PCR Analysis dialog box options, press the OK button in the upper right corner of the dialog. Vector NTI performs PCR analysis. A new folder is created and added to the text pane of the ColE1 Display window.
6. Inspect the PCR Analysis folder
Inspect the contents of the PCR Analysis folder in the text pane. The PCR Analysis folder contains several subfolders, each describing one possible set of primers for amplifying a fragment of a length which is within maximum and minimum lengths you specified in the PCR Analysis dialog box. The subfolders are listed in the order of primers’ quality which is calculated basing on the importance factors you can assign for different primer parameters in the Primer/Oligo Quality Specifics dialog box.
Each subfolder contains useful information such as product melting point, optimum annealing temperature, sense and antisense primers with their melting temperatures, free energies, etc.
The sense and antisense primers are indicated with the symbol “ ” followed by their nucleotide sequences. In Vector NTI, the symbol “
 ” is used to mark oligonucleotides created by many of the program’s functions (PCR analysis, molecule design, hybridization, etc.). You can perform oligo analysis on any nucleotide sequence marked by this symbol in the text pane of a Molecule Display window.
7. Perform oligo analysis on a PCR sense primer
Let’s perform oligo analysis on the sense primer given in the first subfolder of the PCR Analysis folder. Scroll through the text pane and find the folder labeled “#1: Product of length 900". If the folder is closed, open it by double-clicking it.
Inside this subfolder, locate the sense primer, represented by the line
 ACTCTTTTGAATGGTACTCC
Move the mouse cursor on top of the sense primer and press the right mouse button (Windows) or hold down the command key and press the mouse button (Macintosh). A shortcut menu appears, allowing you to choose commands related to this oligonucleotide. Choose the Analyze command from the shortcut menu. The Oligo Analysis dialog box appears:
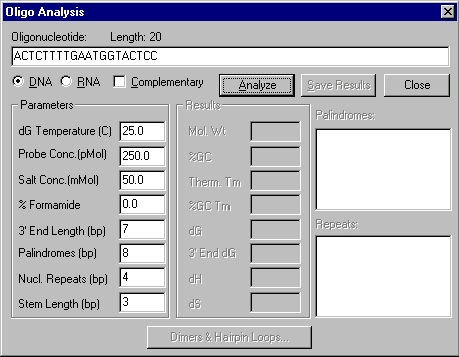
In this dialog box you can set numerous parameters for oligonucleotide analysis. Leave the parameters unchanged and press the Analyze button. The analysis results appear in the appropriate areas of the dialog box. Note the biochemical and structural parameters in the Results column. Press the Dimers & Hairpin Loops button to inspect the dimers and hairpin loops.
Press the f1 key (Windows) or the help key (Macintosh) to view Vector NTI’s on-line help information for this dialog box.
When you are finished viewing the results of analyzing this oligonucleotide, press the Close button. The Oligo Analysis dialog box disappears.
8. Save a PCR primer to the database
Now let’s save the same primer to the database for future use. Click on the
 ACTCTTTTGAATGGTACTCC
line of the text pane and select Save To Database command from a shortcut menu. The tabbed Oligo Editor dialog box appears with the General page activated.
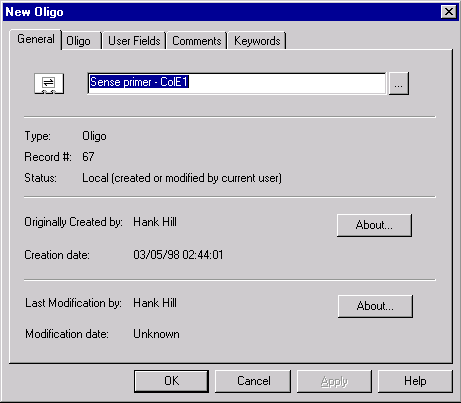
Enter “Sense primer - ColE1” in the name box and click on the Oligo tab. This page is filled automatically by oligo sequence and description. Click on the Keywords tab to activate the Keywords page.
Click in the New Keyword entry box and enter “PCR-COLE1”. Press the Add button to add your new keyword to the keyword list. Then select the existing SENSE_PRIMER keyword and add it to the keywords list too.
Press the OK button. The primer is saved to the database under the name “Sense primer - ColE1”.
9. Continue the PCR task
Now let’s continue with our PCR task of amplifying the ColE1 region. Using the Switch Panes button (  ) on the Window toolbar, activate the graphics pane. Make sure the 5200–6400 region is selected.
Call up the PCR Analysis dialog box by choosing the PCR Primers command from the Analyze menu. We will load the sense primer we just saved to the database and then attach sequences to the 5’ and 3’ ends of the product to allow convenient cloning. Vector NTI will then find an optimum antisense primer.
Locate the User-Defined Primers box in the PCR Analysis dialog box. Press the Browse button (  ) to the right of the Sense Primer box. A dialog box appears, showing oligonucleotides saved in the database. Select the “Sense primer - ColE1” oligo that was just saved, and click OK. The “Sense primer - ColE1” oligo is loaded into the Sense Primer box.
Now let’s attach a BamHI cloning site to the 5’ end of our sense primer. Locate the Attach to 5’ Terminus of Sense Primer box and press its Browse button. A list of restriction endonucleases appears. Select the MAIN REN subbase and the BamHI REN, and click OK. The BamHI recognition site is entered into the Attach to 5’ Terminus of Sense Primer box.
Let’s attach a HindIII cloning site to the 5’ end of the antisense primer. Locate the Attach to 5’ Terminus of Antisense Primer box and press its Browse button. A list of restriction endonucleases appears. Select the MAIN REN subbase and the HindIII REN, and click OK. The HindIII recognition site is entered into the Attach to 5’ Terminus of Antisense Primer box.
Now locate the Check Cloning Sites for Enzymes From check box and turn it on. This tells Vector NTI to search for certain cloning sites in the PCR product-plus-primer fragment you are creating. The cloning sites that will be searched for are given in the restriction endonuclease subbase shown below the Check Cloning Sites for Enzymes From check box. Click the down-arrow next to this combo box to view a list of existing REN subbases. Choose the Palindromes/Non-Ambiguous subbase from the list.
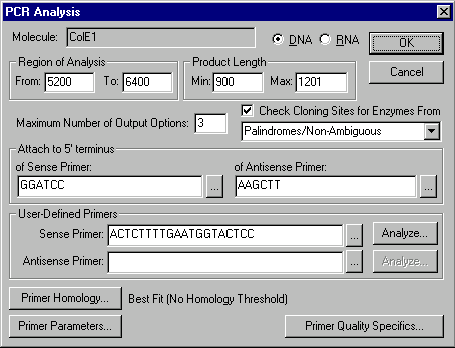
Now press the OK button in the upper right corner of the PCR Analysis dialog. Press OK when Vector NTI shows the warning dialog. Vector NTI performs a new PCR analysis using the additional information you have entered. A warning appears, telling you that the previous PCR results will be overridden. Click OK, and Vector NTI performs the new analysis.
10. Inspect the new PCR Analysis results
Now let’s inspect the results of the new PCR Analysis. Activate the text pane by pressing the Switch Panes button in the Window toolbar.
Scroll down through the subfolders of the PCR Analysis folder. Notice that all the options generated by Vector NTI have the same sense primer, “Sense primer - ColE1”, and that the sequences we requested have been attached at the 5’ ends of both strands of the product. Only the antisense primers vary.
Also notice that lists of RENs have appeared beneath each primer. These are the RENs from the selected subbase (Palindromes/Non-Ambiguous) whose recognition sequences are found within the generated fragment. Numbers in parentheses indicate the number of times that REN’s recognition sequence is found within the PCR product. If no number is given after a REN’s name, then that REN is found only in the primer or the attached sequence and not within the product.
11. Save the PCR product to the database and open a Display window
Now let’s save the PCR product to the database and take a look at it in a new Molecule Display window.
Place the mouse cursor on the folder labeled “#1: Product of length 912,” and press the right mouse button (Windows) or hold down the command key and press the mouse button (Macintosh). A shortcut menu appears. Choose Save to Database and Create Window command. A tabbed dialog box appears asking you for information about the new molecule. In the Name field, enter “PCR Product 1”. Click OK, and the molecule is saved to the database and a new Molecule Display Window is created containing the molecule.
12. Arrange the view of the product
Now arrange the new Molecule Display window to show your PCR product conveniently. Make sure the text pane is active. Click the Link Panes button in the Window toolbar. Most of the symbols in the graphics pane disappear because most of the folders in the text pane are closed. We will now open only those folders which are of most interest to our PCR task.
Place the mouse cursor on the Feature Map folder and press the right mouse button (Windows) or hold down the command key and press the mouse button (Macintosh). A shortcut menu appears. Choose Expand Branch. The Feature Map folder and all its subfolders open, and the signals are displayed in the graphics pane.
Now scroll down through the text pane and find the Restriction Map folder. Place the cursor on the Restriction Map folder and display a shortcut menu. Choose Expand One Level. The Restriction Map folder opens, but the subfolders remain closed. Scroll down through the restriction map and open the BamHI and HindIII folders by double-clicking them. These sites appear in the graphics pane.
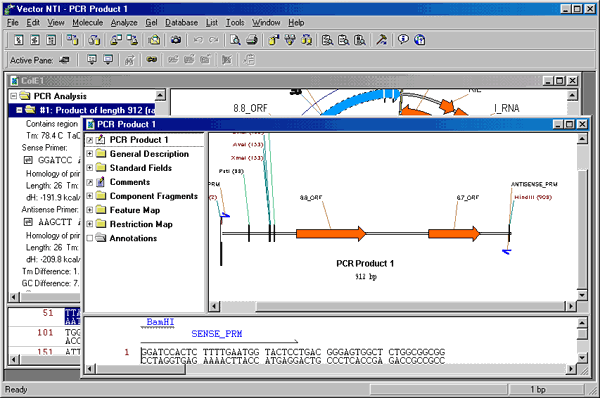
Activate the graphics pane with the Switch Panes button. Press the Standard Arrangement button on the Window toolbar (  ) to arrange restriction site and functional signal labels. Hold down the shift key and click the Zoom In (
  ) and Zoom Out (
  ) buttons in the Window toolbar until you have a crisp, clean view of your PCR product, showing the primers and the attached restriction sites. You can also hold down the control key while pressing the zoom buttons to change only horizontal dimensions of the graphical map. You can enhance your picture further using picture editing techniques described in Chapter 3.
13. Close Display windows and exit Vector NTI
This concludes the PCR analysis tutorial. You have taken a first look at Vector NTI’s PCR analysis capabilities. Close all Molecule Display windows using the Close command in the File menu, and then quit the program with the File menu’s Exit command (Windows) or Quit command (Macintosh).
See Also:
Chapter 11 -- Display Windows and User Interface
Chapter 7 -- Molecule Construction
Chapter 10 -- Working With Gel Display windows
Chapter 13 -- Oligonucleotides and Primers
Chapter 1 -- Display Windows
Chapter 14 -- Molecule Components and Construction
Introduction
Chapter 3 -- Working With Graphics Representation
Back to Index