- Overview
- Section 1: Oligonucleotide Analysis
- Section 2: PCR Primers
- Section 3: Sequencing Primers
- Section 4: Hybridization Probes
- Section 5: “Silent Mutations”
- Section 6: Calculating Restriction Fragments
- Summary
This chapter describes Vector NTI’s analysis functions. The oligonucleotide analysis section of the chapter covers the Oligo List, oligo analysis, and oligo duplex analysis. Vector NTI can search for PCR primers, sequencing primers, and hybridization probes. The chapter has sections covering each of these, including preparation, execution, and results of these analyses. The rest of the chapter describes "silent mutation" analysis and calculation of restriction fragments.
Section 1: Oligonucleotide Analysis
This section describes Vector NTI’s oligonucleotide functions, including the Oligo List and the Oligo Editor, Oligo Analysis, and Oligo Duplexes dialog boxes.
The Oligo List
The Oligo List is a data clipboard for analyzing oligonucleotides. Its main use is to collect oligonucleotides from various places (Display windows, the database, etc.) and analyze them, for example by finding their duplexes.
Viewing the Oligo List
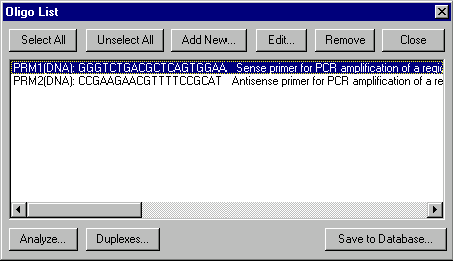
You can call up the Oligo List by pressing the Show Oligo List button (  ) on the main toolbar or by choosing the Oligo List option from the Lists menu. The Oligo List dialog box appears.
The dialog box shows the current contents of the Oligo List. You can use the dialog box for editing the Oligo List, editing individual oligos, or for performing oligonucleotide analysis or oligo duplex analysis.
Use the Select/Unselect All buttons to select/unselect all the oligos in the list.
Press the Add button to call up the Oligo Editor dialog box to enter a new oligo. Please note, the new oligo will be entered in the Oligo List only and will not be saved into the database until you select the oligo and press the Save To Database button.
If an oligo is selected, press the Remove button to remove the oligo from the Oligo List.
If an oligo is selected, you may press the Edit button to call up the Oligo Editor with the selected oligo loaded and ready to edit. You may also press the Save To Database button to insert the selected oligo into the database.
If a single oligo is selected, you can press the Analyze button to perform oligo analysis.
If one or more oligos are selected, you can press the Duplexes button to investigate their duplexes.
Press the Close button when you are finished working with the Oligo List.
Oligo Editor dialog box
The Oligo Editor is a tabbed dialog box for editing information about new or existing oligonucleotides. You can call up the Oligo Editor from the Oligo List and the Database Manager.
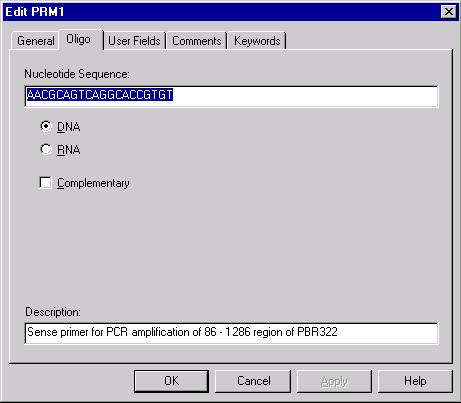
The Oligo Editor contains information for one oligo at a time. You may change information about the oligo as follows:
In the name box on the General Page, enter the name of the oligo.
In the Nucleotide Sequence box on the Oligo page you may enter or edit the oligo’s nucleotide sequence. Valid characters: ATUCGRYWSMKBDHVN.
Use the DNA/RNA buttons on the Oligo page to select the oligo’s type.
To replace the oligo sequence with the complementary one check the Complementary box on the Oligo page.
In the Description box on the Oligo page, enter the oligo’s description.
Use the User Fields page to add custom data in a form of fields (see the Database Operations chapter for details)
Use the Comments page to enter text comments.
Use the Keywords page to enter key words for the oligo. To add a key, type a new word or select an item you desire in the list of existing keywords. Then press the Add button to move the keyword into the oligo’s keyword list. To remove an item from the oligo’s list of keywords, select one or more items you want to remove and press the Remove button.
Oligo Analysis dialog box
The Oligo analysis dialog box allows you to analyze oligonucleotides. You can call up the Oligo analysis dialog box from many places within Vector NTI, as described below in the section on operations with oligonucleotides:
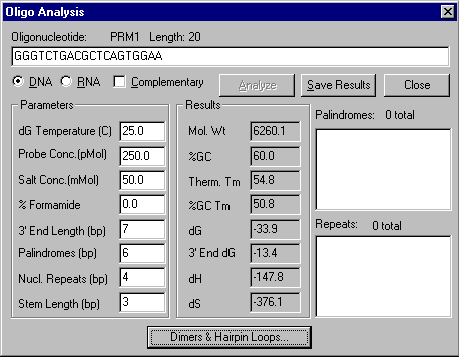
You have various options in this dialog box:
Oligonucleotide
Enter oligonucleotide to be analyzed.
DNA/RNA
Select the type of nucleotide sequence.
Complementary
Turn on this box to analyze complementary oligo.
Analyze
Press this button to analyze the oligo.
Parameters
DG Temperature
- Enter the temperature in degrees Celsius to be used for calculating free energy values.
Probe Concentration
- Enter the value of probe concentration in pMol.
Salt Concentration
- Enter the value of salt concentration in mMol.
%Formamide
- When hybridizing in formamide enter the formamide concentration in %.
3’ End Length
- Specify the length of the oligo 3’ region which should be analyzed.
Palindromes
- Enter the minimum length of palindromes to search for.
Nucleotide Repeats
- Enter the minimum length of nucleotide repeats to search for.
Stem Length
- Enter the minimum number of base pairs in a hairpin or dimer stem.
Results
Examine the results of the analysis.
Mol. Wt
- The Mol. Wt field shows the molecular weight of the oligo.
%GC
- The % GC field shows the percentage of G and C in the oligo.
Therm. Tm
- The Therm. Tm field shows the melting temperature calculated by the nearest-neighbors method. (This is useful for short oligos, < ~35 bp)
%GC Tm
- The %GC Tm field shows the melting temperature calculated by the %GC method. (This is useful for long oligos, > ~35-40 bp)
dG
- The dG field shows the free energy of the whole oligonucleotide.
3’ End dG
- The 3’ End dG field shows the free energy of the 3’ end of the oligo.
dH
- The dH field shows the enthalpy of the whole oligo.
dS
- The dS field shows the entropy of the whole oligo.
Palindromes
Examine the palindromes the oligo contains.
Nucleotide Repeats
Examine the nucleotide repeats the oligo contains.
Dimers & Hairpin Loops
Press this button to examine the dimers and hairpin loops the oligo contains. this button brings up the Dimers & Hairpin Loops dialog box.
Dimers & Hairpin Loops dialog box
The Dimers & Hairpin Loops dialog box allows you to examine oligo’s dimers and hairpin loops.
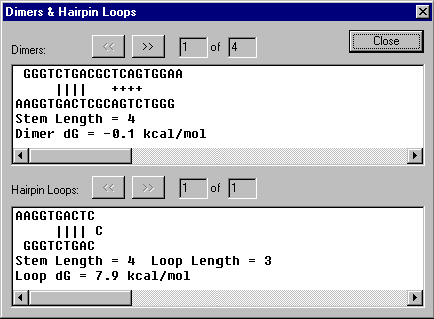
Dimers
Examine the dimers the oligo contains. Press the Next button to view the next dimer. Press the Prev button to view the previous dimer.
Hairpin Loops
Examine the hairpin loops the oligo contains. Press the Next button to view the next hairpin loop. Press the Prev button to view the previous hairpin loop.
Oligo Duplexes dialog box
The Oligo Duplexes dialog box allows you to generate all possible duplexes of selected oligonucleotides.
The upper box shows oligonucleotides which are currently in the workspace. Select one oligo to analyze self-duplexes. Select any two oligos to analyze their cross-duplexes.
Press the Add New button to call up the Oligo Editor to enter a new oligo for the Oligo Duplexes workspace.
Press the Database button to add oligos to the workspace from the oligo database.
Press the Oligo List button to add oligos to the workspace from the Oligo List.
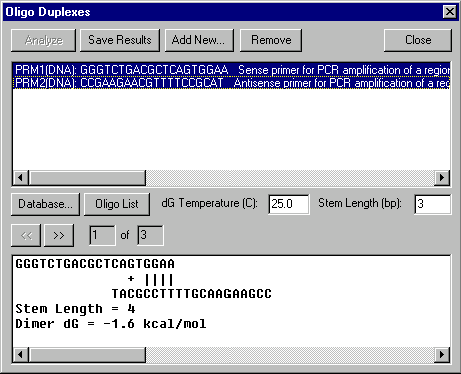
Press the Remove button to remove selected oligos from the workspace.
In the dG Temperature field, enter the temperature in degrees Celsius to be used for calculating free energy values.
In the Stem Length field, enter the minimum number of base pairs in a hairpin or dimer stem.
When one or two oligos are selected, press the Analyze button to generate and analyze duplexes of the selected oligos. If less than one or more than two oligos are selected, the Analyze button will be disabled.
The box at the bottom shows dimers found. Stem length and dimer dG are shown. Use the scroll bar to move left or right along the dimer. Press the Next button to view the next dimer. Press the Prev button to view the previous dimer.
Section 2: PCR Primers
Vector NTI can find primers to perform PCR analysis of a DNA molecule fragment selected in a Molecule Display window. You select the desired part of the molecule—the region where the system will find PCR products. You then define the maximum and minimum lengths of PCR products and set desired primer parameters, and Vector NTI seeks and evaluates several primer options, sorting them from best to worst. You can immediately display the product and primers in a Molecule Display window, and perform many other useful operations.
This section covers preparation for PCR analysis; the PCR analysis dialog box; the results of PCR analysis presented in PCR Analysis folders; and operations with PCR primers and PCR products.
Preparation for PCR analysis
To prepare for PCR analysis, perform the following steps:
Create or open a Display window for the DNA molecule on which you wish to perform PCR analysis.
Select the region of the molecule you wish to analyze, using ordinary selection techniques in a sequence or graphics pane of the Display window.
Choose the PCR Primers command from the Analyze menu. (This command will be deactivated if no selection zone is defined.)
PCR Analysis dialog box
When you choose the PCR Primers command from the Analyze menu, the PCR Analysis dialog box appears:
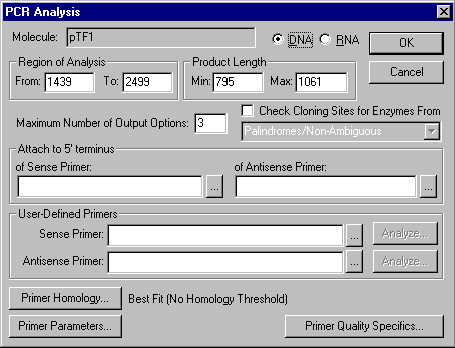
The options in this dialog box allow you to set parameters for PCR primer search:
Region of Analysis
Enter the start and end coordinates of molecule's region where the primers will be sought.
Product Lengths
Enter the maximum and minimum lengths of the molecule region which will be included in the PCR product. For each primer pair the product lengths is the distance between 5' end of the duplex of molecule and sense primer and 3' end of the duplex of molecule and antisense primer.
DNA/RNA
Select the type of nucleotide sequence.
Preferred Number of Output Options
Enter the number of sense-antisense primer pairs you would like to find. The actual result may contain fewer pairs than this number if there are not enough possible primers.
Attach to 5’ Terminus of (Anti)Sense Primer
Enter a short (up to 18 bp) nucleotide sequence (if any) to be attached to the 5’ end of the (anti)sense primer, or choose from recognition sites of database RENs. This sequence will be taken into account when checking primer parameters but it does not affect calculation of homology between primer and molecule. A sequence may be attached regardless of whether the primers are user-defined or found by Vector NTI.
User-Defined Primers
Enter primer’s nucleotide sequence or choose primer from oligo database if you want to use some particular primer instead of leaving Vector NTI to perform the primer search. You may define sense, antisense, or both primers. If you define both primers, Vector NTI will check the compatibility of your primers according to primer parameters.
Analyze
Press this button to analyze a user-specified primer. This button brings up the Oligo Analysis dialog box.
Check Cloning Sites For Enzymes From ...
Check this box if you want the system to find possible cloning sites inside primers and attached nucleotide sequences (if any). All enzymes from the specified REN subbase will be checked for their presence in the primers and attached sequences, and within the actual PCR product.
Primer Parameters
Press this button to set parameters for desired PCR primers. This button brings up the Primer/Oligo Parameters dialog box.
Primer Homology
Press this button to specify homology requirements for the primers. This button brings up the Homology dialog box.
Primer Quality Specifics
Press this button to assign "importance factors" to different primer parameters which changes the scoring function used to evaluate primer quality. This button brings up the Primer/Oligo Quality Specifics dialog box.
Primer/Oligo Parameters dialog box
This dialog box allows you to specify parameters for PCR primers, sequencing primers, and hybridization probes.
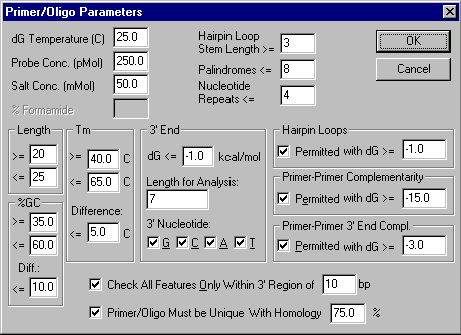
Length
Enter the limits of primer length. Please note that nucleotide sequences attached to a primer’s 5’ end are not taken into account when calculating primer length.
%GC
Enter the limits of the percentage of G and C in the primer and difference between GC percentages for sense and antisense primers.
Tm
Enter limits for primer melting temperature (temperature at which 50% of primer is a duplex) and difference between melting temperatures for sense and antisense primers in degrees Celsius.
3’ End
Specify parameters of the primer’s 3’ end. In the Length for Analysis field, enter the length of the primer 3’ region which should be analyzed. In the dG <= field specify the maximum permitted value of 3’ end free energy. Check the nucleotide boxes to specify permitted last primer nucleotides.
Hairpin Loops
Check Permitted box if hairpin loops are permitted, and enter the minimum permitted value for free energy of hairpin loops. Primers with hairpin loops which have free energy values greater than or equal to this number will be accepted.
Primer-Primer Complementarity
Check Permitted box if primer-primer complementarity is permitted, and enter the minimum permitted value for duplex free energy.
Primer-Primer 3’ End Complementarity
Check Permitted box if primer-primer 3’ end complementarity is permitted, and enter the minimum permitted value for duplex free energy.
DG Temperature
Enter the temperature in degrees Celsius to be used for calculating free energy values.
Probe Concentration
Enter the value of probe concentration in pMol.
Salt Concentration
Enter the value of salt concentration in mMol.
%Formamide
When hybridizing in formamide enter the formamide concentration in %.
Hairpin Loop Stem Length >=
Enter the minimum number of base pairs in a hairpin stem. This value is also used as a minimum stacking length for primer-primer complementarity and primer-primer 3’ end complementarity.
Nucleotide Repeats <=
Enter the maximum permitted length of nucleotide repeats in primers.
Palindromes <=
Enter the maximum permitted length of palindromes in primers.
Check All Features Only Within 3’ Region of ...
Check this box and enter the length of a 3’ region if all of a primer’s features (repeats, palindromes, hairpin loops, dimers) should be checked only within that 3’ region. If this box is empty, the whole primer will be evaluated.
Primers/Oligos Must Be Unique With Homology ...
Check this box and enter the homology threshold if you want the system to check primer uniqueness on the molecule. Primers which have parasitic hybridization with homology >= this threshold will be rejected. Please note that this homology threshold must be <= the minimum homology required for hybridization of user-defined primers (if any).
Homology dialog box
This dialog box allows you to specify homology requirements.
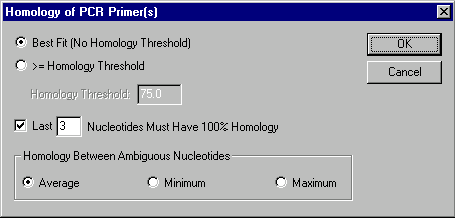
Best Fit
Check this button to indicate that you are looking for a homology site(s) with a maximum homology, not setting any threshold for that maximum.
With Homologies >= Homology Threshold
Check this button to indicate that you are looking for all homology sites with a homology above specified homology threshold.
Homology Threshold
Enter the percentage of homology which is the minimum possible homology for a homology site to be accepted.
Last ... Nucleotides Must Have 100% Homology
Check this button if you require a homology site to be accepted only if the last (3' end) several nucleotides of a primer/oligo have 100% homology with a nucleotide sequence. This condition is the additional one for the Homology Threshold or the Best Fit conditions.
Homology Between Ambiguous Nucleotides
Select a method of calculating homology between ambiguous nucleotides (if any). The Average, Minimum, and Maximum buttons indicate that the average, minimum, and maximum possible homology respectively will be calculated for any nucleotide pair. For instance, if you are calculating homology between N and A, then the average homology is 25%, the minimum homology is 0%, and the maximum homology is 100%. In case of R and A they are 50%, 0%, and 100%; in case of R and T - 0%, 0%, and 0%.
Primer/Oligo Quality Specifics dialog box
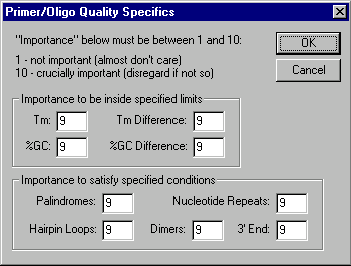
This dialog box allows you to assign "importance factors" to different primer/oligo parameters changing the scoring function which evaluates primer/oligo quality. The importance factors are integers in the range 1..10. The lower the factor, the less weight it has in calculating the score for a primer/oligo. To indicate that a particular parameter is not important for you at all enter 1 in the appropriate box. To indicate that the parameter is crucially important, enter 10. Otherwise, enter a number from 1 to 10 measuring the degree of a parameter importance.
The PCR Analysis folder
During PCR primer analysis, Vector NTI generates a number of options which satisfy the conditions set in the PCR Analysis dialog box. These options are inserted into your molecule Display window’s Text pane as subfolders of the PCR Analysis folder:
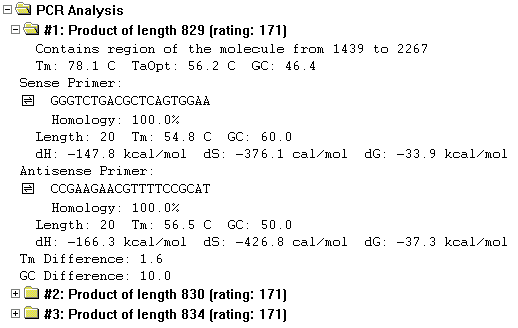
Contents of the PCR Analysis folder
The options are sorted by their ratings calculated on the basis of user-defined primer quality specifics, in descending order.
The subfolder titles show the length and rating of the PCR products they contain.
Each subfolder contains the following information:
The coordinates of molecule's region which is included in the PCR product.
The information about the product—melting temperature, optimum temperature for annealing in the PCR reaction, and GC percentage.
The next two sections describe the sense and antisense primers. They include the homology between the primer and the molecule sequence, the actual primer sequence in the 5’-3’ direction (with attached sequence, if any), the primer length in nucleotides, its melting temperature, its GC percentage and values for enthalpy, entropy, and free energy.
Note the oligonucleotide symbols to the left of the primer sequences (  ). Wherever you see the oligo symbol, you can perform various oligo functions by placing the mouse cursor on the line with the oligo and pressing the right button (Windows) or holding down the command key and pressing the mouse button (Macintosh). A shortcut menu will appear; its functions are described below in the Operations With PCR Primers section.
If the Cloning Sites box was checked in the primer search dialog box, the primer section will also contain a line showing cloning sites found in the product and its primers and attached sequences. If there is a number in parentheses after the cloning site name, that is the number of times that site occurs in the product.
The last line in each product folder shows the difference in the melting temperatures and GC percentages of the sense and antisense primers.
Operations with PCR products
If you wish, you can save a PCR product as an independent molecule in the Vector NTI database, or save it to the database and immediately open a Display window containing it. You can also automatically set selection in the Display window's Graphics and Sequence panes on the region of the molecule included in a PCR product. To perform one of these options, move the mouse cursor on top of a PCR product’s subfolder in a Display window’s text pane, and click the right mouse button (Windows) or press and hold down the command key and click (Macintosh). A shortcut menu appears.
Choose the Save as Molecule in Database option to save the PCR product to the database. The New DNA/RNA Molecule tabbed dialog box appears (described elsewhere in the manual). The Description field on the DNA/RNA Molecule page automatically contains text stating the origin of the fragment. Enter a name in the name field on the General page and any other information you desire and press the OK button. The product is added to the database.
Choose the Save to Database and Create Display window option to save the fragment to the database and immediately open it in a Display window. The New Database Molecule dialog box appears. When you are done entering information, press OK. The molecule is saved to the database, and is immediately loaded into a Molecule Display window for your further analysis.
Choose the Find PCR Product option to select the region of the molecule which is included in the PCR product.
Operations with PCR primers
PCR primers are shown with the oligo symbol (  ) in each PCR product subfolder. For these primers, you may call up the Oligo Analysis dialog box to perform oligo analysis, add the primer to the oligo list, or save it in the database for future use. To perform any of these operations, move the mouse cursor on top of a PCR primer’s oligo symbol in a Display window’s text pane, and click the right mouse button (Windows) or hold down the command key and press the mouse button (Macintosh). A shortcut menu appears.
Choose the Analyze command to perform oligonucleotide analysis on this primer using the Oligo Analysis dialog box.
Choose the Add to Oligo List command to add this primer to the Oligo List. This may be useful if you want to investigate possible duplexes between sense and antisense primers, for example. To test for duplexes between sense and antisense primers, add both primers to the Oligo List, call up the Oligo List, select the primers and press the Duplexes button.
Choose the Save to Database command to save this primer as an oligonucleotide in Vector NTI’s database.
Section 3: Sequencing Primers
Vector NTI can find primers to perform sequencing of a molecule fragment selected in a DNA Molecule Display window. You select the desired part of the molecule—the sequencing region. If the sequencing region is long enough, you can divide it into sequencing domains, areas in which a single sequencing reaction will take place. You then set the size of the primer hybridizing domain (the region in which primers will be sought); and desired primer parameters, and Vector NTI seeks and evaluates several primer options, sorting them from best to worst. You can immediately perform various operations with the primers Vector NTI has generated.
This section describes preparation for analysis of sequencing primers; the Sequencing Primers dialog box; and the results of sequencing primer analysis generated for the Sequencing Primers folder.
Preparation for sequencing primer analysis
To prepare for sequencing primer analysis, perform the following steps:
Create or open a sequence or graphical map Display window for the molecule on which you wish to perform the analysis. If the Display window is opened from a file, rather than freshly created, please be aware that the nucleotide sequence used may be inconsistent with the Display window’s display if you have made changes in the database.
Select the region of the molecule you wish to analyze, using ordinary selection techniques in a sequence or graphics pane of the Display window.
Choose the Sequencing Primers command from the Analyze menu. (This command will be deactivated if no selection zone is defined.) The Sequencing Primers dialog box appears.
Sequencing Primers dialog box
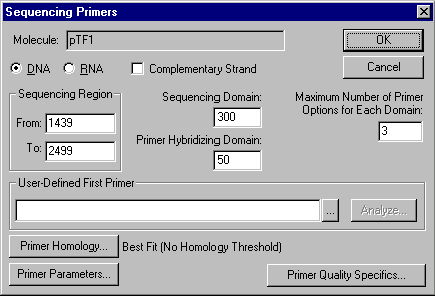
The options in this dialog box allow you to set parameters for sequencing primer search:
Sequencing Region
Enter the start and end coordinates of sequencing region.
Sequencing Domain
Enter the number of bases for a single sequencing reaction.
Primer Hybridizing Domain
Enter the length of region where primers for each sequencing domain should be sought.
DNA/RNA
Select the type of nucleotide sequence.
Maximum Number of Primer Options for Each Domain
Enter the number of primers you would like to find for each sequencing domain. The actual result may contain fewer primers than this number if there are not enough possible primers.
User-Defined First Primer
Enter primer’s nucleotide sequence or choose primer from oligo database if you want to use some particular primer as the primer for the FIRST sequencing domain instead of leaving the primer search to Vector NTI.
Analyze
Press this button to analyze a specified primer. This button brings up the Analyze Oligo dialog box.
Primer Parameters
Press this button to set parameters for desired sequencing primers. This button brings up the Primer/Oligo Parameters dialog box.
Primer Homology
Press this button to specify homology requirements for the primers. This button brings up the Homology dialog box.
Primer Quality Specifics
Press this button to assign "importance factors" to different primer parameters changing the scoring function which evaluates primer quality. This button brings up the Primer/Oligo Quality Specifics dialog box.
The Sequencing Primers folder
During sequencing primer analysis, Vector NTI generates a number of primer options for each sequencing domain and stores them in the Sequencing Primers folder in the text pane.
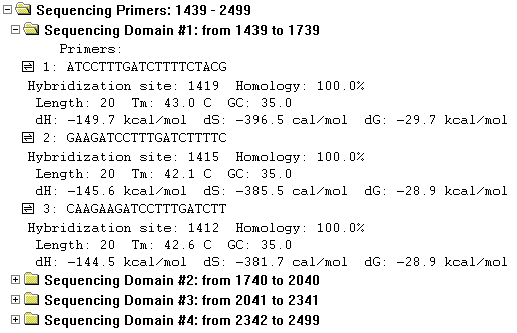
The Sequencing Primers folder contains one subfolder for each sequencing domain in the analyzed region. Subfolder titles show the length and boundaries of the sequencing domains. The subfolders contain the primers found for that sequencing domain.
Within each sequencing domain subfolder, the primer options are sorted by their ratings calculated on the basis of user-defined primer quality specifics, in the descending order.
The following information is shown for each primer:
The primer sequence, in the 5’-3’ direction; primer hybridization site and homology; the primer length in nucleotides; its melting temperature; its GC percentage; and values for enthalpy, entropy, and free energy.
Note the oligonucleotide symbols (  ) to the left of the primer sequences. Wherever you see the oligo symbol, you can perform various oligo functions by placing the mouse cursor on the line with the oligo and pressing the right button (Windows) or holding down the command key and pressing the mouse button (Macintosh). A shortcut menu will appear.
Choose the Analyze command to perform oligonucleotide analysis on this primer using the Oligo Analysis dialog box.
Choose the Add to Oligo List command to add this primer to the Oligo List.
Choose the Save to Database command to save this primer as an oligonucleotide in Vector NTI’s database.
Section 4: Hybridization Probes
In Vector NTI, hybridization probe analysis is used to find oligonucleotides that will hybridize with a selected molecule fragment, given certain restrictions set by the user, such as % homology, %GC, etc. The user may either ask Vector NTI to generate a set of oligos that will hybridize with the selected fragment, or may test if a user-defined oligo, or any oligos from an indicated subbase will hybridize with the selected fragment given the assigned restrictions.
This section covers preparation for hybridization probe analysis; the Hybridization Probes dialog box; and the results of hybridization probe analysis shown in the Hybridization Probes folder.
Preparation for hybridization probe analysis
To prepare for hybridization probe analysis, perform the following steps:
Create or open a sequence or graphical map Display window for the DNA molecule on which you wish to perform the analysis. If the Display window is opened from a file, rather than freshly created, please be aware that the nucleotide sequence used may be inconsistent with the Display window’s display if you have made changes in the database.
Select the region of the molecule you wish to analyze, using ordinary selection techniques in a sequence or graphics pane of the Display window.
Choose the Hybridization Probes command from the Analyze menu. (This command will be deactivated if no selection zone is defined.) The Hybridization Probes dialog box appears.
Hybridization Probes dialog box
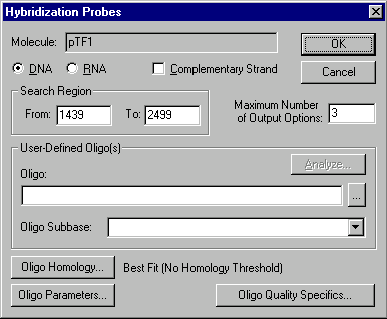
The options in this dialog box allow you to set parameters for the search for oligos capable of hybridizing with your selected fragment:
Search Region
Enter the start and end coordinates of the region where oligos should be hybridized:
DNA/RNA
Select the type of nucleotide sequence.
Maximum Number of Output Options
Enter the number of oligos you would like to find. The actual result may contain fewer oligos than this number if there are not enough possible oligos.
User-Defined Oligo(s)
Oligonucleotide
Enter an oligo’s nucleotide sequence or choose oligo from oligo database if you want to check hybridization abilities of some particular oligo.
Oligo Subbase
Enter oligo subbase name or choose a name from oligo subbases if you want to check hybridization abilities of all the oligos from this subbase.
Analyze
Press this button to analyze a specified oligo. This button brings up the Oligo Analysis dialog box.
Oligo Parameters
Press this button to set parameters for desired oligos. This button brings up the Primer/Oligo Parameters dialog box.
Oligo Homology
Press this button to specify homology requirements for the oligos. This button brings up the Homology dialog box.
Oligo Quality Specifics
Press this button to assign "importance factors" to different oligo parameters changing the scoring function which evaluates oligo quality. This button brings up the Primer/Oligo Quality Specifics dialog box.
The Hybridization Probes folder
During hybridization probe analysis, Vector NTI generates a number of oligos which will hybridize with the selected fragment and stores them in the Hybridization folder in the text pane. Oligos are sorted by their ratings calculated on the basis of user-defined oligo quality specifics, in descending order.
If you entered a user-defined oligo, the Hybridization folder will contain only that oligo, if it is capable of hybridizing with the selected fragment given the conditions set in the Hybridization Probes dialog box. If you entered a user-defined subbase of oligos, the Hybridization folder will contain all oligos from that subbase which are capable of hybridizing with the selected fragment given the conditions set in the Hybridization Probes dialog box. If you did not enter a user-defined oligo or oligo subbase, the Hybridization folder will contain a number of possible oligos generated by Vector NTI and capable of hybridizing with the selected fragment.
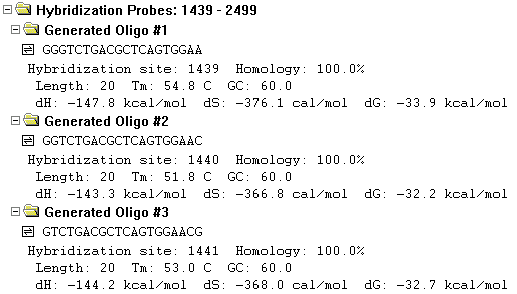
The Hybridization folder contains one or more oligos, each in its own subfolder.
Subfolder titles show the name of the oligo they contain.
The subfolders contain the following information for each oligo:
The nucleotide sequence in the 5’-3’ direction, oligo hybridization site and homology, the oligo length in nucleotides, its melting temperature, its GC percentage, and values for enthalpy, entropy, and free energy.
Note the oligonucleotide symbols (  ) to the left of the oligos’ sequences. Wherever you see the oligo symbol, you can perform various oligo functions by placing the mouse cursor on the line with the oligo and pressing the right button (Windows) or holding down the command key and pressing the mouse button (Macintosh). A shortcut menu will appear.
Choose the Analyze command to perform oligonucleotide analysis using the Oligo Analysis dialog box.
Choose the Add to Oligo List command to add this oligo to the Oligo List.
Choose the Save to Database command to save this oligo in Vector NTI’s database.
Section 5: “Silent Mutations”
After you open a DNA/RNA Molecule Display window which contains a restriction map, you can search for mutations which, in any selected region, do not affect amino acid translation of the selected DNA but result in appearing and/or disappearing of one or more restriction sites. You can search separately for direct or complimentary sequence strand.
To search for the "silent mutations", open a Molecule Display window making sure that display setup contains Restriction Map option for an at least one restriction enzyme. Select a region of the molecule in the Display window and choose the Mutagenesis/Direct (Complementary) Strand command from the Analysis menu of the main Vector NTI window.
A dialog box appears allowing you to select 1 or more restriction enzyme sites to be analyzed. You can only analyze restriction sites for the enzymes currently in the Display window's Restriction Map (including those which have no sites). Select at least one enzyme.
Vector NTI will analyze the selected region of the molecule and attempt to generate suitable silent mutations. The reading frame for the amino acids will be defined by the start of the selected region so that the first three nucleotides of the selected region will form the first codon. Note that the program is able to find both "single" (just one nucleotide altered) and "multiple" (several neighbor nucleotides altered) mutations for any elementary event (appearing and/or disappearing of at least one site) significantly widening the set of possible solutions compared to just "single"-mutation analysis.
The results of analysis are listed in the Mutagenesis folder of the Text Pane of the Display window. You are presented with a set of mutation options resulting in appearing and/or disappearing of at least one restriction site. The options are sorted by the position of the first altered nucleotide. If you were analyzing the complementary strand, mutation coordinates on both complementary and direct strands will be listed.
You can easily identify a mutation region on the molecule for each mutation option. Set the cursor on the appropriate line in the Mutagenesis folder and press the right mouse button. A pop-up menu appears containing the Find command. This command sets selection on the region of the molecule containing nucleotides to be altered according to the mutation option. Alternatively, you can press control+f key combination or click the Find button on the Window toolbar.
Section 6: Calculating Restriction Fragments
After you open a DNA/RNA Molecule Display window which contains a restriction map, you can calculate restriction fragments which are the result of cutting the molecule with any subset of enzymes constituting the restriction map.
To calculate the restriction fragments, open a Molecule Display window making sure that display setup contains Restriction Map option for an at least one restriction enzyme. Select the Restriction Fragments command from the Analysis menu of the main Vector NTI window.
A dialog box appears allowing you to select a restriction enzyme(s) which should be used for cutting the molecule. You can only calculate restriction fragments for the enzymes currently in the Display window's Restriction Map. Select at least one enzyme.
Vector NTI will calculate the appropriate restriction fragments and list the result in the Restriction Fragments folder of the Text Pane of the Display window. The fragments are sorted by their size in descending order.
You can easily identify a restriction fragment on the molecule. Set the cursor on the appropriate line in the Restriction Fragments folder and press the right mouse button. A pop-up menu appears containing Find command. This command set selection on the region of molecule containing the restriction fragment.
Summary
This chapter has described Vector NTI’s oligonucleotide and primer functions.
The chapter covered the following points:
Oligonucleotide Functions:
- The Oligo List
- The Oligo Editor
- The Oligo Analysis dialog box
- The Oligo Duplexes dialog box
Primers:
- PCR primers
- Sequencing primers
- Hybridization probes
- Primer/Oligo Parameters
- Primer/Oligo Quality Specifics
- Primer/Oligo Homology
"Silent Mutations" analysis
Calculation of Restriction Fragments
See Also:
Introduction
Chapter 15 -- Database Operations
Chapter 11 -- Display Windows and User Interface
Chapter 14 -- Molecule Components and Construction
Chapter 4 -- Tools and Internet Connectivity
Chapter 6 -- PCR Analysis
Chapter 9 -- Advanced Molecule Design
Chapter 16 -- Molecule Design
Chapter 1 -- Display Windows
Back to Index