- Overview
- Procedure for designing a new DNA molecule with the help of Vector NTI’s built-in biological knowledge.
- Describing the goal molecule
- Starting the design
- Design parameters
- Design preferences
- Advanced design preferences
- The design process
- Returning to the pre-design state
- The Design Description folder
- Summary
This chapter describes the creation of DNA molecules using Vector NTI’s built-in biological knowledge. In Vector NTI terms, this procedure is called design
To have Vector NTI design a molecule, you describe a goal molecule by creating a Goal Molecule Definition List (Goal List) with the help of the Fragment Wizard. You must define one recipient fragment, which must be the first in the Goal Molecule Definition List, and one or more donor fragments. You then call up the Construct/Design Molecule dialog box and request the system to proceed with the design. You can describe the goal molecule in very general or very specific terms and can set preferences for techniques used in creating the molecule, such as how fragments may be isolated from their parent molecules, how termini may be modified, etc. Vector NTI takes all of this information into account as it generates the design plan.
If more than one cloning step is necessary to create the goal molecule, the design process will create a number of intermediate recombinants. The recombinants will be named name_$step number_variant number, where name is the goal molecule’s name, step number is the number of the cloning step, and variant number is the number of the step variant, if more than one has been generated.
When the design is complete, Vector NTI enters the goal molecule and all intermediate recombinants into the database, where it can be studied with Display windows, the Molecule Editor, etc.
The intermediate recombinants will be stored in a new subbase, called name_$Intermediate, where name is the goal molecule’s name.
The generated design plan appears as a folder in the text pane of Display windows containing the designed molecule.
If you start a design task for a goal molecule with a name that causes a conflict with an existing set of intermediate recombinants, Vector NTI will inform you of the conflict and ask permission to delete the existing intermediates and turn the existing designed molecule into a basic molecule. If you do not want to do this, we recommend you choose a different name for the new goal molecule.
This chapter describes the overall procedure for designing a DNA molecule, discusses how to describe a goal molecule using Display windows, Fragment Wizard, and the Molecule Editor, how to start the design process, and how to set your preferences for design techniques. The chapter then goes on to explain what Vector NTI actually does during the design process, and how you can control the process. The chapter concludes with a discussion of the design plans Vector NTI generates.
Procedure for designing a new DNA molecule with the help of Vector NTI’s built-in biological knowledge.
Creating new molecules with Vector NTI’s built-in biological knowledge is one of the system’s most powerful features. This method is called design. In design, you select fragments of existing molecules that you would like the system to clone together into a goal molecule. Vector NTI then chooses restriction sites, methods of terminus modification, etc. to produce the most convenient cloning strategy. For all recombinants generated, the system models preselection and post-transformation analysis, and produces other useful information.
To create a new molecule with Vector NTI’s design capabilities, perform the following procedure (each of these steps is described in more detail later):
Describe your goal molecule by defining its recipient and donor fragments and placing them in the Goal Molecule Definition List in the proper order with the help of the Fragment Wizard.
Call up the Construct/Design Molecule dialog box. It will be loaded with your Goal Molecule.
Enter general information for new molecule, and press the Design button.
When the Design Parameters dialog box appears, set the appropriate parameters and your design preferences.
Start the design process. Vector NTI will seek good design options. Wait until the process is complete, or stop it at any point along the way.
If the design was successful, your molecule will be entered into the database and the new Molecule Display window will be created.
Study the molecule as necessary. The text pane of a Display window containing the goal molecule will have a Design Description folder. Open this folder to inspect the design plan Vector NTI has generated.
If you are not satisfied with the design plan, you may perform additional designs. To generate additional designs for a molecule, choose the Design command from the Vector NTI workspace’s Molecule menu, or call up the Database Explorer, select the molecule in the DNA/RNA Molecules table and choose the Re-Design Molecule operation. The Construct/Design Molecule dialog box will appear loaded with the selected molecule. The Component Fragments section of the dialog box will contain the component fragments constituting the original design task for the molecule. Change the molecule’s name and design the molecule again, but with different design parameters and preferences. Inspect the Design Description folder of your new attempt. Try this several times, with different design parameters and preferences.
If you cannot achieve a satisfactory design by changing the design parameters and preferences, try changing the description of the goal molecule. Make your designs under new names each time so you will have a record of your attempts.
If you still cannot achieve a satisfactory design, try changing the internal design parameters to influence Vector NTI’s heuristic search for design options.
Describing the goal molecule
To describe a goal molecule, you must define one recipient fragment and at least one donor fragment.
We strongly recommend that you use Display windows and the Fragment Wizard tool to define fragments for molecules you will be designing. You can then use the Fragment Editor to fine-tune fragment descriptions. You can define these fragments by hand in the Construct/Design dialog box, but it will be much slower and much less effective than using Display windows. You can find the general information about the Fragment Wizard in Chapter 14; here we will describe how to use it to define design recipient and design donor fragments.
Defining the recipient
The recipient fragment is the part of the recipient molecule which will remain unaffected during cloning. All nucleotides within the fragment you defined will be included in the goal molecule.
The recipient must be the first fragment in the Goal Molecule Definition List. You can place the recipient at the top of the list either by defining it before any donors, or by moving it to the top of the list in the Construct/Design dialog once all fragments have been defined.
The recipient must come from a circular molecule, stored in the Vector NTI database.
To define a recipient fragment, open the Display window for the recipient molecule. Make sure that the molecule window is the active one (topmost), activate its graphics pane and press the Add Fragment To Goal List button (  ) on the Window toolbar. The Fragment Wizard dialog is displayed. The technique for defining a recipient fragment is basically the same as for construction fragments described in Chapter 13.
The first screen of the Fragment Wizard dialog allows you to choose the type of a new fragment. Choose the Design Recipient Fragment option and press the Next button to go to the second screen of the dialog.
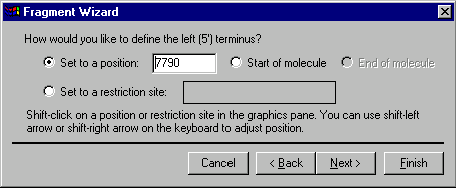
The second screen allows you to specify the 5’ terminus of the fragment. Your choices of the terminus type are a position, the start of the molecule , the end of the molecule (this option is disabled for the 5’ terminus) and a restriction site. If you want to set the terminus to a certain position, you can either enter the position into the position box on the dialog or click in the graphics pane of the Display window and adjust the position using arrow key combinations. To set the 5’ terminus to the start of the molecule, select the Start of Molecule option. Vector NTI will look for good cloning sites in the region before the position you specified.
If you want to set the terminus to a restriction site, click on the site or its label in the graphics pane. In this case, Vector NTI will be forced to use that site in cloning. If the site is not convenient, for example requiring complicated partial digestion, you will be responsible for the difficulty of the cloning situation.
Press the Next button to the next screen of the dialog.
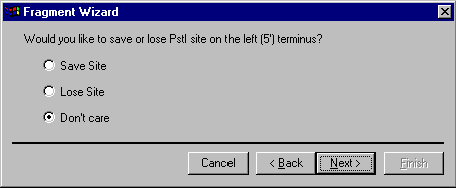
If you specified that the 5’ terminus should be set to a palindromic restriction site, the next screen will allow you to specify that the site should be saved or lost in the designed molecule. Your options are Save Site, Lose Site or Don’t Care. If you do not specify that site is to be saved or lost, its fate will be unpredictable. Choose the desired option and press the Next button to the next screen of the dialog.
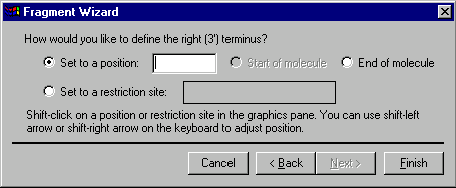
The next screen allows you to specify the 3’ terminus of the fragment. Your choices of the terminus type are a position, the start of the molecule (this option is disabled for the 3’ terminus), the end of the molecule and a restriction site. If you want to set the terminus to a certain position, you can either enter the position into the position box on the dialog or shift-click in the graphics pane and adjust the position using shift-arrow key combinations. To set the 3’ terminus to the end of the molecule, select the End of Molecule option. Vector NTI will look for good cloning sites in the region following the position you specified.
If you want to set the terminus to a restriction site, shift-click on the site or its label in the graphics pane. Vector NTI will be forced to use that site in cloning. Notice, that the shift key should be held down for all selections in the graphics pane since you need to extend the existing selection, leaving the 5’ terminus on its place. If your action in the graphics pane changes the 5’ terminus position, the Fragment Wizard automatically returns you back to the second screen where the 5’ terminus is defined.
If you specified that the 3’ terminus should be set to a palindromic restriction site, you will be able to go to the next screen and specify that the site should be saved or lost in the designed molecule. Choose the desired option and press the Finish button to complete the definition of the fragment. Otherwise, the Next button is disabled; press the Finish button.
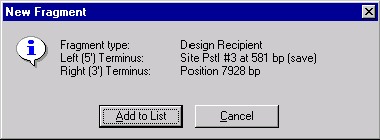
The New Fragment message box is displayed with the description of the selected recipient fragment. If you made a mistake, press the Cancel button to return to the Fragment Wizard dialog. Otherwise, press the Add to List button. The fragment will be added to the Goal Molecule Definition List and the Fragment Wizard dialog will be closed.
Please note that if you later edit the recipient fragment in the Construct/Design dialog box and assign biochemical operations to be performed on the termini of the recipient fragment, these operations will be ignored. During the design process, Vector NTI will choose all methods of terminus modification itself.
Also note that the recipient fragment always has direct orientation. The Inverted box in the recipient’s Fragment Editor dialog is ignored during the design process.
Defining donors
Donors are fragments which Vector NTI will insert into the recipient to produce the goal molecule. The purpose of donor fragments is to carry functional signals into the recipient.
When performing a design task, Vector NTI requires all fragments except the first in the Goal Molecule Definition List to be donor fragments. As mentioned before, the first fragment must be a recipient fragment.
Donor fragments can come from circular or linear molecules stored in the database.
To define a donor fragment, open the Display window for the donor molecule. Make sure that the molecule window is the active one (topmost), activate its graphics pane and press the Add Fragment To Goal List button (  ) on the Window toolbar. The Fragment Wizard dialog is displayed.
The first screen of the Fragment Wizard dialog allows you to choose the type of a new fragment. Choose the Design Donor Fragment option and press the Next button to go to the second screen of the dialog.
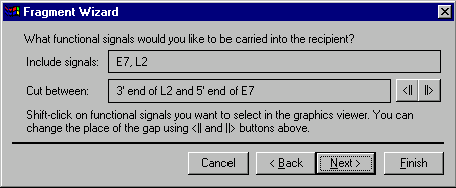
The second screen allows you to specify the functional signals you want to be carried into the recipient. To select the desired signals, hold down the shift key and click on desired functional signals or their labels in the graphics pane. Remember, that Vector NTI turns the mouse cursor to a hand ( ) when the cursor points to a functional signal or its label; you can also leave the cursor over a signal for a few seconds and a help message will be displayed, containing the information about the signal to which you are pointing. To deselect a selected signal, click on it one more time (the shift key should be in the down position).
The names of the signals you selected are displayed in the Fragment Wizard dialog. If the donor molecule is circular and you have chosen more than one signal, Fragment Wizard will allow you to choose the place of the "gap" between signals where Vector NTI will look for a convenient place to cut the donor molecule. To move the gap clockwise, press the ||> button on the dialog; the <|| button moves the gap counterclockwise. When you selected the desired signals, press the Next button to go to the next screen.
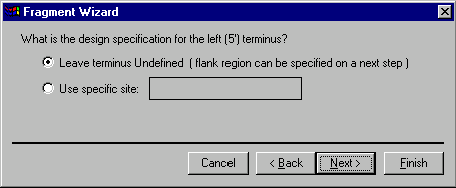
The next screen allows you to specify the 5’ terminus for design. Your options are: Leave Terminus Undefined and Use Specific Site. If you want the design process to use a particular restriction site to cut the signals from the donor molecule, select the Use Specific Site option. Fragment Wizard prompts you to hold down the shift key and click on the restriction site or its label in the graphics pane. The site label becomes selected and the name of the site and its position are shown in the Fragment Wizard dialog. If you set a site in this way, Vector NTI will be forced to use that site in cloning. If the site is not convenient, for example requiring complicated partial digestion, you will be responsible for the difficulty of the cloning situation.
If you want Vector NTI to choose restriction sites for you, select the Leave Terminus Undefined option. Press the Next button to go to the next screen.
If you have chosen the Use Specific Site option, Fragment Wizard will show the screen allowing you to specify the 3’ terminus for design. The required actions are the same as for the 5’ terminus screen described above.
If you have chosen the Leave Terminus Undefined option, the next screen will allow you to specify the maximum size of the 5’ flank region (if you came from the 5’ terminus definition screen) or 3’ flank region.
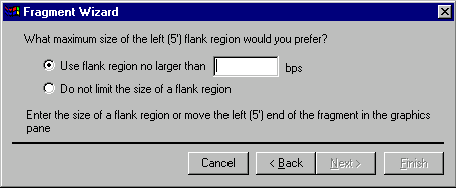
Your options are: Do Not Limit the Size of a Flank Region and Use Flank Region No Larger Than … bps. If you want to let Vector NTI to search all available space for restriction sites, choose the Do Not Limit the Size of a Flank Region option. If you want to limit the region within which cloning sites may be sought (thus limiting the size of the resulting flank region), you need to choose the Use Flank Region No Larger Than … bps option. Vector NTI prompts you that you should either enter the maximum length of the flank region in the dialog’s text box or move the appropriate end of the selection in the graphics pane into the gap beyond the edges of the selected functional signals. In this case, the selection in the graphics pane will show a maximum possible flank region. You can use all available techniques for extending a selection in the graphics pane: drag the appropriate end of the selection, shift-click on the desired position, etc.
When you are finished with the description of both termini, the Next button becomes disabled. Press the Finish button to complete the definition of the donor fragment.
The New Fragment message box is displayed with the description of the selected donor fragment. If you made a mistake, press the Cancel button to return to the Fragment Wizard dialog. Otherwise, press the Add to List button. The fragment will be added to the Goal Molecule Definition List and the Fragment Wizard dialog will be closed.
Defining design fragments in Fragment Editor
The alternative way to define design fragments is to enter them manually in the Construct/Design dialog using the Add New: Mol Fragment button. Vector NTI will show the Fragment Editor dialog:
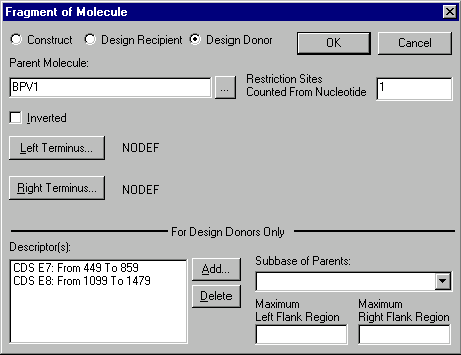
If after leaving the Display window you would like to add flank regions to a donor fragment, or change flank regions set through a Display window, you may use the Maximum Flank Region boxes.
The purpose of donor fragments is to carry functional signals into the recipient. These signals are called descriptorsYou can add or remove descriptors from a donor fragment with the Descriptor(s) box of the For Design Only section of this dialog box. To add a descriptor, press the Add button. The Fragment Descriptor dialog box will appear:
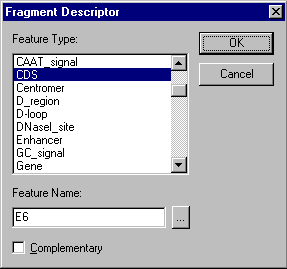
To define a descriptor for the donor fragment, you must choose the type of signal and enter the name of the signal if necessary. If the signal is on the complementary strand, check the Complementary box. If you do not enter a signal name, the descriptor will be added to the donor fragment and will be treated as any signal of the specified type. The Fragment Descriptor dialog box is the only way to add a descriptor containing any signal of a specified type; such a descriptor cannot be added from a Display window.
To remove a descriptor from a donor fragment’s description, highlight it in the Descriptor(s) box and press the Delete button.
A donor fragment created with a Display window always has a defined parent molecule name. In the Fragment of Molecule dialog box, you can change the orientation of a donor fragment by checking the Complementary box. You can also describe a donor fragment whose parent is any molecule in a subbase which you indicate. Vector NTI will decide which specific molecule of the subbase will be used to obtain the functional signals that are the fragment’s descriptor(s).
Starting the design
You have now completely described the goal molecule. Its components are ready for processing by Vector NTI’s built-in biological knowledge.
To begin the design of your new molecule, call up the Construct/Design Molecule dialog box. It will be automatically loaded with the Goal Molecule. Enter general information for the new molecule.
Press the Design button to have Vector NTI prepare to design your molecule.
When you press the Design button, Vector NTI performs a preliminary save of the current molecule state. The molecule’s name, general information, fragment list, etc. are saved and can be recalled. The system then performs a preliminary analysis of the design possibilities, and calls up the Design Parameters dialog box, described below.
Design parameters
You can set the parameters Vector NTI uses to design molecules, including the restriction endonucleases to be used, transformation systems, the order in which fragments should be cloned and their placement order in the goal molecule, etc.
When you press the Design button in the Construct/Design Molecule dialog, Vector NTI asks you to select a subbase for design results, and then the Design Parameters dialog box appears:
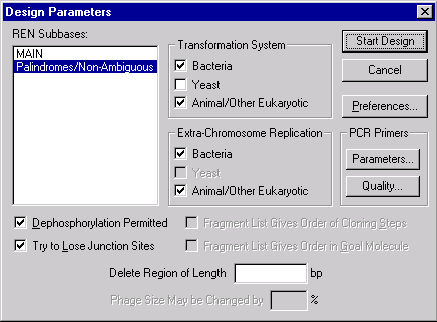
This dialog box allows you to set the parameters of molecule design.
Use the REN Subbases box to select the restriction endonucleases that Vector NTI will consider in the current design task. During design, Vector NTI will use only the RENs in the subbase highlighted in this box. You can press the Enzyme Manager button below the box to call up the Enzyme Manager directly from the Design Parameters box. With its help, you can define the set of RENs you need just before beginning the actual design task.
Set transformation system(s) and extra-chromosome replication capabilities for the current design task with the appropriate check boxes.
Check the Dephosphorylation Permitted box if you want to allow Vector NTI to use dephosphorylation as a preselection method.
Check the Try to Lose Junction Sites box to request Vector NTI to lose junction sites if possible without increasing cloning complexity. Vector NTI will then use lost sites for efficient preselection. This box is a request, not a command, and Vector NTI may save the site if that results in a more convenient design option. If you have requested that sites be saved or lost in the description of the recipient, they will automatically be saved or lost regardless of whether the Try to Lose Junction Sites box is checked or not.
To delete a region from the recipient molecule during cloning, indicate the number of nucleotides to be deleted in the Delete Region field.
Check the Fragment List Gives Order of Cloning Steps box to command Vector NTI to insert the first donor into the recipient in the first cloning step, the second donor in the second cloning step, etc. If this box is not checked, Vector NTI will choose the order of cloning steps based on the most convenient restriction sites.
Check the Fragment List Gives Order in Goal Molecule box to command Vector NTI to place the donor fragments in the goal molecule in the same order in which they are listed in the goal molecule description. If this box is not checked, Vector NTI will choose the placement order based on the most convenient restriction sites.
If the recipient molecule is a phage, it might lose its functionality due to length changes. If you want to preserve phage functionality in the goal molecule, it may be useful to prevent the goal molecule from being much different in length than the recipient molecule. Enter the maximum change in length (%) for phages in the Phage Size May Be Changed By field. If this field is not empty, and the recipient’s parent molecule is a phage, then Vector NTI will keep the lengths of the goal molecule and all intermediate recombinants produced by the design process within the specified length limits.
Press the Preferences button to call up the Design Preferences dialog box, in which you can specify your own preferences for genetic engineering techniques. The next section of this chapter describes how to set these preferences.
Vector NTI can use PCR amplification to isolate donor fragments. The system also proposes primers for PCR amplification of cloned fragments in all molecules produced by the design process, including the goal molecule. The PCR Primers section of the Design Parameters dialog box allows you to set the desired parameters of PCR primers, by pressing the Parameters button, and to control primer selection process, by pressing Quality button. See the PCR Analysis chapter for an explanation of how to work with the Primer/Oligo Parameters and Primer/Oligo Quality Specififcs dialog boxes brought up by these commands.
When all design parameters are set as you desire, press the Start Design button to command Vector NTI to begin designing your new molecule.
Design preferences
One of Vector NTI’s most powerful features is that it lets the user indicate which techniques he or she prefers to design molecules. Press the Preferences button in the Design Parameters dialog box to call up the Design Preferences dialog:
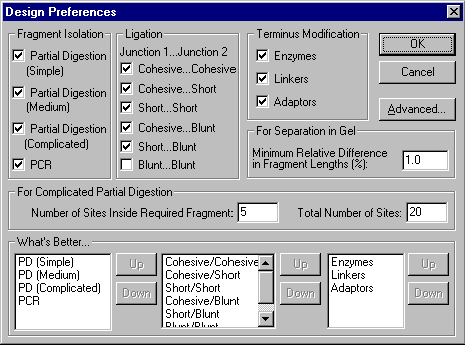
In this dialog box, you can set preferences in the categories of fragment isolation, fragment ligation, and terminus modification.
Vector NTI will design the goal molecule in different ways, depending on how you set the Design Preferences. You will sometimes find it useful to have Vector NTI design the same goal molecule several times, changing the design preferences each time. This will give you several alternatives for constructing your molecule.
Fragment isolation
Vector NTI will try to isolate fragments for cloning using convenient restriction sites whenever possible. If no convenient restriction sites are present, Vector NTI can use partial digestion or PCR to isolate fragments. Check the isolation methods you want to permit, as defined below:
Partial Digestion (Simple)
Partial Digestion with 1 site inside required fragment and 3 sites total.
Partial Digestion (Medium)
Partial Digestion with 1 site inside required fragment and not more than 6 sites total.
Partial Digestion (Complicated)
Partial Digestion with more than 1 site inside required fragment.
Ligation
Check the junction types you will permit Vector NTI to use in designing molecules. Cohesive...Cohesive junction means both ligated fragments have two cohesive ends, each longer than 1 nucleotide; Cohesive...Short junction means both ligated fragments have one cohesive and one short (exactly 1 nucleotide) end, etc.
Terminus modification
Vector NTI may need to modify termini to make them compatible. Check the methods you are willing to permit the program to use.
Priorities
In the What’s Better boxes, specify what techniques and ligation types are relatively better for you by moving them in the corresponding lists. To move any item, select it and then use the Up and Down buttons. Items near the top of the lists have higher priority than items lower in the lists.
Other preferences
In the For Separation in Gel field, specify the minimum relative difference in length (%) for separating fragments in gel.
In the For Complicated Partial Digestion field, specify the maximum number of restriction sites inside the required fragment and the total number of sites on the molecule which are acceptable for fragment isolation using complicated partial digestion.
Advanced design preferences
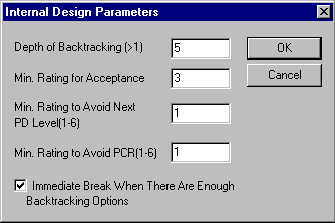
Press the Advanced button to call up the Internal Design Parameters dialog box. It allows you to fine-tune Vector NTI’s heuristic search for molecule design options:
Depth of Backtracking
Specify the number of options Vector NTI should keep as alternatives for backtracking in case of a dead end.
Min. Rating for Acceptance
Vector NTI rates design options on an integer scale of 1 to 8. Specify the minimum acceptable rating to immediately accept an option and end the current search step.
Min. Rating to Avoid Next PD Level
If Vector NTI cannot achieve a minimum rating for enough design options, it may try the next more complicated level of partial digestion. Specify the rating below which the system will try more complicated partial digestion.
Min. Rating to Avoid PCR
If Vector NTI cannot achieve a minimum rating for enough design options, it may try to apply PCR. Specify the rating below which the system will try PCR.
Immediate Break When There Are Enough Backtracking Options
Check this box to force Vector NTI to stop searching for further solutions immediately after finding enough alternatives for backtracking. Checking this option can result in faster searches. When this option is checked, the optimum design option will usually be among those found, but sometimes the system may find something better if permitted further search.
The default internal design parameters are:
|
Depth of Backtracking |
5 |
|
Min. Rating for Acceptance |
3 |
|
Min. Rating to Avoid Next PD Level |
1 |
|
Min. Rating to Avoid PCR |
1 |
|
Immediate Break When There Are Enough Backtracking Options |
Yes |
InforMax recommends that you not change these parameters until you have developed extensive experience with Vector NTI’s design capabilities.
The design process
When you press the Start Design button, Vector NTI begins the design process. The "Designing..." dialog box appears, showing you the progress of the design and allowing you to break and accept at certain points, or cancel the design entirely.
The design process consists of several stages.
First, Vector NTI collects all the information it needs to perform the design. The message "Collecting necessary data..." is displayed on the screen.
Vector NTI then creates restriction maps for all molecules which potentially may be involved in the design. If many maps need to be created (for example, if you chose a large subbase of molecules as potential donors) and if many restriction endonucleases are involved, Vector NTI may take a relatively long time to create all the maps.
Next, Vector NTI begins to perform cloning steps. In each step, one donor fragment is cloned into the recipient. The message "Thinking..." is displayed. When each cloning step is complete, Vector NTI constructs the best recombinant it obtained for that step, models cloning analysis after transformation, searches for important restriction sites in the recombinant, etc. If a cloning step produces the goal molecule, i.e. if no donors remain to be cloned, Vector NTI finishes the design task and enters the goal molecule into the database. If donor fragments remain, the system moves on to the next cloning step.
When the design process is complete, all intermediate recombinants (if any) are stored in the database.
The recombinants will be named as follows: name_$step number_variant number, where name is the goal molecule’s name, step number is the number of the cloning step, and variant number is the number of the variant of this step, if more than one variant has been generated. The intermediate recombinants will be stored in a new subbase, called name_$Intermediate, where name is the goal molecule’s name.
You may examine and delete the intermediate recombinants as desired. If you delete intermediate recombinants, the goal molecule will become a basic molecule.
From the moment Vector NTI begins making restriction maps, the Cancel button is active. Press it if you want to abort the design at any point. If you cancel the design, the information in the Construct/Design Molecule dialog will remain unchanged.
During each cloning step, if at least one acceptable design option has been found, the Accept Now button will be active. Press it to stop further search and accept the best option already found for the current cloning step. Sometimes you may wish to turn off the Immediate Break When There Are Enough Backtracking Options check box in the Advanced Design Preferences, and control the depth of the heuristic search for each cloning step with the Accept Now button.
Returning to the pre-design state
When Vector NTI designs molecules with its built-in biological knowledge, it saves the original goal description (list of recipient and donor fragments) in the database along with all other information about the molecule. After the molecule has been designed, you can return it to its original state. Select the Design command in the Vector NTI workspace’s Molecule menu or call up the Database Explorer, select the molecule in the DNA/RNA Molecules table and choose the Re-Design Molecule operation. The Construct/Design Molecule dialog box will appear loaded with the selected molecule. The Component Fragments section of the dialog box will contain the component fragments constituting the original design task for the molecule.
The ability to return to the pre-design state is useful if you want to try several different designs based on the same goal molecule description. Design the molecule one way and inspect the results in a Molecule Display window. If you are not satisfied with the results, change the design parameters or design preferences, and try again until you are satisfied, as described below:
If you cannot achieve a satisfactory design by changing the design parameters and preferences, try changing the description of the goal molecule. Make your designs under new names each time so you will have a record of your attempts.
If you still cannot achieve a satisfactory design, try changing the internal design parameters to influence Vector NTI’s heuristic searches for design options.
The Design Description folder
When you load a molecule created by Vector NTI’s built-in biological knowledge into a Display window, the text pane of the Display window will contain a Design Description folder. This folder contains subfolders for each cloning step used to create the molecule. In each cloning step, one donor fragment is cloned into the recipient.
Cloning step subfolders
Each cloning step subfolder of the Design Description folder contains the following information:
Result molecule
Name of the recombinant obtained in this cloning step. If this is the final cloning step, the name of the recombinant is the same as the name of the goal molecule. If this is an intermediate recombinant, the name is formed according to the rules given in this chapter's Overview.
Recipient
This folder shows what molecule was used as the recipient, which restriction sites were used as the left and right termini of the recipient, how the termini were modified (if modified), and if partial digestion was used in this cloning step, the number of sites inside the required fragment and the total number of sites on the molecule.
Donor
This folder shows what molecule was used as the donor, which restriction sites were used as the left and right termini of the donor, how the termini were modified (if modified), and if partial digestion was used in this cloning step, the number of sites inside the required fragment and the total number on the molecule. If the donor fragment was cloned in complementary orientation, this is indicated immediately after the name of the donor. For both ends of the donor, the folder shows the actual flank regions, i.e. the distance in nucleotides between the first or last nucleotide in the fragment and the appropriate boundary of the nearest functional signal. If the donor fragment was obtained through PCR amplification, the folder shows the PCR primers used. The primers used satisfy the conditions set by the user in the PCR Analysis dialog box. Both sense and antisense primers are shown in the 5’-3’ direction. If a restriction site was attached to the 5’ end of the primer, that site is also shown here.
Ligation
Junction types are shown here.
Lost restriction sites on the recipient
If recipient restriction sites are lost during cloning, this is shown here.
Donor fragment orientation
If the ligation conditions prevent parasitic donor fragment orientations, this is indicated here.
Preselection
Recommended preselection method is shown here. If one or both recipient sites are lost after ligation, they will be recommended for effective preselection. Otherwise, the system will recommend dephosphorylation if that was permitted by the user in the Design Parameters dialog box. The ability to perform preselection influences the choice of methods of clone analysis after transformation.
Transformation system
The recommended transformation system for clone analysis is shown here. This information is useful if the user allowed more than one transformation system to be used. Vector NTI takes into account the size of recombinants, their replicon types, and extra-chromosome replication capabilities.
Recommended method(s) for clone analysis
Recommended methods for clone analysis after transformation are shown here. Vector NTI proposes the most reasonable set of four possible methods: Screening, Colony Hybridization, Restriction Analysis, and PCR amplification of the cloned fragment. The system recommends these methods based on a number of conditions: ligation type, full or partial digestion, preselection, etc.
Vector NTI then proposes restriction sites for restriction analysis, an oligonucleotide for colony hybridization, and primers for PCR. The recommended restriction sites give distinguishable gel patterns for the result molecule (recipient with insertion) and the recipient without insertion. The oligonucleotide for colony hybridization will successfully hybridize with the inserted fragment. PCR primers satisfy the conditions set by the user in the PCR Analysis dialog box, and allow amplification of the region closest to the boundaries of the cloned fragment.
This information is given even if these methods were not recommended for clone analysis.
If the ligation conditions permit parasitic donor orientations, Vector NTI recommends restriction sites for restriction analysis which allow the clone with required donor fragment orientation to be chosen.
Finally, Vector NTI lists important restriction sites for the result molecule created in this cloning step. They are divided into three categories: sites missing on the molecule, unique sites located within the cloned fragment, and unique sites located outside the cloned fragment.
Summary
This chapter discussed the design of molecules with the help of Vector NTI’s built-in biological knowledge. The chapter covered the following points:
- Procedure for molecule design
- How to describe the goal molecule
- Launching a molecule design
- Design parameters and preferences
- The design process
Results of design: the Design Description folder
See Also:
Chapter 8 -- Molecule Design
Chapter 9 -- Advanced Molecule Design
Chapter 7 -- Molecule Construction
Chapter 14 -- Molecule Components and Construction
Introduction
Chapter 11 -- Display Windows and User Interface
Chapter 13 -- Oligonucleotides and Primers
Back to Index