- Background
- Your Task: Cloning
Note This chapter assumes that you have completed the preceding chapters of the tutorial and understand how to create and manipulate Display windows and the information they contain, Vector NTI’s user interface and toolbars.
This chapter demonstrates the creation of a new DNA molecule by construction. In Vector NTI terms, construction means creating a DNA molecule from fragments that are completely defined and made compatible by the user.
In order to construct a molecule, you must first describe it for Vector NTI by making a list of the fragments from which it is to be built. This is called the Goal Molecule Definition List. You specify the needed fragments for the Goal List, then call up the Construct/Design Molecule dialog box and proceed to construct your new molecule.
DNA molecules can be composed of several different types of fragments: fragments of existing DNA molecules, linkers, adaptors, etc. Most of the fragments you will use to create new molecules will be fragments of existing molecules, and most of the work involved in creating a new molecule will be describing them. Linkers, adaptors, etc. usually require much less work to describe. Fortunately, Vector NTI has a special tool—the Fragment Wizard—that guides you while describing a new molecule fragment and allows you to add fragments quickly and easily.
In addition to using the Fragment Wizard from a Molecule Display window, you can define fragments using the Fragment Editors available from the Construct / Design Molecule dialog box. The Fragment Editors are fully capable of describing fragments of all types, but are most convenient for linkers, adaptors, etc. and less convenient for fragments of molecules.
Besides construction, Vector NTI has several other ways of adding new molecules to its database. You can import molecules from GenBank, EMBL or FASTA files; you can describe the maps of a new molecule by hand and read its sequence from a text file. You can also design new molecules with the help of Vector NTI’s built-in biological knowledge. Molecules which you or Vector NTI create from fragments of existing molecules are called constructed molecules. Molecules that you import or describe by hand are called basic molecules because they enter the database as whole, entire units rather than being built up from fragments.
Later tutorial chapters will show you how to create new molecules with the help of Vector NTI’s built-in biological expertise. This is a powerful capability never before available to molecular biologists.
Your Task: Cloning
Your task will be to create a new molecule by cloning the tetracycline resistance gene from pBR322 into pUC19, using the EcoRI and AvaI restriction sites on pBR322 and the EcoRI and SmaI sites on pUC19.
Follow the steps in the order shown. Figures show what your screen should look like at various points along the way.
1. Launch Vector NTI
Launch Vector NTI by double-clicking its icon in the program group or folder in which you installed Vector NTI.
2. Create Display windows for pBR322 and pUC19
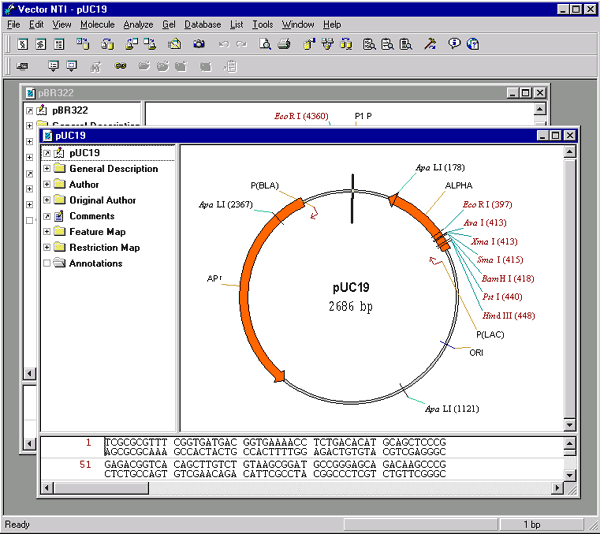
Activate the Database Explorer window and switch to the DNA/RNA molecules table. Select the DNA/RNA Molecules (MAIN) subbase, select the pBR322 and pUC19 molecules and choose the Open command from the Explorer’s DNA/RNA menu.
You should now have two Display windows open, showing the text descriptions, nucleotide sequences and functional and restriction maps of pBR322 and pUC19.
3. Arrange the Display windows
Expand the Display windowsto occupy the full Vector NTI workspace by clicking the maximize box (  ) in the upper right corner of the window (you can use the Window menu to switch between windows). Reduce the text pane in each Display window so there will be plenty of space for two other panes. In both Display windows, set a convenient size for the graphical maps so that the features and labels will be visible and legible as we work with the molecules.
We will now begin to define our goal molecule. The first fragment will be part of pUC19 and the second fragment will come from pBR322.
4. Define the first fragment
The first fragment will include most of the pUC19 molecule. The 5’ end of the fragment will be the SmaI restriction site and the 3’ end will be the EcoRI restriction site.
Make sure the pUC19 Display window is the active window. Use the Switch Panes button (  ) to activate the Graphics Pane of the Display window.
Now press the Add Fragment to Molecule Goal List button (  ) to display the Fragment Wizard dialog. This dialog will guide you through the process of fragment selection. The Fragment Wizard dialog consists of several sequential screens describing the corresponding actions you should take to define the fragment. If you make a mistake you can always return to the previous step by pressing the Back button. Notice, that the dialog is not modal and you can manipulate a selection in the graphics pane behind it. Move the dialog up or down so that you can see the SmaI and the EcoRI restriction sites on the graphical map of pUC19.
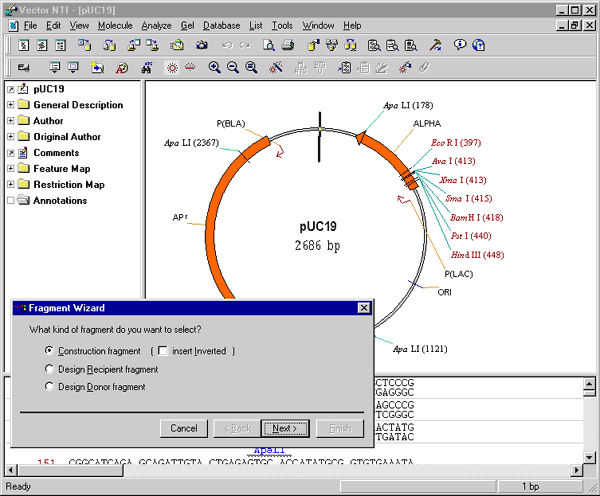
On the first screen, select the Construction Fragment option. Leave the Insert Inverted option unchecked and click the Next button to proceed.
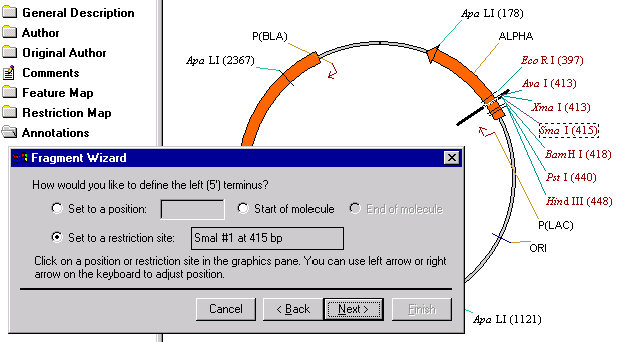
The second screen helps you to define the 5’ terminus of a new fragment. Click on the SmaI restriction site label in the graphics pane. The Set to a Restriction Site option is automatically checked and the name and position of the restriction site is displayed. Click the Next button to proceed.
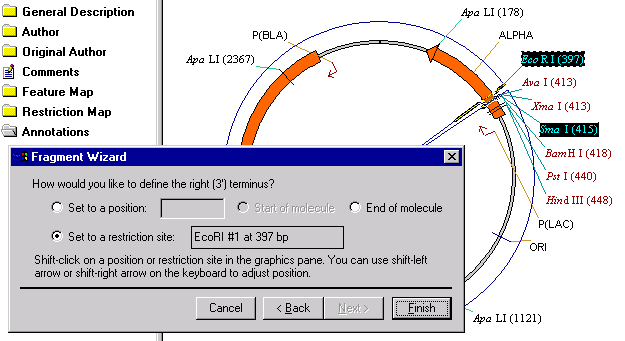
The third screen helps you to define the 3’ terminus of a new fragment. Hold down the shift key and click on the EcoRI restriction site label in the graphics pane. The Set to a Restriction Site option is automatically checked and the name and position of the restriction site is displayed. Both labels in the graphics pane are highlighted and the selected fragment is displayed with the wireframe. This screen is the last one in the sequence and the Next button is disabled. Click the Finish button to complete the definition of a fragment.
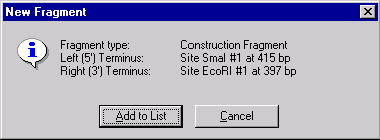
The New Fragment message box is displayed with the description of a selected fragment. Check the description of the fragment in the message box. If the description of the fragment is not correct, you can press the Cancel button and return back to the Fragment Wizard dialog. Otherwise, press the Add to List button. The first fragment is added to the Molecule Goal list.
5. Define the second fragment
Now let’s define the second fragment. Switch to the pBR322 Display window. Click once anywhere in the graphics pane and then Add Fragment to Molecule Goal List button (  ) to display the Fragment Wizard dialog. Move the dialog up or down so that you can see the EcoRI and the AvaI restriction sites on the graphical map of pBR322.
On the first screen, select the Construction Fragment option. Leave the Insert Inverted option unchecked and click the Next button to proceed.
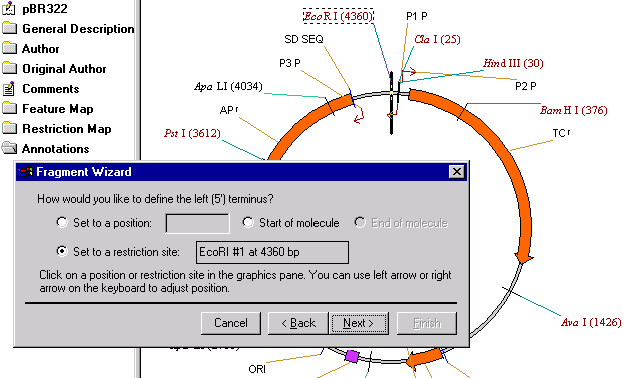
When on the second screen, click on the EcoRI restriction site label in the graphics pane. The Set to a Restriction Site option is automatically checked and the name and position of the restriction site is displayed. Click the Next button to proceed.
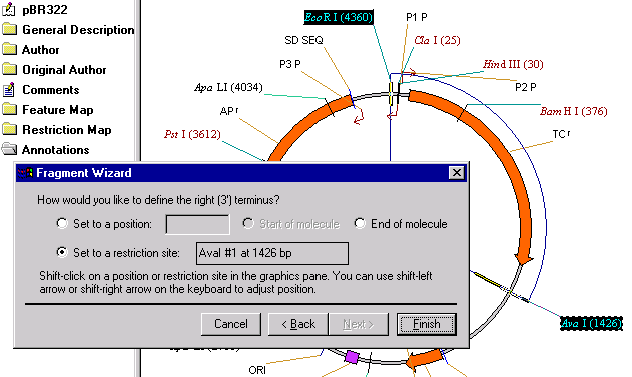
Now, hold down the shift key and click on the AvaI restriction site label in the graphics pane. The Set to a Restriction Site option is automatically checked and the name and position of the restriction site is displayed. Click the Finish button to complete the definition of a fragment.
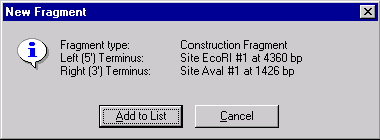
The New Fragment message box is displayed with the description of a selected fragment. Check the description of the fragment in the message box. If the description of the fragment is correct, press the Add to List button. The second fragment is added to the Molecule Goal list.
6. Inspect the Goal List
Now let’s check the Goal Molecule Definition List to make sure our fragments were properly included. Press the Molecule Goal List button (  ) in the main toolbar and the Construct/Design Molecule dialog box appears.
The Component Fragments section of the dialog box contains the Goal Molecule Definition List. The list consists of the two fragments we defined.
7. Enter general information about the new molecule
Click in the Name field and change the name of the new molecule from the default NEWMOL to TUTORIAL1.
Press the General Info button. In the General Data dialog box, you can specify general information about the new molecule.
Click in the Description field and type “Tutorial molecule #1”.
In the Extra-Chromosome Replication field, check “Bacteria”.
In the Replicon Type field, select “Plasmid”.
In the Key Words box, enter your last name in the text entry box and press the Add button to add your last name to the list of keywords for this molecule. This will give you a convenient way to find molecules you created—just search Vector NTI’s database for all molecules with your last name as a keyword.
Press OK to return to the Construct/Design dialog box.
Take a look at the radio buttons just above the Component Fragments section. These are the fields describing the choices for the new molecule start. The first molecule fragment in the list of component fragments is treated by Vector NTI as the fragment of “recipient” molecule. You can require the new molecule to look much as the recipient molecule looks, checking the Recipient’s Start button. Alternatively, you can choose any nucleotide of any component fragment as the starting coordinate of the new molecule, checking the Position … of Fragment # … button. By default, it’s the first nucleotide of the first fragment. Check the Recipient Start button to ask Vector NTI to make the start of the new molecule at the same place (if possible) where pUC19 starts.
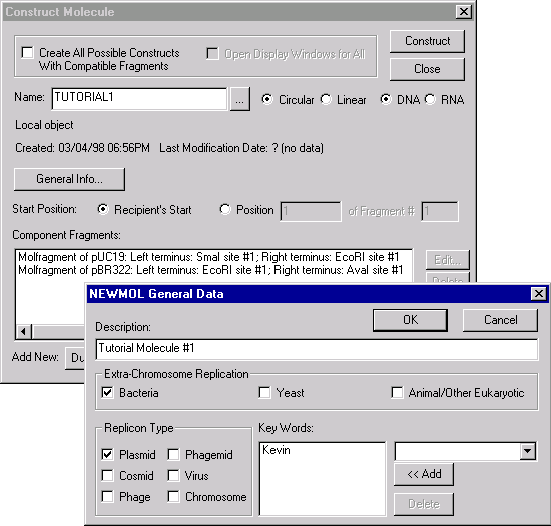
8. Attempt to construct the new molecule
Now press the Construct button in the upper right corner of the Construct/Design Molecule dialog. First, Vector NTI asks you to choose a subbase for the constructed molecule. Name your subbase “Tutorial” and confirm the creation of the subbase. Vector NTI will attempt to construct your new molecule and save it into the database. The system displays various messages as the save progresses. Vector NTI soon determines that the left end of fragment #1 (the SmaI site) is incompatible with the right end of fragment #2 (the AvaI site). A message appears stating that the ends are incompatible and that Vector NTI cannot completely process your molecule.
Since you are attempting construction, where you define all fragment termini yourself, you begin scratching your head to figure out why your fragments are incompatible and how to make them work with each other. As it turns out, your fragments are incompatible because the blunt 5’ end of the pUC19 fragment can’t link with the cohesive 3’ end of the pBR322 fragment. You will need to modify these termini to make them compatible.
Press OK in message dialog boxes to return to the Construct Molecule dialog.
9. Fill in the AvaI site of the pBR322 fragment to make it blunt
Look at the Component Fragments section and click on the second fragment in the list (“Molfragment of pBR322”). The Edit button lights up. Press it, and the Fragment Editor dialog box appears.
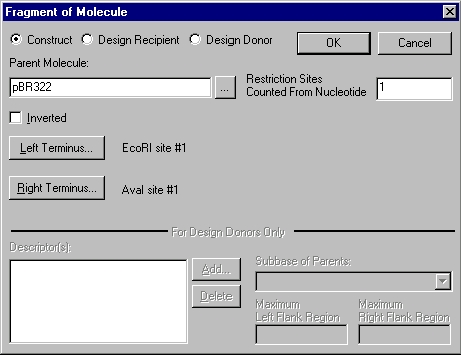
You need to modify the AvaI site which makes up this fragment’s right terminus. Click on the Right Terminus button, and the Terminus Editor dialog box appears.
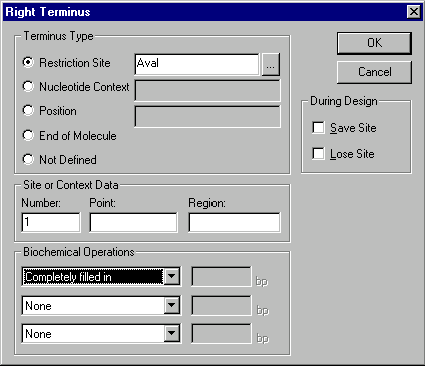
In the Terminus Editor you can set information pertaining to the ends of a fragment. You need to perform a biochemical operation on this terminus, so look in the Biochemical Operations section in the lower left corner of the dialog box.
Vector NTI can handle up to three sequential biochemical operations per terminus, but in this case you only need to perform one, filling in the cohesive AvaI site. Click in the first biochemical operations box, and a list of allowable operations appears. Choose Completely filled in.
Now press the OK button in the Terminus Editor and the OK button in the Fragment Editor. You will be returned to the Construct/Design Molecule dialog box. Press the Construct button. A dialog box appears asking for subbase name. Press OK to confirm that the “Tutorial” subbase should be used. Another dialog appears asking if it’s OK to overwrite the previously saved TUTORIAL1. Press the Overwrite button. Vector NTI analyzes your molecule and this time enters it into the database without complaint.
10. Inspect your new molecule
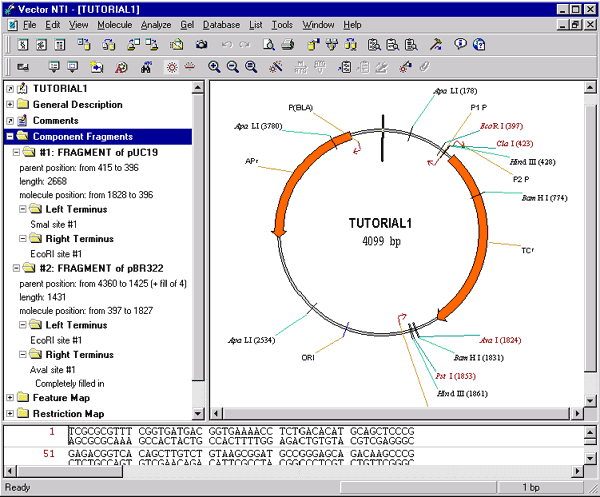
After creating the new molecule and saving it to the database, Vector NTI opens a new Molecule Display window containing the molecule you have created. Find TC(R) on TUTORIAL1’s graphical map. Note that we did not enter the molecule’s functional and restriction maps by hand—Vector NTI created them automatically. One of Vector NTI’s most powerful features is its ability to create the maps and nucleotide sequences for new molecules with complete accuracy, even in the most complicated cloning situations.
Look in TUTORIAL1’s text pane and you will see a folder called “Component Fragments”. Open this folder; the two fragments that you used to make this molecule are listed. Subfolders describe the left and right termini of each fragment.
Congratulations, you have created your first new molecule with Vector NTI!
You defined all of the necessary restriction sites and biochemical operations to clone a fragment from pBR322 into pUC19; this user-defined process is called construction. The remaining two Chapters of the Tutorial explore Vector NTI’s design capabilities, where the program itself determines how to create the goal molecule. In Chapter 8, you will perform the same cloning operation, moving TC(R) from pBR322 into pUC19, but instead of selecting restriction sites and biochemical operations yourself, you will leave the choices up to Vector NTI. Chapter 9 demonstrates more complicated molecule designs.
11. Close the Display windows and exit Vector NTI
You have finished your session with Vector NTI. Close the Molecule Display windows using the Close command option in the Molecule menu. Quit Vector NTI with the File menu’s Exit command (Windows) or Quit command (Macintosh).
This concludes Chapter 7 of the Vector NTI tutorial.
See Also:
Introduction
Chapter 14 -- Molecule Components and Construction
Chapter 15 -- Database Operations
Chapter 9 -- Advanced Molecule Design
Chapter 8 -- Molecule Design
Chapter 16 -- Molecule Design
Chapter 4 -- Tools and Internet Connectivity
Chapter 6 -- PCR Analysis
Chapter 10 -- Working With Gel Display windows
Back to Index