- Background
- Your Task: Edit a Molecule in the Molecule Display Window.
In this chapter you will learn how to use Molecule Display Windows to edit molecules’ feature map and sequence. Although in this chapter you will deal only with DNA molecules, all operations are applicable to protein molecules as well.
Your Task: Edit a Molecule in the Molecule Display Window.
Your task will be to create a Display window for pBR322 and edit its general data, feature map, and sequence.
Follow the steps in the order shown. Figures show what your screen should look like at various points along the way.
1. Launch Vector NTI
Launch Vector NTI by double-clicking its icon in the program group or folder in which you installed Vector NTI.
2. Open a Display window for pBR322
Activate the Database Explorer window and switch to the DNA/RNA molecules table. Select the DNA/RNA Molecules (MAIN) subbase and double-click on the pBR322 molecule. A display window opens in the workspace, containing pBR322’s text description, graphical feature and restriction maps, and sequence.
Maximize the Display window and arrange its panes conveniently.
3. Edit pBR322’s general data
In the text pane you may see the name of the molecule and its properties inside the General Description folder. Double-click on the pBR322 name in the text pane. Vector NTI displays the Edit Molecule Properties dialog:
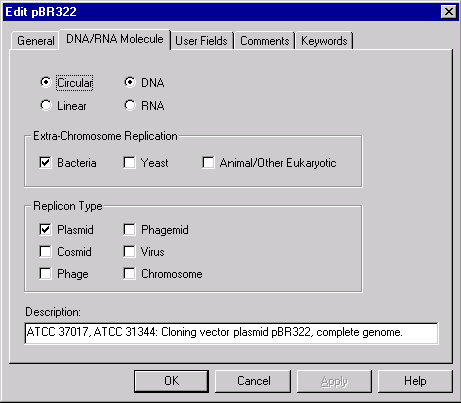
First, let’s add a keyword to the list of pBR322’s keywords. Choose the Keywords tab, enter “My own plasmid” in a keyword combo box and press the Add button. Now the keyword list contains two keywords: “ATCC” and “My own plasmid”. Switch to the DNA/RNA Molecule tab, change the description of the molecule to “My pBR322” and press the OK button. Vector NTI updates the text pane to show the new properties. Note that pBR322’s window is marked with an asterisk in a window title after the name of the molecule. This means that the molecule in a window is a modified version of pBR322 stored in the Vector NTI database.
Let’s save the modified pBR322 into the database under a new name. Select the Save To Database As command from the Molecule menu and enter “My pBR322” to the Molecule Name dialog. Press OK. Vector NTI stores the modified molecule under a new name and updates the display window. Note that the window title and both the text and graphics pane show the new name “My pBR322”. The Display window is no longer marked as modified because the displayed molecule is exactly the same as the database molecule “My pBR322”. You can open a Display window for pBR322 to make sure that the original molecule was not modified. To continue, close all extra Display windows except “My pBR322”.
4. Edit My pBR322’s sequence
Switch to the sequence pane and select the fragment 21 bp–40 bp using one of methods described in the previous chapter. Note that the selected sequence contains ClaI and HindIII sites.
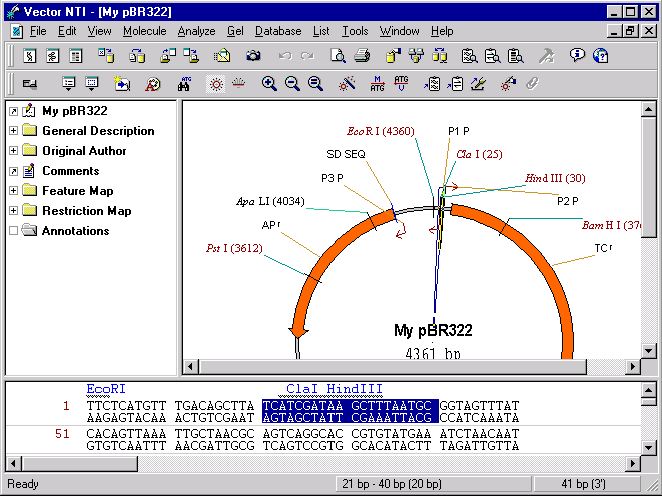
Choose the New4
Replace Sequence 21 bp–40 bp command from the Edit menu. The Replace Sequence dialog box appears. Use arrow keys to move the caret to the position before 26 bp (the current position is displayed on the bottom of the dialog). Press the Backspace (Windows) or Delete (Macintosh) key twice to delete C and T to the left. Type A twice so that the resulting sequence looks like TCAAAGATAAGCTTTAATGC. The status line on the bottom of the dialog displays “inserted 2, deleted 2” message.
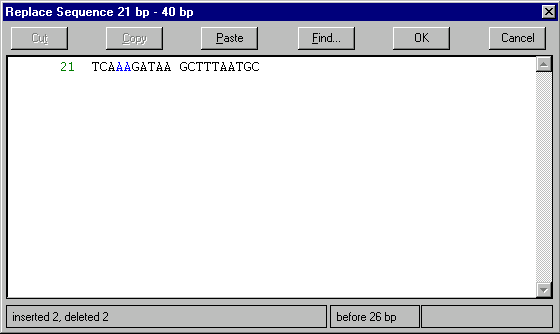
Press the OK button to finish editing of the fragment. Vector NTI updates the Display window and you can notice that the ClaI site on the modified fragment disappears.
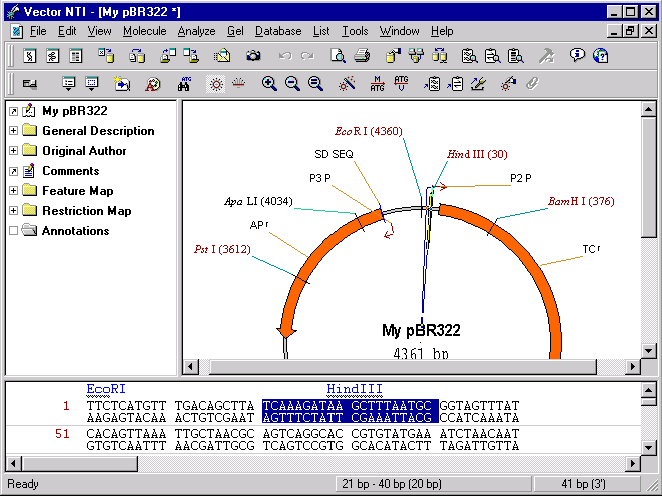
5. Revert to database version of My pBR322
Vector NTI marks the “My pBR322” molecule in Display window as modified because it differs from the version of “My pBR322” currently saved in the database. To return to the database version choose Revert To Saved In Database command from the Molecule menu and press OK in the confirmation dialog box. The molecule in the Display window returns to its database state and the window is no longer marked as modified (there is no asterisk after molecule’s name in a window title bar). Notice that ClaI site returned to its place in the original sequence.
6. Insert a new sequence fragment
In general, editing a molecule sequence usually requires adjustment of its feature map. In this step we will insert a new sequence fragment into our molecule and look at the resulting feature map. Before you start, notice that the current AP(R) signal is at 3293 bp–4156 bp and TC(R) is at 86 bp–1276 bp. To see the position of the feature, place the mouse cursor over the feature or its label in a graphics pane and do not move cursor for a short period of time. Soon the message appears on the screen displaying the name and position of the feature under the cursor.
Place the caret to 200 bp using the mouse, arrow keys, or Set Caret Position command from the Edit menu. Choose the New4
Insert Sequence at 200 bp command from the Edit menu. The Insert Sequence dialog box appears. Type in ten Ts (the number of nucleotides you entered is shown at the bottom of the dialog box). Press the OK button to insert the sequence you entered.
Vector NTI figures out that the modification you made requires an adjustment in the feature map. The dialog box appears with the message “CDS TC(R) is affected by sequence editing” and buttons Delete, Delete All, Keep, and Keep All. Press the Keep button to leave the feature in a feature map. Now place the mouse cursor over AP(R) again to determine its position. You will notice that AP(R) has been moved 10 nucleotides clockwise and is now positioned at 3303 bp–4166 bp.
Vector NTI automatically moves all features located after the insertion but it does not move any features before insertion. If the insertion point is inside a feature and you decided to keep the feature, Vector NTI automatically moves only the 3’ end of the feature. You can look at the TC(R) signal and see that its 3’ end position was changed to 1286 bp.
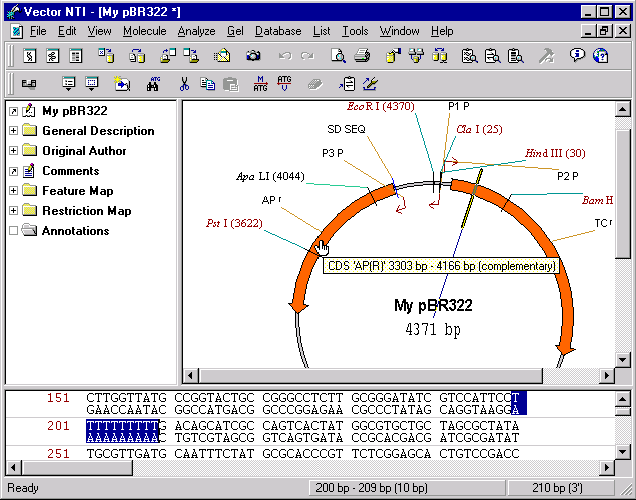
You will probably need to manually adjust positions of any feature overlapping with the insertion region if you decided to leave them in the feature map. In the next steps you will learn how to modify the feature map.
7. Edit the TC(R) signal
Double-click on the TC(R) signal or its name in the graphics pane (Vector NTI helps to indicate the positions of the features by turning the mouse cursor to a hand over features and their names). Alternatively, you can click on the signal once and choose Feature Properties command from the Edit menu or choose Feature Properties from TC(R)’s shortcut menu. To display a shortcut menu for any object in a Vector NTI Display window, click on it with the right button (Windows) or hold down the command key and click (Macintosh). Vector NTI displays a popup menu containing commands related to the item to which you are pointing. When the shortcut menu appears, you can choose a command by clicking a command name (Windows) or dragging to a command name (Macintosh).
The Molecule Feature dialog appears. In this dialog you can change the name, type or description of the feature as well as its position on the molecule. Change the name of the signal to “Old TC(R)” and its description to “10 bp fragment inserted”. Press the OK button. Vector NTI updates the Display window to show the new name of the signal.
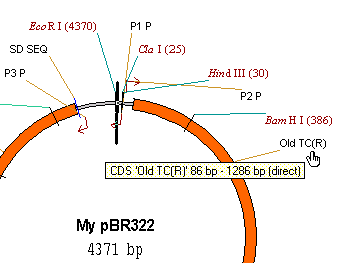
8. Delete the P2_P signal and add a new signal
Vector NTI allows you to easily add and delete features in a feature map. To delete the P2_P promoter from the feature map, select it in a graphics pane and choose the Delete Feature From FMap command from the Edit menu. Alternatively, you can select P2_P and choose Delete Feature From FMap from the shortcut menu. Press the OK button in the confirmation dialog. P2_P is deleted from the feature map and disappears from the Display window.
Let’s add a new feature to the feature map of My pBR322. First, select a region 3000bp–3500 bp and press the Add Feature button (  )on the Window toolbar. Alternatively, you can choose the New4
Add Feature to FMap from the Edit menu. Again, the Molecule Feature dialog box appears. When the dialog appears, Vector NTI puts the currently selected region into the From and To fields. By default, Vector NTI assigns the “Misc. Feature” type to new DNA/RNA features, but you may change the type to any other type in the Feature Type panel. Name the new feature “New Feature” and press the OK button. The new feature appears in the text and graphics panes of the Display window.
To save modified My pBR322 into the database, choose the Save to Database command from the Molecule menu. Vector NTI asks permission to overwrite the version of My pBR322 currently stored in the database. Press the OK button. The modified version is stored in the database.
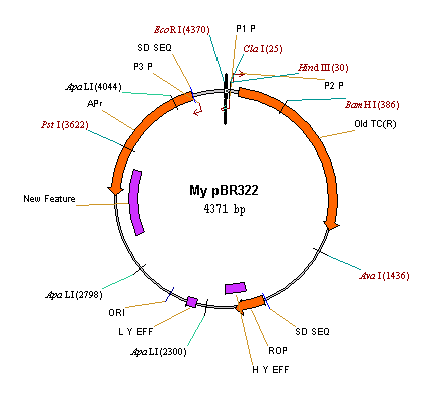
9. Change the starting coordinate of My pBR322
Vector NTI ’s Molecule menu contains the operations that can be performed on a molecule as a whole. Let’s try to change the starting coordinate of My pBR322 so that all features after the inserted fragment would have the same coordinates they had in the original pBR322 molecule. Choose the Advanced (DNA/RNA)4
Change Starting Coordinate command from the Molecule menu. A dialog box shows up where you can enter a new starting coordinate. Since the length of the inserted fragment was 10 bp, the new starting coordinate should be 1 bp + 10 bp = 11 bp. Enter 11 into the New Start field and press the OK button. Press OK in the confirmation dialog. Vector NTI recalculates the feature map and updates the Display window. Now you can make sure that the new coordinates of AP(R) feature are the same as in the pBR322: 3293 bp–4156 bp and “Old TC(R)” is now at 76bp–1276bp.
Notice that the Display window is not marked as modified. For all commands from the Molecule menu Vector NTI always operates on the molecule in the database and updates the Display window if required. If a molecule in a Display window was modified but not saved at the time you choose a command, Vector NTI asks you to save the modified molecule into the database and then repeat the command.
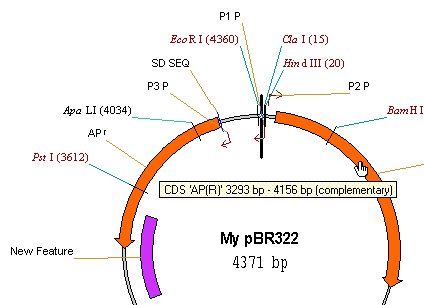
10. Close the Display window and exit Vector NTI
You have finished your session with Vector NTI. Close the Molecule Display window using the Close command option in the Molecule menu. Quit Vector NTI with the File menu’s Exit command (Windows) or Quit command (Macintosh).
This concludes Chapter 2 of the Vector NTI tutorial. You have begun working with Molecule Display windows, and have edited a feature map, the nucleotide sequence, and the general description of the pBR322 molecule
See Also:
Introduction
Chapter 4 -- Tools and Internet Connectivity
Chapter 5 -- Database Explorer
Chapter 11 -- Display Windows and User Interface
Chapter 15 -- Database Operations
Chapter 17 -- Vector NTI Tools
Chapter 14 -- Molecule Components and Construction
Back to Index