- Background
- Your Task: Manipulating Database Contents
In this chapter you will learn more about Vector NTIs Database Explorer, a simple and flexible interface for manipulating various kinds of objects in the Vector NTI database.
Your Task: Manipulating Database Contents
Your task will be to open the Database Explorer window and manipulate the contents of the database, including switching between tables, selecting objects, creating subbases and adding User-defined fields to database objects.
Follow the steps in the order shown. Figures show what your screen should look like at various points along the way.
1. Launch Vector NTI
Launch Vector NTI by double-clicking its icon in the program group or folder in which you installed Vector NTI. The Database Explorer window appears, showing the contents of the DNA/RNA or Proteins table.
2. Inspect the Database Explorer window
Vector NTI Database Explorer windows display the contents of the local and shared databases. Vector NTI databases (both local and shared) consist of several tables: the Molecule Table, the Enzyme table, etc. Each table contains zero or more database objects or items of the appropriate type. The Explorer window displays the contents of one table at a time. You may switch between tables by selecting a table from the Table menu or Table combo box in the top left corner of the Explorer window. Each window has two panes, one for subbases (named subsets of database objects), another for objects themselves.
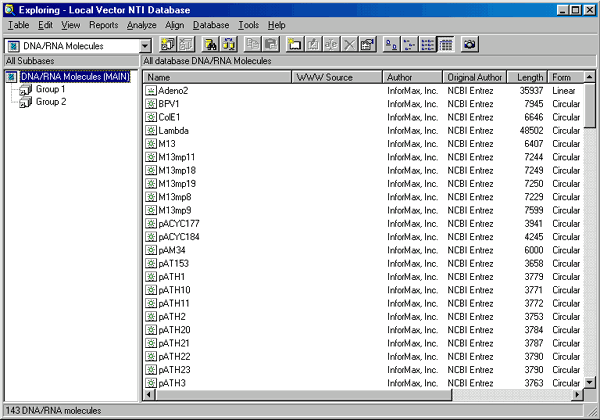
The Vector NTI Database Explorer window has a single toolbar containing the most frequently used commands.

3. Switch to Proteins table
Click on the Database Table combo box arrow and select the Protein Molecules table. Database Explorer now displays the list of subbases in the subbase pane and the list of protein molecules in the right pane. The subbase pane initially contains only one subbase called Protein Molecules (MAIN). This subbase is maintained by the system and contains all the protein molecules in the database. We will create our own subbases in step 5.
4. Experiment with View Options
Pull down the View menu and take look at the available options. Vector NTI Database Explorer has the same set of View modes as the standard Windows 95/98/NT Explorer. You can view your molecules as large or small icons, compact list and a tabular form with columns showing various object properties (so called details mode). You can also sort the object list in ascending or descending order by any of the properties selected for display in the details mode.
Initially, Database Explorer shows proteins in the details mode. Click on each of four mode buttons to see what the list looks like in each mode and then switch back to the details mode.
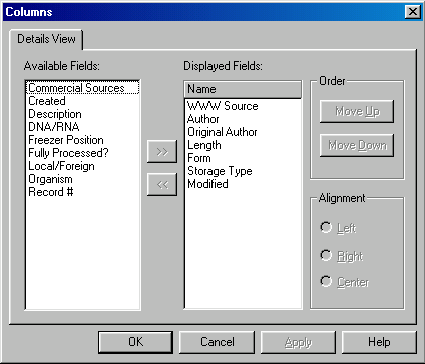
The set and order of columns in the details mode can be changed at any time. Call up a shortcut menu for any of the column headers (you need to right-click for Windows or command-click for Macintosh). Choose the Columns command. Vector NTI displays the Columns dialog allowing you to modify the list of visible columns.
Select the Modified column name in the Displayed Fields list and click the << button to remove this field from the list. Select the Local/Foreign column name in the Available Fields list and click the >> button. The Local/Foreign column is now added to the Displayed Fields list and selected. Press the Move Up button five times to move the Local/Foreign column just below the Length column (it will be displayed to the right of the Length column). Click the OK button.
Vector NTI redraws the Database Explorers object pane. Now you can see the Local/Foreign column to the right of the Length column. At this time it shows that most protein molecules are marked as Foreign (they were not created or modified by this Vector NTI installation). Adjust the widths of the column to your liking by dragging small lines separating column headers.
Vector NTI allows you to sort objects using the Arrange Icons submenu of the View menu or, if you are in the details mode, by clicking on the column headers. Click on the Length column header several times to watch the Database Explorer sorting the molecules by length. As you may have expected, each click in the header reverses the direction of the sort.
5. Experiment with Selection and Menus
The Database Explorer window combines several standard selection techniques: you may select multiple objects by shift-click (continuous selection), control-click (disjoint selection) or by wireframe selection (press the mouse button somewhere outside item names / icons and drag the selection rectangle). You may also invert the current selection using the Invert Selection command from the Edit menu.
Database Explorers menus have several commands that work with selected objects; these commands are disabled when nothing is selected. Some selection-oriented commands are also grouped into the shortcut menu available by right-click on Windows and command-click on Macintosh.
Click on the Name column header to sort the list by name in alphabetic order. Select the 41BB_HUMAN and 41BB_MOUSE molecules and press the New Subbase button on the toolbar. Vector NTI creates a new subbase called Group 1 and activates its name for in-place editing in the subbase pane. Name the new subbase 41BB and press enter (return on Macintosh). Your subbase is renamed.
You can rename both subbases and database objects this way: click on the name of the item you want to rename to select it, then wait a second and click on the same name once more. Clicking two times consecutively is interpreted as double-click, but if you wait momentarily before the second click, Vector NTI interprets this as an in-place editing request and shows a small edit box on top of the item name allowing you to edit the name.
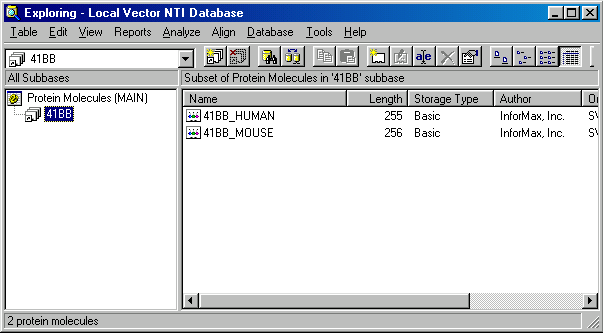
Switch back to the MAIN subbase by clicking on it in the subbase pane. Database explorer shows the entire list of database proteins again.
Note Vector NTIs subbases differ from the file systems folders in their basic functionality: subbases do not prevent you from having one object in more than one subbase (which is basically just a set of objects) while folders require you to make a copy of an object to put it somewhere else. You may notice, that the 41BB_HUMAN and 41BB_MOUSE molecules were not moved out of the MAIN subbase, you just created another group based on some criteria.
You can easily add objects to subbases by drag-drop operations within the Database Explorer window. Other subbase operations are available from the Table menu or from the subbase shortcut menu. Call up the shortcut menu for 41BB and take a brief look at the available commands:
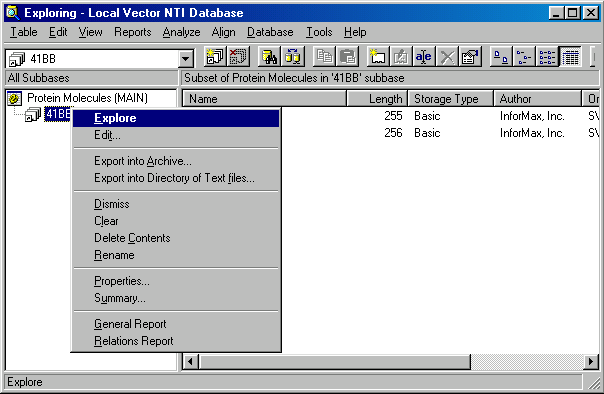
The contents of the subbase can be exported into the Vector NTI archive or a directory of text files (GenBank for DNA/RNA molecules and GenPept for proteins). You may Clear the subbase (exclude all items from it) or Dismiss the subbase (exclude all items from it and then remove the subbase itself ). These two operations do not change the content of the database (molecules themselves). They just change the grouping used to simplify browsing the content. You may also use the Delete Contents command to delete the actual objects grouped into the subbase from the database (since the objects will no longer be stored in the database, they will also disappear from all subbases where they were listed).
Vector NTI can also prepare a text description of all the objects in the subbase. If you invoke the Summary command from the shortcut menu of subbase 41BB, Vector NTI will save the following information into a text file of your choice:
***** Vector NTI Database Summary (Proteins) 02/03/98 18:31:11
Subbase 41BB: 2 proteins(s) total
41BB_HUMAN: 255 AA Basic
4-1BB LIGAND RECEPTOR PRECURSOR (T-CELL ANTIGEN 4-1BB HOMOLOG) (T-CELL ANTIGEN ILA) (CD137 ANTIGEN).
Foreign object. Author: InforMax, Inc.. Original author: SWISS-PROT
Created: 01/01/96 12:00PM Last Modified: 01/13/98 04:01PM
41BB_MOUSE: 256 AA Basic
4-1BB LIGAND RECEPTOR PRECURSOR (T-CELL ANTIGEN 4-1BB).
Foreign object. Author: InforMax, Inc.. Original author: SWISS-PROT
Created: 01/01/96 12:00PM Last Modified: 01/13/98 04:01PM
6. Examine Vector NTIs Contact Manager
To simplify tracking of database objects, Vector NTI maintains a Contact List which you can use to store contact information. This list is automatically updated when you import molecules or proteins created by your colleagues. You may enter any suitable information about yourself and this information will be attached to your molecules and will be automatically added to the contact list of those colleagues who import your molecules. The Contact Manager is a tool for creating, updating, deleting and organizing contact records.
To launch the Contact Manager, choose the corresponding command from the Database Explorers Database menu. The Contact Manager dialog box appears:
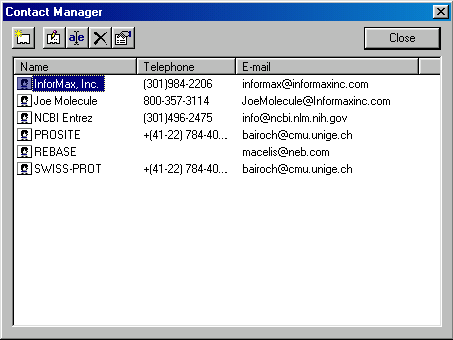
The Contact Manager dialog box displays a list of all stored contact records. There are five operation buttons in the upper left corner of the Contact Manager allowing you to perform various operations on the contact records, including Add New, Edit, Rename and Delete.
7. Examine Vector NTIs User Field Manager
Many researchers use Vector NTI as a major tool for storing and managing their laboratory data. In order to generalize the Vector NTI database and make it suitable for a wider range of information management functions, Vector NTI allows you to associate User Fields with any database object (molecules, oligos, etc.). A User Field may contain any laboratory-specific and user-specific information necessary to provide an appropriate description of the object. User Fields can be imported, exported, displayed, printed and managed just as the regular database fields.
Vector NTI maintains a local list of descriptions of known User Fields that are presented to the user when he or she creates new database objects. This list can be viewed and modified using the User Field Manager.
Choose the User Field Manager command from the Database Explorers Database menu. The User Fields Manager dialog is displayed:

This dialog allows you to define new User Fields and perform global operations on user fields. It also has Edit, Rename, Delete commands working on field definitions as well as Import / Export facilities. Importing and exporting allows you to exchange your list of field definitions with your colleagues.
Note Vector NTI stores field definitions together with field values in database objects and retains this information when it exports database objects. When you import those objects into another database, Vector NTI will help you to add the definitions of the fields to the local User Field definitions list.
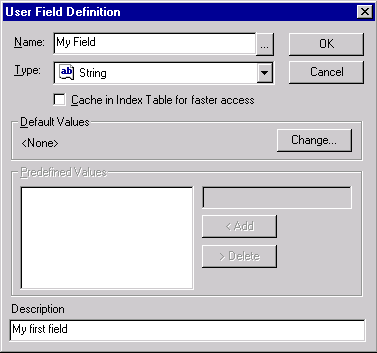
8. Define new User Field
Click on the New button in the User Field Manager dialog. The User Field Definition dialog appears allowing you to describe a new field.
Enter My Field into the Name box, leave String as its type and type in some description into the Description field. Do not check the Cache in index table box (caching increases access speed but slows down adding/deleting of field values ).
Press the OK button. Your field description is added to the list and now you can start assigning values of this type to various database objects.
Lets define this field in all proteins listed in the 41BB subbase we recently created. Select My Field in the field definitions list and browse the database content tree to find and select the 41BB subbase (you need to open the Protein Molecules branch first). When both field definition and subbase are selected, press the Set My Field in button. Vector NTI prompts you to enter the field value string. Enter My Value and press OK. Vector NTI displays a confirmation dialog describing the operation (it should say You are about to insert a specified value of My Field in all proteins of subbase 41BB and overwrite existing values of My Field). Press OK.
Vector NTI performs the operation and returns you back to the User Field Manager dialog. Press Close to close the dialog.
9. View the new User Field in Database Explorer
Lets customize the Database Explorer view of proteins to show our new field. First, make sure that you are looking at the proteins table in the Details mode. If this is not the case, adjust the Database Explorer window.
Click on the columns header to call up the shortcut menu and choose the Columns command. The Columns dialog appears. Now you can see that the My Field name is listed in the Available Fields box. Select it and press the >> button to add it to the Displayed Fields box. Press the Move Up button to put it just below the Length field (it will be displayed in the next column to the right). Press the OK button. You may also choose how you would like the field adjusted in terms of margin.
Vector NTI updates the Database Explorer to display the new field as a column in the list pane. Select the 41BB subbase. As you may have expected, both protein molecules have My Value in the My Field column. Select the MAIN subbase and scroll the molecule list down until you see both molecules with My Value text in the new column. Click on the column header to sort by My Field in ascending and descending order.
You may notice that sorting by My Field column takes longer than sorting by other columns like Length. This is because unlike the Length field, which is cached in index tables, My Field is not cached and thus is slower to access. Caching requires extra memory, but it usually makes sense to turn it on for fields which are displayed as columns in the list pane.
To turn on caching of My Field, call up the User Field Manager dialog using the User Field Manager command from the Database menu, double-click on the My Field definition to edit it, check the Cache In Index Table box and press OK. Vector NTI asks for confirmation and, after you allow it to continue, rescans the database and rebuilds the database indices. Close the User Field Manager dialog and try to sort the proteins by clicking on the My Field column header. Sorting should work faster now.
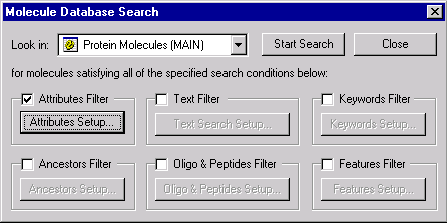
10. Search the Database
The Database Explorer has a sophisticated searching capability. You may search by different criteria and logically combine search results.
Lets try to find all proteins having the My substring in the value of My Field and also having at least one Transmembrane Region. While in the Protein molecule database, press the Search button on the Database Explorers toolbar. The Search dialog box appears:
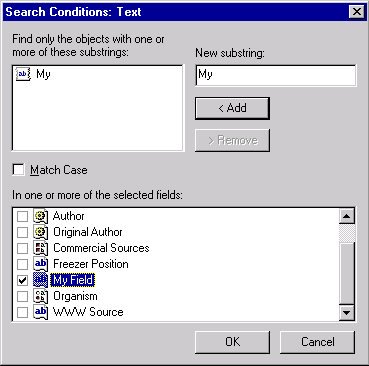
Check the Text filter and press the Text Search Setup button to set up the filters parameters. Type My in the New Substring field and press << Add to add it to the substring list box. Click on the My Field name in the fields list to select it.
Press OK to close the Text Filter setup. Check the Features Filter and press the Features Setup button. In the Features Setup dialog press the << Add button. The Add Features dialog appears allowing you to choose the feature for which to search. Browse the feature tree to find the Transmembrane Region feature type (look in Protein Features/Protein Functional Features/Domains) and click on the Transmembrane Region item to select it.
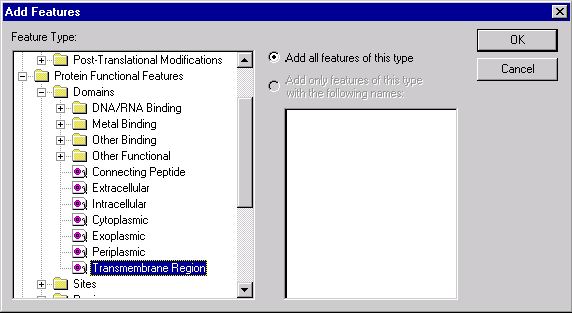
Press OK to close the Add Features dialog. Now the Any Transmembrane Region item is listed in the Features Setup dialog. Press OK to close the Features Setup dialog and return to the Search dialog.
Make sure that all filters but Text Filter and Feature Filter are unchecked and that Protein Molecules (MAIN) subbase is selected in the Look in combo box. Press the Start Search button.
Vector NTI scans the entire protein table and then displays the Insert Search Results dialog allowing you to select a subbase to put the search results in. The default subbase name is Search Results. Press OK to accept the default name and confirm the creation of the new subbase when Vector NTI asks for confirmation.
When the search results are placed in the Search Results subbase, Vector NTI informs you about the number of items in the result set, but the Search dialog is not closed (you may want to refine your search using the result set as an input set of a next search). Press the Close button to close the Search dialog.
You may see that both of 41BB molecules were found. Select both of them and choose the Open command from the Protein menu to open the molecules in Display windows. You may see that both molecules contain a transmembrane region and that their text panes contain the User fields folder. You may open these folders and see the My Field: My Value pair inside.
11. Close the Molecule Display windows and exit Vector NTI
You have now taken a close look at Vector NTIs Database Explorer capabilities. Close all Display windows using the Close command in the Molecule menu, and then quit the program with the File menus Exit command (Windows) or Quit command (Macintosh).
See Also:
Chapter 1 -- Display Windows
Chapter 11 -- Display Windows and User Interface
Chapter 12 -- Gel Display Windows
Chapter 15 -- Database Operations
Introduction
Chapter 2 -- Molecule Operations
Chapter 4 -- Tools and Internet Connectivity
Chapter 17 -- Vector NTI Tools
Back to Index
