|
|
|

|
Click |
To |
|
|
|
|
|
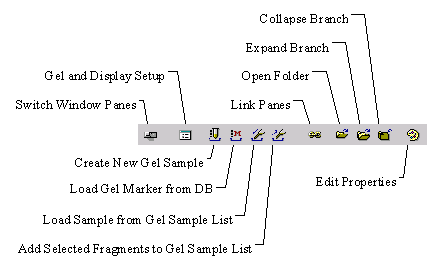
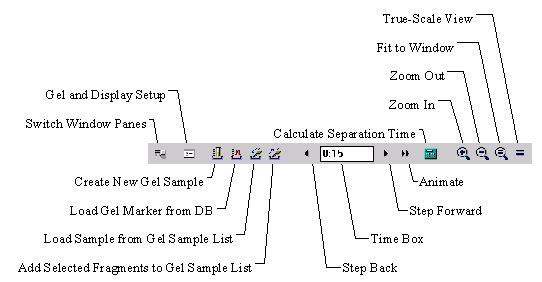
Change the active Display window parameters. |
|
|
Create a gel sample and display it in a new lane. |
|
|
Add a new gel marker to database and to new lane. |
|
|
Load fragments from the Gel Sample List into a new lane. |
|
|
Step gel run back one time increment. |
|
|
Display/modify the electrophoresis run time. |
|
|
Step gel run forward one time increment. |
|
|
Start/stop animation of gel run. |
|
|
Calculate fragment separation time. |
|
|
Scale the gel to 150% of current magnification. |
|
|
Scale the gel to 50% of current magnification. |
|
|
Scale the gel to fit to pane window. |
|
|
Approximate true-scale view of the gel. |
Gel Samples and Gel Markers
In Vector NTI, gels can contain two types of data: gel samples, and gel markers. Gel samples are sets of fragments ready to be analyzed in a Gel Display window or saved as a gel marker. Gel samples are not stored in the Vector NTI database but are created on the spot for short-term use. If a gel sample is saved to the database, it becomes a gel marker.
Gel markers are sets of fragments of known lengths used as yardsticks for measuring migration speed. Gel markers are stored and loaded from the Vector NTI database.
Creating a gel sample and adding it to a gel
To create a gel sample, press the Create Sample button ( ![]() ) on the Window toolbar or choose the Create Gel Sample command from the Gel menu. The Create Gel Sample dialog box appears:
) on the Window toolbar or choose the Create Gel Sample command from the Gel menu. The Create Gel Sample dialog box appears:
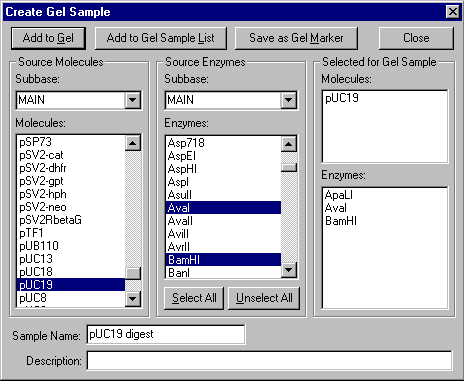
Create a gel sample by cutting one or more DNA molecules with one or more restriction endonucleases.
In the left column, select a DNA/RNA Molecules subbase and one or more molecules from that subbase.
In the middle column, select an REN subbase and one or more enzymes from that subbase.
The right column of the dialog box shows molecules and enzymes currently selected for creating the sample. To remove a molecule or enzyme from the Selected for Gel Sample column, deselect it in the source column or double-click on its name in the Selected for Gel Sample column.
If you wish, you may use the Sample Name and Description boxes to enter a name and/or description for the sample you are creating.
When the gel sample is defined as you desire, you are ready to use one of the action buttons at the top of the dialog box.
Press the Add to Gel button to add the sample to the active Gel Display window. If there is no active Gel Display window, this button is disabled.
Press the Add to Gel Sample List button to add the sample to the Gel Sample List (described below).
Press the Save as Gel Marker button to save the sample as a gel marker. If you press this button, the New Gel Marker dialog box appears.
When the New Gel Marker dialog box is displayed, the General page of the dialog is active, allowing you to enter a name for the new marker. When the name is entered, you can switch to the Gel Marker page.
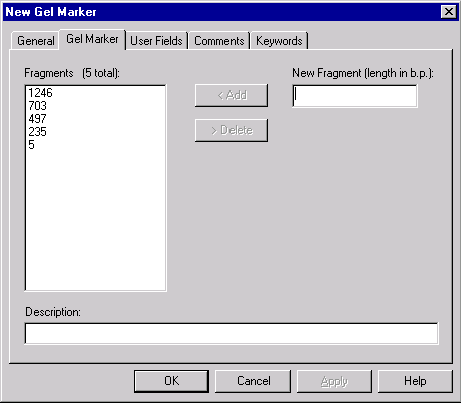
On this page the Fragments list box lists by length, all fragments making up the current sample. To add a fragment to the sample, enter its length in bp in the New Fragment box and press the Add button. The fragment is added to the list and the total number of fragments in the sample is increased by one. To remove a fragment from the sample, select it in the Fragments box and press the Delete button.
On the Gel Marker page you may also edit the samples description, shown in the box at the bottom of the dialog box. The User Fields, Comments, and Keywords pages are the same as for other kinds of database objects; they are described in the previous chapter.
When you are ready, press the OK button to create a new gel marker with the specified information.
The Gel Display windows text pane
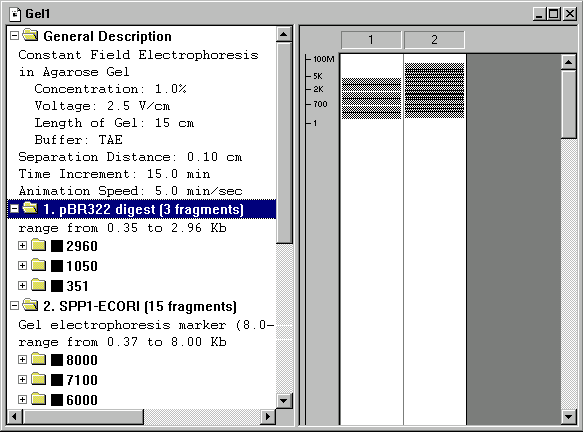
The Gel Display windows text pane contains one or more folders as described below. The folders can be opened, closed, expanded, collapsed, etc. as described in the chapter on Molecule Display windows.
The Gel Display window text pane always has a General Description folder, containing data about the gel itself, including electrophoresis type, gel concentration, voltage, gel length, and buffer type. The folder also shows the separation distance, time increment, and animation speed for this gel.
If at least one lane of a gel is occupied, the text pane will contain a folder for each occupied lane. Each lane folder contains a line giving the length range of the fragments in the lane, a description of the contents of that lane, plus a subfolder for each fragment found in the lane. The subfolders are labeled by fragment length. The subfolders are empty for gel markers. For samples created and not yet saved, the subfolders contain a description of the source of the fragment, for example, Source: ColE1; HaeII(5419) - HaeII(1012)".
Setting the display color and pattern of a fragment
You can use the text pane to set the color and pattern with which a fragment will be displayed in the gel pane.
To set a fragments display color, select the fragments folder in the text pane and press the right mouse button (Windows) or hold down command key and press the mouse button (Macintosh). A shortcut menu appears. Choose the Sample Fragment Properties command. The Format Sample Fragment dialog box appears. Choose the pattern and color you want used for the fragment, and click OK. The fragment is displayed in the gel pane with the appropriate pattern and color.
You can also call up the Format Sample Fragment dialog box by selecting the fragments folder and pressing the Edit Properties button ( ![]() ) in the Window toolbar, by pressing the alt+enter (Windows) or command+i (Macintosh) key combination or by choosing the Sample Fragment Properties command from the Edit menu.
) in the Window toolbar, by pressing the alt+enter (Windows) or command+i (Macintosh) key combination or by choosing the Sample Fragment Properties command from the Edit menu.
The Gel Display windows gel pane
The Gel Display windows gel pane displays a simulated gel. The lanes of the gel run vertically in the gel pane. Each lane has a rectangle at the top of the gel, showing the lanes number. These rectangles are called wells. A size scale runs down the left side of the gel pane, showing fragment sizes in bp.
Step Forward, Step Back, and Animation
The Time box on the Display window toolbar ( ![]() ) shows the time the gel has been running, in the form hours:minutes. To set a new time, click into this box to activate it, enter the new time and press enter (Windows) or return (Macintosh).
) shows the time the gel has been running, in the form hours:minutes. To set a new time, click into this box to activate it, enter the new time and press enter (Windows) or return (Macintosh).
The Step Forward ( ![]() ) and Step Back (
) and Step Back ( ![]() ) buttons advance and rewind the gel one increment of time whenever they are clicked.
) buttons advance and rewind the gel one increment of time whenever they are clicked.
The Animation button ( ![]() ) starts the gel running continuously; to stop the animation, press the Animation button again or the Step Forward or Step Back buttons.
) starts the gel running continuously; to stop the animation, press the Animation button again or the Step Forward or Step Back buttons.
The time increment and the animation speed are set in the Gel Display window Setup dialog box.
Selecting fragments
You can select fragments in the gel pane by moving the mouse cursor directly above or below the fragments to be selected and dragging across them. A highlighted selection zone will appear; all fragments within it are selected.
There are two reasons for selecting fragments:
Selected fragments can be copied to the Gel Sample List, and
If the selected fragments are too close to distinguish (closer to each other than the separation distance), you can calculate how long the gel would have to run to separate them.
Copying fragments to the Gel Sample List and calculating separation times are described below.
Zooming in and zooming out
The gel pane has four buttons for magnifying and reducing the display:
Press the Zoom In button ( ![]() ) to magnify the display by 150%.
) to magnify the display by 150%.
Press the Zoom Out button ( ![]() ) to reduce the display by 50%.
) to reduce the display by 50%.
Press the Fit to Window button ( ![]() ) to fit the entire gel display within the current window.
) to fit the entire gel display within the current window.
Press the True Scale button ( ![]() ) to display the gel in an approximation of true scale. When you select this display option, Vector NTI looks up the pixel size (dot pitch) of your monitor and displays the gel based on that value.
) to display the gel in an approximation of true scale. When you select this display option, Vector NTI looks up the pixel size (dot pitch) of your monitor and displays the gel based on that value.
The separation distance
When the gel pane has been zoomed in several times, gray bars will appear around each fragment. These are separation distances. They indicate the minimum distance by which fragments must be separated in order to be distinguishable.
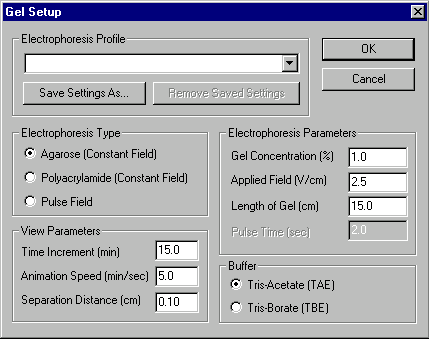
You can set the separation distance in the Gel Setup dialog box.
Calculating separation times
Vector NTI can calculate separation times for fragments too close together to distinguish. To calculate a separation time, select any number of fragments, at least two of whose gray bars are touching.
Then press the Calculate Separation Time button ( ![]() ) on the Window toolbar or choose the Calculate Separation Time option from the Analyze menu. Vector NTI will inform you of the minimum time necessary to separate the selected fragments. The gel running time will then be set to that value.
) on the Window toolbar or choose the Calculate Separation Time option from the Analyze menu. Vector NTI will inform you of the minimum time necessary to separate the selected fragments. The gel running time will then be set to that value.
Vector NTI will prompt you if any one of the selected fragments would reach the end of the gel before all selected fragments have separated.
Lanes
A Gel Display window can contain any number of lanes. You can change the display width for lanes, change their order or delete them from the Display window, and select all of a lanes fragments at once.
At the top of each lane in the gel pane is a rectangle containing the lanes number. This rectangle is called the well. You can select a lane by clicking on its well.
To change the lane width, move the mouse cursor to the edge of any lanes well. The cursor will change to a double-ended arrow ( ![]() ). The cursor will not change at the left edge of the well of Lane 1. Drag the mouse left or right to change the width. All of a gels lanes are displayed with the same width, so if you change the width of one lane, all of the lanes will change as well.
). The cursor will not change at the left edge of the well of Lane 1. Drag the mouse left or right to change the width. All of a gels lanes are displayed with the same width, so if you change the width of one lane, all of the lanes will change as well.
To perform other operations on lanes, place the mouse cursor within the lanes well and press the right mouse button (Windows) or hold down the command key and press the mouse button (Macintosh). A shortcut menu will appear, showing various commands.
To move a lane one slot to the left, choose the Move Left command from the shortcut menu. You can also move a lane left by selecting it (click on the well) and choosing the Move4 Move Left command from the Edit menu.
To move a lane one slot to the right, choose the Move Right command from the shortcut menu. You can also move a lane right by selecting it (click on the well) and choosing the Move4 Move Right command from the Edit menu.
To delete a lane, choose the Delete command from the shortcut menu. You can also delete a lane by selecting it (click on the well) and choosing the Delete Lane command from the Edit menu.
The shortcut menu also contains a Select All command. This selects all fragments in the lane.
The shortcut menu also contains an Add to Gel Sample List command. This adds all selected fragments to the Gel Sample List.
Using the Camera to copy Gel Display window information to the clipboard or to a file
You can copy information from a Gel Display window to the Clipboard or a file with Vector NTIs Camera feature. If called up from a Gel Display window text pane, the Camera works the same as for Molecule and Sequence Display window text panes, i.e., it can copy either the whole text pane or text selected within the pane. If called up from a Gel Display window graphics pane, the Camera functions as follows:
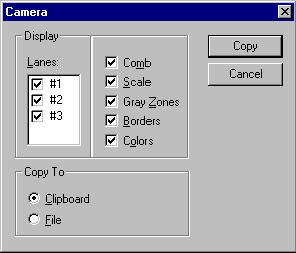
The Camera options allow you to specify the data to be copied from the active gel pane, and the destination:
Display
Specify the data you want to copy. You can select one or more options:
|
Option |
Effect |
|
Include selected lanes. |
|
|
Include lane numbers (above selected lanes). |
|
|
Include scale (to the left of selected lanes). |
|
|
Include separation thresholds (gray rectangles around fragments). |
|
|
Include borders between lanes |
|
|
Use fragment colors |
Copy To
Specify the destination of the copy operation. If you select the File option, Vector NTI displays the Copy To dialog box so you can specify the name and format of the output file. Copying data to the clipboard replaces any existing clipboard contents.
The Camera sends Gel Display window graphics pane information to the clipboard or to a file in Windows Metafile format (Windows) or in PICT format (Macintosh).
The Gel Sample List
The Gel Sample List is a data clipboard for mixing gel sample fragments taken from various sources within Vector NTI.
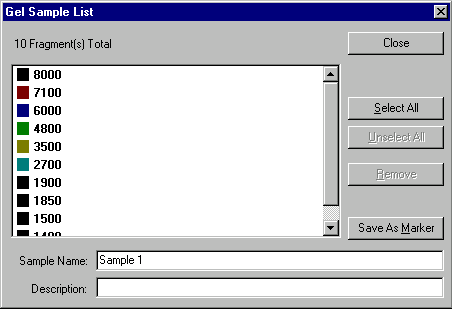
Viewing the Gel Sample List
You can call up the Gel Sample List at any time by pressing the Show Gel Sample List button ( ![]() ) on the main toolbar or by choosing the Show Gel Sample List option from the Lists menu. The Gel Sample List dialog box appears.
) on the main toolbar or by choosing the Show Gel Sample List option from the Lists menu. The Gel Sample List dialog box appears.
You can use the Gel Sample List dialog box for editing the Gel Sample List or for saving the list as a gel marker.
If you wish, enter a name and/or description for the sample shown in the Gel Sample List in the boxes provided.
To remove a fragment from the Gel Sample list, select the fragment and press the Remove button. The Select All button selects all the fragments currently in the list. The Unselect All button deselects all the fragments currently in the list.
You may save the Gel Sample List as a gel marker by pressing the Save as Gel Marker button. This calls up the Gel Marker Editor, described above.
Adding fragments to the Gel Sample List
To add fragments to the Gel Sample List, select them in the gel pane by dragging over them with the mouse. Then press the Add to Gel Sample List button ( ![]() ) in the Display window toolbar, or choose the Add Selection to Gel Sample List command from the List menu. If the Gel Sample List is empty, the fragments you have selected will be added to the list.
) in the Display window toolbar, or choose the Add Selection to Gel Sample List command from the List menu. If the Gel Sample List is empty, the fragments you have selected will be added to the list.
If the Gel Sample List is not empty, you will be given the option of adding the currently selected fragments to the existing set, or of having the selected fragments override the existing set.
Loading fragments from the Gel Sample List
To load fragments from the Gel Sample List, press the Add Lane from Gel Sample List button ( ![]() ) in the Display window toolbar, or choose the New4
Add Lane from Gel Sample List command from the Edit menu. The fragments currently contained in the Gel Sample List are added to a new lane of the active Gel Display window.
) in the Display window toolbar, or choose the New4
Add Lane from Gel Sample List command from the Edit menu. The fragments currently contained in the Gel Sample List are added to a new lane of the active Gel Display window.
Printing from Gel Display windows
Printing from Gel Display windows is done one pane at a time. To print a pane, move the focus to that pane and then press the Print button ( ![]() ) on the main toolbar or choose the Print command from the File menu. A standard printing dialog box appears. Click OK (Windows) or Print (Macintosh) to print the active pane of the Display window.
) on the main toolbar or choose the Print command from the File menu. A standard printing dialog box appears. Click OK (Windows) or Print (Macintosh) to print the active pane of the Display window.
Page Setup
Vector NTI prints text panes in a standard format. For text, you can change the content of what is printed, but not the layout.
Gel panes can be printed out at any size and in various positions on the page.
To change the size and position of a gel panes printout, go to the File menu and choose Page Setup. A dialog box appears, in which you can set the margins for your printout:
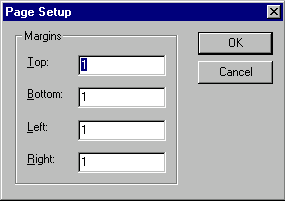
Set the margins to your desired values in inches and click OK.
By choosing the margins, you can obtain any desired scale and position of the gel pane on the page.
Print preview
To see a preview on your screen of what the printout will look like, choose the Print Preview command from the File menu.
Summary
This chapter has described Vector NTIs Gel Display windows, which are tools for simulating electrophoresis.
The chapter covered the following points:
Opening a Gel Display window
Gel Display window components
Gel Samples and Gel Markers
Gel Display window text and gel panes
Copying information from Gel Display windows with the Camera
The Gel Sample List
Printing Gel Display windows
See Also:
Chapter 10 -- Working With Gel Display windows
Chapter 11 -- Display Windows and User Interface
Chapter 5 -- Database Explorer
Chapter 15 -- Database Operations
Chapter 18 -- Reports Generation
Chapter 4 -- Tools and Internet Connectivity